Service Proxies
It is common to call a REST endpoint in the server from our Angular applications. In this case, we generally create services (those have methods for each service method on the server side) and model objects (matches to DTOs in the server side).
In addition to manually creating such server-interacting services, we could use tools like NSWAG to generate service proxies for us. But NSWAG has the following problems we've experienced:
- It generates a big, single .ts file which has some problems;
- It get too large when your application grows.
- It doesn't fit into the modular approach of the ABP framework.
- It creates a bit ugly code. We want to have a clean code (just like if we write manually).
- It can not generate the same method signature declared in the server side (because swagger.json doesn't exactly reflect the method signature of the backend service). We've created an endpoint that exposes server side method contacts to allow clients generate a better aligned client proxies.
ABP CLI changes that via the generate-proxy command. It automatically generates the client proxies in TypeScript. by creating folders which separated by module names in the src/app folder.
Run the following command in the root folder of the angular application:
abp generate-proxy
The command without any parameters creates proxies only for your own application's services and places them in your default Angular application. There are several parameters you may use to modify this behavior. See the CLI documentation for details.
The generated files will be placed in a folder called proxy at the root of target project.
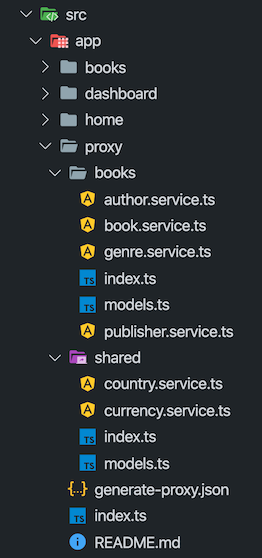
Each folder will have models, enums, and services defined at related namespace accompanied by a barrel export, i.e. an index.ts file for easier imports.
The cammand is able to find application/library roots by reading
angular.jsonfile. Make sure you have either defined your target project as thedefaultProjector pass the--targetparameter to the command. This also means that you may have a monorepo workspace.
Angular Project Configuration
If you've created your project with version 3.1 or later, you can skip this part since it will be already installed in your solution.
For a solution that was created before v3.1, follow the steps below to configure your Angular application:
- Add
@abp/ng.schematicspackage to thedevDependenciesof the Angular project. Run the following command in the root folder of the angular application:
npm install @abp/ng.schematics -D
- Add
rootNamespaceproperty to the/src/environments/environment.tsin your application project as shown below.MyCompanyName.MyProjectNameshould be replaced by the root namespace of your .NET project.
export const environment: Config.Environment = {
  // other environment variables...
  apis: {
    default: {
      rootNamespace: "MyCompanyName.MyProjectName",
      // other environment variables...
    },
  },
};
- [OPTIONAL] Add the following paths to
tsconfig.base.jsonin order to have a shortcut for importing proxies:
{
  // other TS configuration...
  "compilerOptions": {
    // other TS configuration...
    "paths": {
      "@proxy": ["src/app/proxy/index.ts"],
      "@proxy/*": ["src/app/proxy/*"]
    }
  }
}
The destination the
proxyfolder is created and the paths above may change based on your project structure.
Services
The generate-proxy command generates one service per back-end controller and a method (property with a function value actually) for each action in the controller. These methods call backend APIs via RestService.
A variable named apiName (available as of v2.4) is defined in each service. apiName matches the module's RemoteServiceName. This variable passes to the RestService as a parameter at each request. If there is no microservice API defined in the environment, RestService uses the default. See getting a specific API endpoint from application config
The providedIn property of the services is defined as 'root'. Therefore there is no need to provide them in a module. You can use them directly by injecting them into constructor as shown below:
import { BookService } from '@proxy/books';

@Component(/* component metadata here */)
export class BookComponent implements OnInit {
  constructor(private service: BookService) {}

  ngOnInit() {
    this.service.get().subscribe(
      // do something with the response
    );
  }
}
The Angular compiler removes the services that have not been injected anywhere from the final output. See the tree-shakable providers documentation.
Models
The generate-proxy command generates interfaces matching DTOs in the back-end. There are also a few core DTOs in the @abp/ng.core package. In combination, these models can be used to reflect the APIs.
import { PagedResultDto } from "@abp/ng.core";
import { BookDto } from "@proxy/books";

@Component(/* component metadata here */)
export class BookComponent implements OnInit {
  data: PagedResultDto<BookDto> = {
    items: [],
    totalCount: 0,
  };
}
Enums
Enums have always been difficult to populate in the frontend. The generate-proxy command genarates enums in a separate file and exports a ready-to-use options constant from the same file. So you can import them as follows:
import { bookGenreOptions } from "@proxy/books";

@Component(/* component metadata here */)
export class BookComponent implements OnInit {
  genres = bookGenreOptions;
}
...and consume the options in the template as follows:
<!-- simplified for sake of clarity -->
<select formControlName="genre">
  <option [ngValue]="null">Select a genre</option>
  <option *ngFor="let genre of genres" [ngValue]="genre.value">
      {{ genre.key }}
  </option>
</select>
Please see this article to learn more about service proxies.
 08-09 May


