Web Application Development Tutorial - Part 2: The Book List Page
About This Tutorial
In this tutorial series, you will build an ABP based web application named Acme.BookStore. This application is used to manage a list of books and their authors. It is developed using the following technologies:
- Entity Framework Core as the ORM provider.
- Angular as the UI Framework.
This tutorial is organized as the following parts;
- Part 1: Creating the server side
- Part 2: The book list page (this part)
- Part 3: Creating, updating and deleting books
- Part 4: Integration tests
- Part 5: Authorization
- Part 6: Authors: Domain layer
- Part 7: Authors: Database Integration
- Part 8: Authors: Application Layer
- Part 9: Authors: User Interface
- Part 10: Book to Author Relation
Download the Source Code
This tutorial has multiple versions based on your UI and Database preferences. We've prepared a few combinations of the source code to be downloaded:
Localization
Before starting to the UI development, we first want to prepare the localization texts (you normally do this when needed while developing your application).
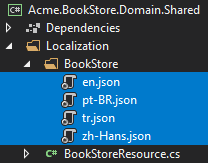
Localization texts are located under the Localization/BookStore folder of the Acme.BookStore.Domain.Shared project:
Open the en.json (the English translations) file and change the content as below:
{
  "Culture": "en",
  "Texts": {
    "Menu:Home": "Home",
    "Welcome": "Welcome",
    "LongWelcomeMessage": "Welcome to the application. This is a startup project based on the ABP framework. For more information, visit abp.io.",
    "Menu:BookStore": "Book Store",
    "Menu:Books": "Books",
    "Actions": "Actions",
    "Close": "Close",
    "Delete": "Delete",
    "Edit": "Edit",
    "PublishDate": "Publish date",
    "NewBook": "New book",
    "Name": "Name",
    "Type": "Type",
    "Price": "Price",
    "CreationTime": "Creation time",
    "AreYouSure": "Are you sure?",
    "AreYouSureToDelete": "Are you sure you want to delete this item?",
    "Enum:BookType:0": "Undefined",
    "Enum:BookType:1": "Adventure",
    "Enum:BookType:2": "Biography",
    "Enum:BookType:3": "Dystopia",
    "Enum:BookType:4": "Fantastic",
    "Enum:BookType:5": "Horror",
    "Enum:BookType:6": "Science",
    "Enum:BookType:7": "Science fiction",
    "Enum:BookType:8": "Poetry"
  }
}
- Localization key names are arbitrary. You can set any name. We prefer some conventions for specific text types;
- Add
Menu:prefix for menu items. - Use
Enum:<enum-type>:<enum-value>naming convention to localize the enum members. When you do it like that, ABP can automatically localize the enums in some proper cases.
- Add
If a text is not defined in the localization file, it fallbacks to the localization key (as ASP.NET Core's standard behavior).
ABP's localization system is built on ASP.NET Core's standard localization system and extends it in many ways. See the localization document for details.
Install NPM packages
Notice: This tutorial is based on the ABP Framework v3.1.0+ If your project version is older, then please upgrade your solution. See the migration guide if you are upgrading an existing project with v2.x.
If you haven't done it before, open a new command line interface (terminal window) and go to your angular folder and then run yarn command to install the NPM packages:
yarn
Create a Books Page
It's time to create something visible and usable! There are some tools that we will use when developing the Angular frontend application:
- Ng Bootstrap will be used as the UI component library.
- Ngx-Datatable will be used as the datatable library.
BookModule
Run the following command line to create a new module, named BookModule in the root folder of the angular application:
yarn ng generate module book --module app --routing --route books
This command should produce the following output:
> yarn ng generate module book --module app --routing --route books

yarn run v1.19.1
$ ng generate module book --module app --routing --route books
CREATE src/app/book/book-routing.module.ts (336 bytes)
CREATE src/app/book/book.module.ts (335 bytes)
CREATE src/app/book/book.component.html (19 bytes)
CREATE src/app/book/book.component.spec.ts (614 bytes)
CREATE src/app/book/book.component.ts (268 bytes)
CREATE src/app/book/book.component.scss (0 bytes)
UPDATE src/app/app-routing.module.ts (1289 bytes)
Done in 3.88s.
BookModule
Open the /src/app/book/book.module.ts and replace the content as shown below:
import { NgModule } from '@angular/core';
import { SharedModule } from '../shared/shared.module';
import { BookRoutingModule } from './book-routing.module';
import { BookComponent } from './book.component';

@NgModule({
  declarations: [BookComponent],
  imports: [
    BookRoutingModule,
    SharedModule
  ]
})
export class BookModule { }
- Added the
SharedModule.SharedModuleexports some common modules needed to create user interfaces. SharedModulealready exports theCommonModule, so we've removed theCommonModule.
Routing
Generated code places the new route definition to the src/app/app-routing.module.ts file as shown below:
const routes: Routes = [
  // other route definitions...
  { path: 'books', loadChildren: () => import('./book/book.module').then(m => m.BookModule) },
];
Now, open the src/app/route.provider.ts file replace the configureRoutes function declaration as shown below:
function configureRoutes(routes: RoutesService) {
  return () => {
    routes.add([
      {
        path: '/',
        name: '::Menu:Home',
        iconClass: 'fas fa-home',
        order: 1,
        layout: eLayoutType.application,
      },
      {
        path: '/book-store',
        name: '::Menu:BookStore',
        iconClass: 'fas fa-book',
        order: 2,
        layout: eLayoutType.application,
      },
      {
        path: '/books',
        name: '::Menu:Books',
        parentName: '::Menu:BookStore',
        layout: eLayoutType.application,
      },
    ]);
  };
}
RoutesService is a service provided by the ABP Framework to configure the main menu and the routes.
pathis the URL of the route.nameis the localized menu item name (see the localization document for details).iconClassis the icon of the menu item (you can use Font Awesome icons by default).orderis the order of the menu item.layoutis the layout of the BooksModule's routes (there are three types of pre-defined layouts:eLayoutType.application,eLayoutType.accountoreLayoutType.empty).
For more information, see the RoutesService document.
Service Proxy Generation
ABP CLI provides generate-proxy command that generates client proxies for your HTTP APIs to make easy to consume your HTTP APIs from the client side. Before running generate-proxy command, your host must be up and running.
Run the following command in the angular folder:
abp generate-proxy
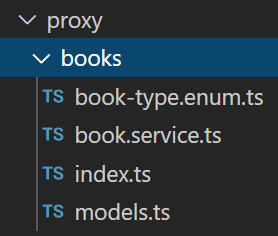
This command will create the following files under the /src/app/proxy/books folder:
BookComponent
Open the /src/app/book/book.component.ts file and replace the content as below:
import { ListService, PagedResultDto } from '@abp/ng.core';
import { Component, OnInit } from '@angular/core';
import { BookService, BookDto } from '@proxy/books';

@Component({
  selector: 'app-book',
  templateUrl: './book.component.html',
  styleUrls: ['./book.component.scss'],
  providers: [ListService],
})
export class BookComponent implements OnInit {
  book = { items: [], totalCount: 0 } as PagedResultDto<BookDto>;

  constructor(public readonly list: ListService, private bookService: BookService) {}

  ngOnInit() {
    const bookStreamCreator = (query) => this.bookService.getList(query);

    this.list.hookToQuery(bookStreamCreator).subscribe((response) => {
      this.book = response;
    });
  }
}
- We imported and injected the generated
BookService. - We are using the ListService, a utility service of the ABP Framework which provides easy pagination, sorting and searching.
Open the /src/app/book/book.component.html and replace the content as below:
<div class="card">
  <div class="card-header">
    <div class="row">
      <div class="col col-md-6">
        <h5 class="card-title">
          {{ '::Menu:Books' | abpLocalization }}
        </h5>
      </div>
      <div class="text-right col col-md-6"></div>
    </div>
  </div>
  <div class="card-body">
    <ngx-datatable [rows]="book.items" [count]="book.totalCount" [list]="list" default>
      <ngx-datatable-column [name]="'::Name' | abpLocalization" prop="name"></ngx-datatable-column>
      <ngx-datatable-column [name]="'::Type' | abpLocalization" prop="type">
        <ng-template let-row="row" ngx-datatable-cell-template>
          {{ '::Enum:BookType:' + row.type | abpLocalization }}
        </ng-template>
      </ngx-datatable-column>
      <ngx-datatable-column [name]="'::PublishDate' | abpLocalization" prop="publishDate">
        <ng-template let-row="row" ngx-datatable-cell-template>
          {{ row.publishDate | date }}
        </ng-template>
      </ngx-datatable-column>
      <ngx-datatable-column [name]="'::Price' | abpLocalization" prop="price">
        <ng-template let-row="row" ngx-datatable-cell-template>
          {{ row.price | currency }}
        </ng-template>
      </ngx-datatable-column>
    </ngx-datatable>
  </div>
</div>
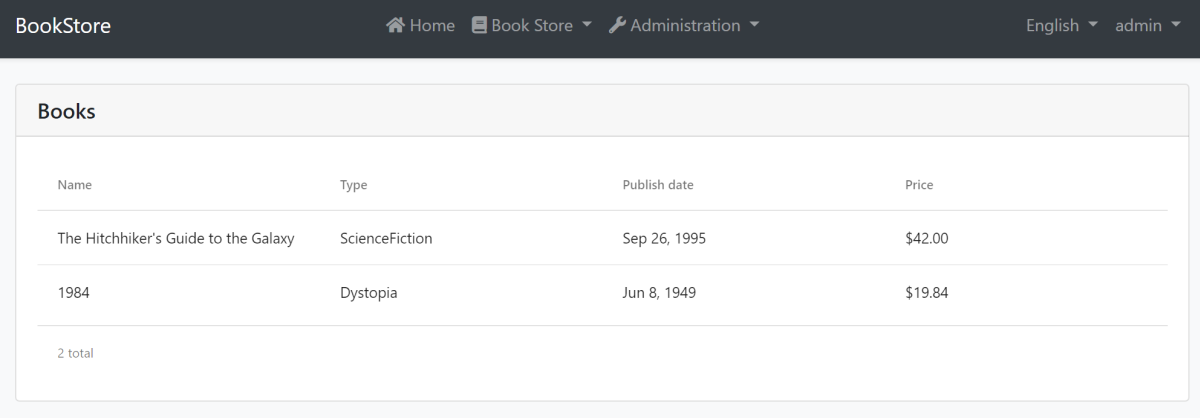
Now you can see the final result on your browser:
The Next Part
See the next part of this tutorial.
 08-09 May


