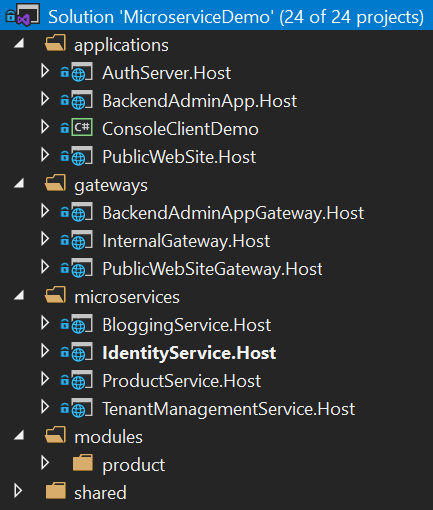
Microservice Demo Solution
"Microservices are a software development technique—a variant of the service-oriented architecture (SOA) architectural style that structures an application as a collection of loosely coupled services. In a microservices architecture, services are fine-grained and the protocols are lightweight. The benefit of decomposing an application into different smaller services is that it improves modularity. This makes the application easier to understand, develop, test, and become more resilient to architecture erosion. It parallelizes development by enabling small autonomous teams to develop, deploy and scale their respective services independently. It also allows the architecture of an individual service to emerge through continuous refactoring. Microservices-based architectures enable continuous delivery and deployment."
Introduction
One of the major goals of the ABP framework is to provide a convenient infrastructure to create microservice solutions.
This sample aims to demonstrate a simple yet complete microservice solution;
- Has multiple, independent, self-deployable microservices.
- Multiple web applications, each uses a different API gateway.
- Has multiple gateways / BFFs (Backend for Frontends) developed using the Ocelot library.
- Has an authentication service developed using the IdentityServer framework. It's also a SSO (Single Sign On) application with necessary UIs.
- Has multiple databases. Some microservices has their own database while some services/applications shares a database (to demonstrate different use cases).
- Has different types of databases: SQL Server (with Entity Framework Core ORM) and MongoDB.
- Has a console application to show the simplest way of using a service by authenticating.
- Uses Redis for distributed caching.
- Uses RabbitMQ for service-to-service messaging.
- Uses Docker & Kubernetes to deploy & run all services and applications.
- Uses Elasticsearch & Kibana to store and visualize the logs (written using Serilog).
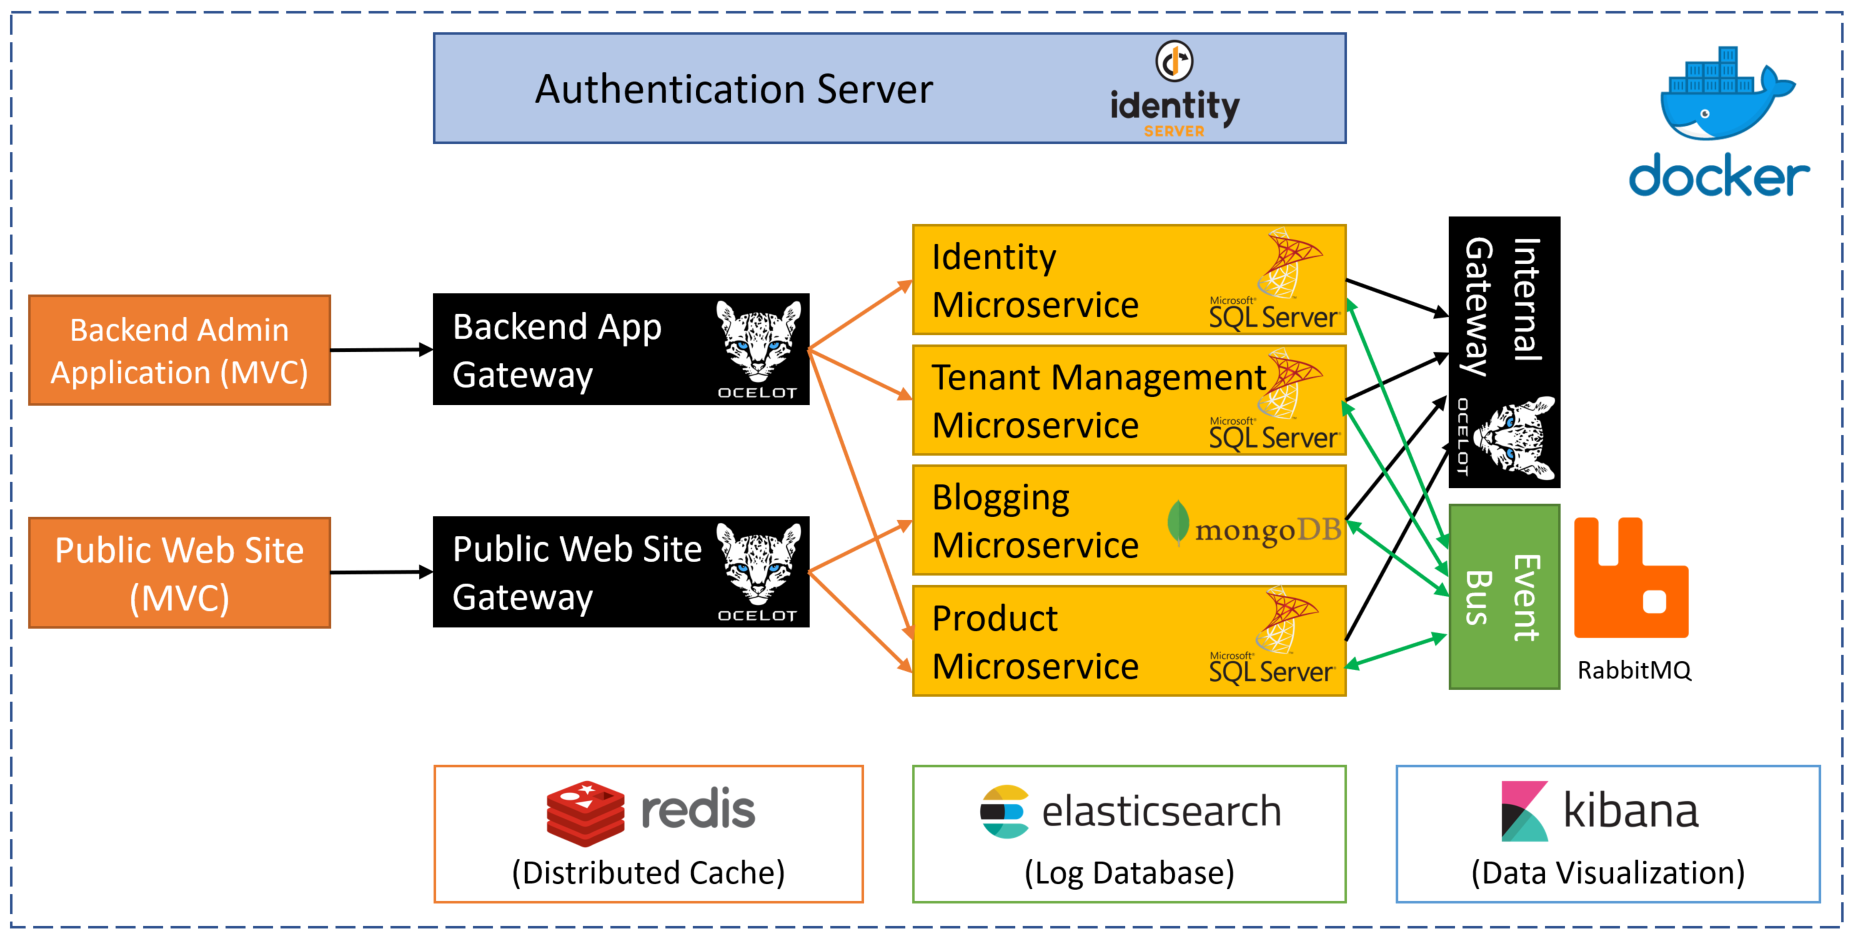
The diagram below shows the system:
Source Code
You can get the source code from the GitHub repository.
Running the Solution
Pre Requirements
To be able to run the solution from source code, following tools should be installed and running on your computer:
- SQL Server 2015+ (can be express edition)
- Redis 5.0+
- RabbitMQ 3.7.11+
- MongoDB 4.0+
- ElasticSearch 6.6+
- Kibana 6.6+ (optional, recommended to show logs)
Running Infrastructure
- Docker-compose is used to run the pre requirements with ease as default. If you don't have it, you can download and start using Docker for Windows from here on windows environment.
- Run the command
docker-compose -f docker-compose.infrastructure.yml -f docker-compose.infrastructure.override.yml up -datMicroserviceDemodirectory or run the powershell script__Run_Infrastructure.ps1located atMicroserviceDemo/_rundirectory. - If you don't want to use docker for pre required services and install them on your local development, you need to update
appsettings.jsonfiles of the projects in the MicroserviceDemo solution accordingly.
Open & Build the Visual Studio Solution
- Open the
samples\MicroserviceDemo\MicroserviceDemo.slnin Visual Studio 2017 (15.9.0+). - Run
dotnet restorefrom the command line inside thesamples\MicroserviceDemofolder. - Build the solution in Visual Studio.
Create Databases
MongoDB database is created dynamically, however you need to create database schemas for SQL server databases. The solution is configured to use Entity Core Code First migrations, so you can easily create databases.
There are two SQL server databases in this solution.
MsDemo_Identity Database
- Right click to the
AuthServer.Hostproject and click to theSet as startup project. - Open the Package Manager Console (Tools -> Nuget Package Manager -> Package Manager Console)
- Select
AuthServer.Hostas the Default project. - Run
Update-Databasecommand.

MsDemo_ProductManagement
- Right click to the
ProductService.Hostproject and click to theSet as startup project. - Open the Package Manager Console (Tools -> Nuget Package Manager -> Package Manager Console)
- Select
ProductService.Hostas the Default project. - Run
Update-Databasecommand.

Run Projects
Run the projects with the following order (right click to each project, set as startup project an press Ctrl+F5 to run without debug):
- AuthServer.Host
- IdentityService.Host
- TenantManagementService.Host
- BloggingService.Host
- ProductService.Host
- InternalGateway.Host
- BackendAdminAppGateway.Host
- PublicWebSiteGateway.Host
- BackendAdminApp.Host
- PublicWebSite.Host
When you run projects, they will add some initial demo data to their databases.
A Brief Overview of the Solution
The Visual Studio solution consists of multiple projects each have different roles in the system:
Applications
These are the actual applications those have user interfaces to interact to the users and use the system.
- AuthServer.Host: Host the IdentityServer4 to provide an authentication service to other services and applications. It is a single-sign server and contains the login page.
- BackendAdminApp.Host: This is a backend admin application that host UI for Identity and Product management modules.
- PublicWebSite.Host: As public web site that contains a simple product list page and blog module UI.
- ConsoleClientDemo: A simple console application to demonstrate the usage of services from a C# application.
Gateways / BFFs (Backend for Frontend)
Gateways are used to provide a single entry point to the applications. It can also used for rate limiting, load balancing... etc. Used the Ocelot library.
- BackendAdminAppGateway.Host: Used by the BackendAdminApp.Host application as backend.
- PublicWebSiteGateway.Host: Used by the PublicWebSite.Host application as backend.
- InternalGateway.Host: Used for inter-service communication (the communication between microservices).
Microservices
Microservices have no UI, but exposes some REST APIs.
- IdentityService.Host: Hosts the ABP Identity module which is used to manage users & roles. It has no additional service, but only hosts the Identity module's API.
- TenantManagementService.Host: Hosts the ABP Tenant Management module which is used to manage roles. It has no additional service, but only hosts the Tenant Management module's API.
- BloggingService.Host: Hosts the ABP Blogging module which is used to manage blog & posts (a typical blog application). It has no additional service, but only hosts the Blogging module's API.
- ProductService.Host: Hosts the Product module (that is inside the solution) which is used to manage products. It also contains the EF Core migrations to create/update the Product Management database schema.
Modules
- Product: A layered module that is developed with the module development best practices. It can be embedded into a monolithic application or can be hosted as a microservice by separately deploying API and UI (as done in this demo solution).
Databases
This solution is using multiple databases:
- MsDemo_Identity: An SQL database. Used SQL Server by default, but can be any DBMS supported by the EF Core. Shared by AuthServer, IdentityService and the TenantManagementService. Also audit logs, permissions and settings are stored in this database (while they could have their own databases, shared the same database to keep it simple).
- MsDemo_ProductManagement: An SQL database. Again, used SQL Server by default, but can be any DBMS supported by the EF Core. Used by the ProductService as a dedicated database.
- MsDemo_Blogging: A MongoDB database. Used by the BloggingService.
- Elasticsearch: Used to write logs over Serilog.
Applications
Authentication Server (AuthServer.Host)
This project is used by all other services and applications for authentication & single sign on. Mainly, uses IdentityServer4 to provide these services. It uses some of the pre-build ABP modules like Identity, Audit Logging and Permission Management.
Database & EF Core Configuration
This application uses a SQL database (named it as MsDemo_Identity) and maintains its schema via Entity Framework Core migrations.
It has a DbContext named AuthServerDbContext and defined as shown below:
public class AuthServerDbContext : AbpDbContext<AuthServerDbContext>
{
    public AuthServerDbContext(DbContextOptions<AuthServerDbContext> options)
        : base(options)
    {

    }

    protected override void OnModelCreating(ModelBuilder modelBuilder)
    {
        base.OnModelCreating(modelBuilder);

        modelBuilder.ConfigureIdentity();
        modelBuilder.ConfigureIdentityServer();
        modelBuilder.ConfigureAuditLogging();
        modelBuilder.ConfigurePermissionManagement();
        modelBuilder.ConfigureSettingManagement();
    }
}
In the OnModelCreating, you see ConfigureX() method calls. A module with a database schema generally declares such an extension method to configure EF Core mappings for its own entities. This is a flexible approach where you can arrange your databases and modules inside them; You can use a different database for each module, or combine some of them in a shared database. In the AuthServer project, we decided to combine multiple module schemas in a single EF Core DbContext, in a single physical database. These modules are Identity, IdentityServer, AuditLogging, PermissionManagement and SettingManagement modules.
Notice that this DbContext is only for database migrations. All modules have their own DbContext classes those are used in the runtime by the modules.
User Interface
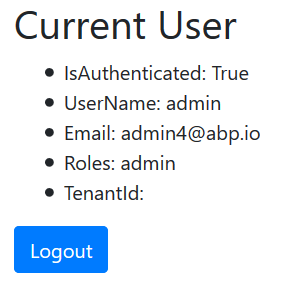
AuthServer has a simple home page that shows the current user info if the current user has logged in:
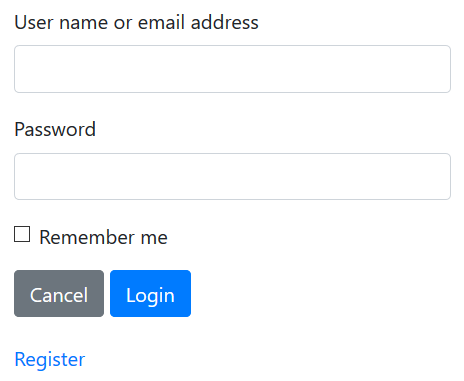
It also provides Login & Register pages:
These pages are not included in the project itself. Instead, AuthServer project uses the prebuilt ABP account module with IdentityServer extension. That means it can also act as an OpenId Connect server with necessary UI and logic.
Dependencies
- RabbitMQ for messaging to other services.
- Redis for distributed/shared caching.
- Elasticsearch for storing logs.
Backend Admin Application (BackendAdminApp.Host)
This is a web application that is used to manage users, roles, permissions and products in the system.
Authentication
BackendAdminApp redirects to the AuthServer for authentication. Once the user enters a correct username & password, the page is redirected to the backend application again. Authentication configuration is setup in the BackendAdminAppHostModule class:
context.Services.AddAuthentication(options =>
{
    options.DefaultScheme = "Cookies";
    options.DefaultChallengeScheme = "oidc";
})
.AddCookie("Cookies", options =>
{
    options.Cookie.Expiration = TimeSpan.FromDays(365);
    options.ExpireTimeSpan = TimeSpan.FromDays(365);
})
.AddOpenIdConnect("oidc", options =>
{
    options.Authority = configuration["AuthServer:Authority"];
    options.ClientId = configuration["AuthServer:ClientId"];
    options.ClientSecret = configuration["AuthServer:ClientSecret"];
    options.RequireHttpsMetadata = false;
    options.ResponseType = OpenIdConnectResponseType.CodeIdToken;
    options.SaveTokens = true;
    options.GetClaimsFromUserInfoEndpoint = true;
    options.Scope.Add("role");
    options.Scope.Add("email");
    options.Scope.Add("phone");
    options.Scope.Add("BackendAdminAppGateway");
    options.Scope.Add("IdentityService");
    options.Scope.Add("ProductService");
    options.ClaimActions.MapAbpClaimTypes();
});
- It adds "Cookies" authentication as the primary authentication type.
- "oidc" authentication is configured to use the AuthServer application as the authentication server.
- It requires the additional identity scopes role, email and phone.
- It requires the API resource scopes BackendAdminAppGateway, IdentityService and ProductService because it will use these services as APIs.
IdentityServer client settings are stored inside the appsettings.json file:
"AuthServer": {
  "Authority": "http://localhost:64999",
  "ClientId": "backend-admin-app-client",
  "ClientSecret": "1q2w3e*"
}
User Interface
The BackendAdminApp.Host project itself has not a single UI element/page. It is only used to serve UI pages of the Identity and Product Management modules. BackendAdminAppHostModule adds dependencies to AbpIdentityWebModule (Volo.Abp.Identity.Web package) and ProductManagementWebModule (ProductManagement.Web project) for that purpose.
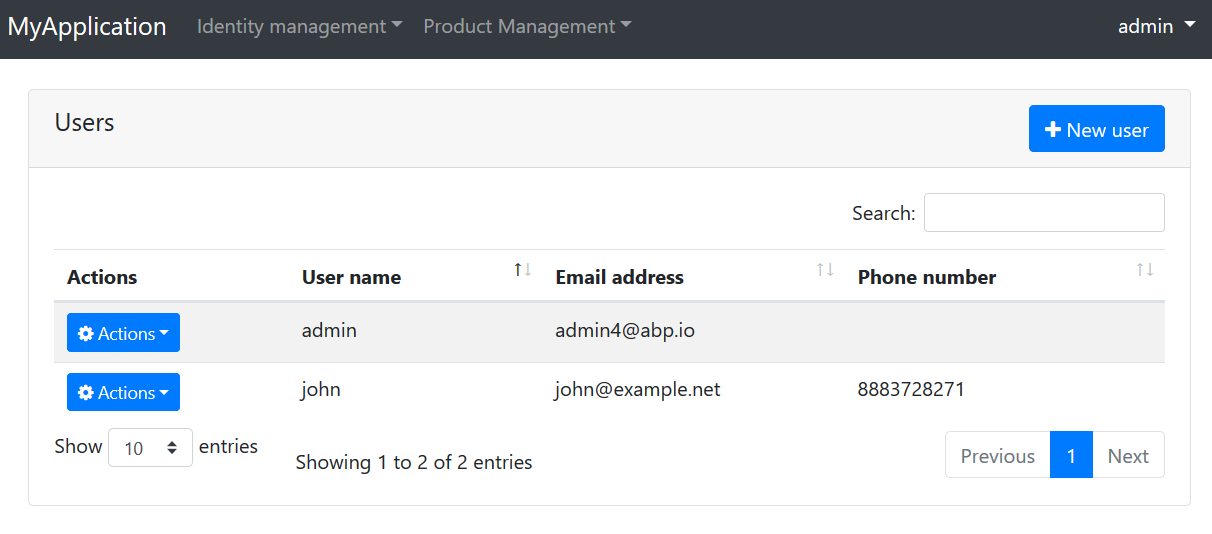
A screenshot from the user management page:
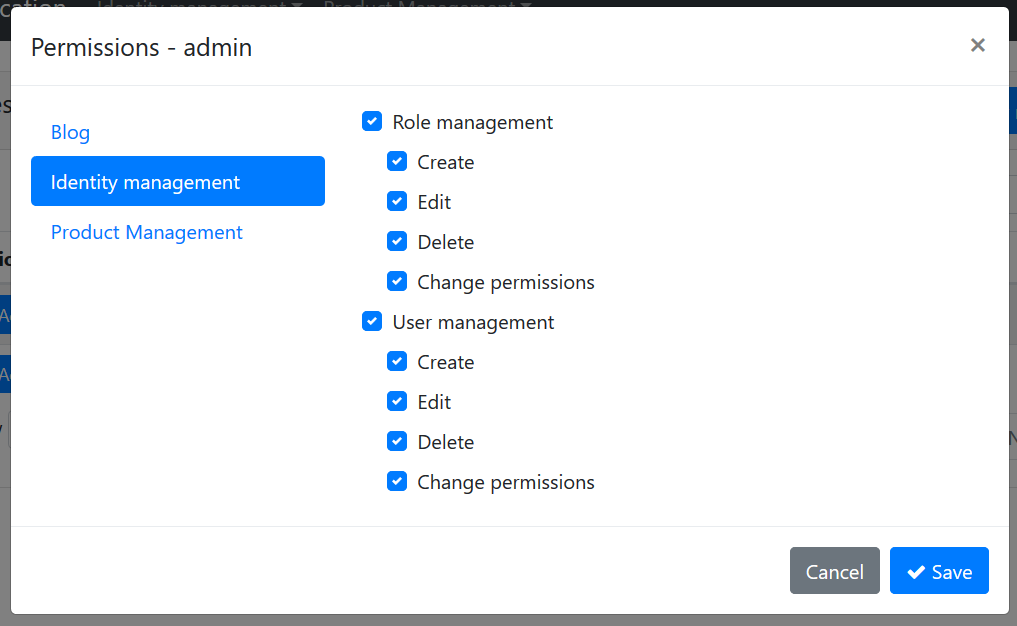
A screenshot from the permission management modal for a role:
Using Microservices
Backend admin application uses the Identity and Product microservices for all operations, over the Backend Admin Gateway (BackendAdminAppGateway.Host).
Remote End Point
appsettings.json file contains the RemoteServices section to declare the remote service endpoint(s). Each microservice will normally have different endpoints. However, this solution uses the API Gateway pattern to provide a single endpoint for the applications:
"RemoteServices": {
  "Default": {
    "BaseUrl": "http://localhost:65115/"
  }
}
http://localhost:65115/ is the URL of the BackendAdminAppGateway.Host project. It knows where are Identity and Product services are located.
HTTP Clients
ABP application modules generally provides C# client libraries to consume services (APIs) easily (they generally uses the Dynamic C# API Clients feature of the ABP framework). That means if you need to consume Identity service API, you can reference to its client package and easily use the APIs by provided interfaces.
For that purpose, BackendAdminAppHostModule class declares dependencies for AbpIdentityHttpApiClientModule and ProductManagementHttpApiClientModule.
Once you refer these client packages, you can directly inject an application service interface (e.g. IIdentityUserAppService) and use its methods like a local method call. It actually invokes remote service calls over HTTP to the related service endpoint.
Passing the Access Token
Since microservices requires authentication & authorization, each remote service call should contain an Authentication header. This header is obtained from the access_token inside the current HttpContext for the current user. This is automatically done when you use the Volo.Abp.Http.Client.IdentityModel package. BackendAdminAppHostModule declares dependencies to this package and to the related AbpHttpClientIdentityModelModule class. It is integrated to the HTTP Clients explained above.
Dependencies
- Redis for distributed/shared caching.
- Elasticsearch for storing logs.
Public Web Site (PublicWebSite.Host)
This is a public web site project that has a web blog and product list page.
Authentication
PublicWebSite can show blog posts and product list without login. If you login, you can also manage blogs. It redirects to the AuthServer for authentication. Once the user enters a correct username & password, the page is redirected to the public web site application again. Authentication configuration is setup in the PublicWebSiteHostModule class:
context.Services.AddAuthentication(options =>
{
    options.DefaultScheme = "Cookies";
    options.DefaultChallengeScheme = "oidc";
})
.AddCookie("Cookies", options =>
{
    options.Cookie.Expiration = TimeSpan.FromDays(365);
    options.ExpireTimeSpan = TimeSpan.FromDays(365);
})
.AddOpenIdConnect("oidc", options =>
{
    options.Authority = configuration["AuthServer:Authority"];
    options.ClientId = configuration["AuthServer:ClientId"];
    options.ClientSecret = configuration["AuthServer:ClientSecret"];
    options.RequireHttpsMetadata = false;
    options.ResponseType = OpenIdConnectResponseType.CodeIdToken;
    options.SaveTokens = true;
    options.GetClaimsFromUserInfoEndpoint = true;
    options.Scope.Add("role");
    options.Scope.Add("email");
    options.Scope.Add("phone");
    options.Scope.Add("PublicWebSiteGateway");
    options.Scope.Add("ProductService");
    options.Scope.Add("BloggingService");
    options.ClaimActions.MapAbpClaimTypes();
});
- It adds "Cookies" authentication as the primary authentication type.
- "oidc" authentication is configured to use the AuthServer application as the authentication server.
- It requires the additional identity scopes role, email and phone.
- It requires the API resource scopes PublicWebSiteGateway, BloggingService and ProductService because it will use these services as APIs.
IdentityServer client settings are stored inside the appsettings.json file:
"AuthServer": {
  "Authority": "http://localhost:64999",
  "ClientId": "public-website-client",
  "ClientSecret": "1q2w3e*"
}
User Interface
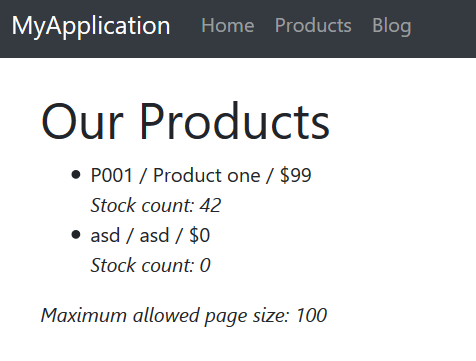
The PublicWebSite.Host project has a page to list products (Pages/Products.cshtml). It also uses the UI from the blogging module. PublicWebSiteHostModule adds dependencies to BloggingWebModule (Volo.Blogging.Web package) for that purpose.
A screenshot from the Products page:
Using Microservices
Public web site application uses the Blogging and Product microservices for all operations, over the Public Web Site Gateway (PublicWebSiteGateway.Host).
Remote End Point
appsettings.json file contains the RemoteServices section to declare the remote service endpoint(s). Each microservice will normally have different endpoints. However, this solution uses the API Gateway pattern to provide a single endpoint for the applications:
"RemoteServices": {
  "Default": {
    "BaseUrl": "http://localhost:64897/"
  }
}
http://localhost:64897/ is the URL of the PublicWebSiteGateway.Host project. It knows where are Blogging and Product services are located.
HTTP Clients
PublicWebSiteHostModule class declares dependencies for BloggingHttpApiClientModule and ProductManagementHttpApiClientModule to be able to use remote HTTP APIs for these services.
Passing the Access Token
Just like explained in the Backend Admin Application section, Public Web Site project also uses the AbpHttpClientIdentityModelModule to pass access_token to the calling services for authentication.
Dependencies
- Redis for distributed/shared caching.
- Elasticsearch for storing logs.
Console Client Demo
Finally, the solution includes a very simple console application, named ConsoleClientDemo, that uses Identity and Product services by authenticating through the AuthServer. It uses the Internal Gateway (InternalGateway.Host) to perform HTTP API calls.
Remote Service Configuration
RemoteService configuration in the appsettings.json file is simple:
"RemoteServices": {
  "Default": {
    "BaseUrl": "http://localhost:65129/"
  }
}
http://localhost:65129/ is the URL of the Internal Gateway. All API calls to the services are performed over this URL.
Authentication (IdentityServer Client) Configuration
appsettings.json also has a configuration for the IdentityServer authentication:
"IdentityClients": {
  "Default": {
    "GrantType": "client_credentials",
    "ClientId": "console-client-demo",
    "ClientSecret": "1q2w3e*",
    "Authority": "http://localhost:64999",
    "Scope": "InternalGateway IdentityService ProductService"
  }
}
This sample uses the client_credentials grant type which requires a ClientId and ClientSecret for the authentication process. There are also other grant types. For example, you can use the following configuration to swith to the password (Resource Owner Password) grant type:
"IdentityClients": {
  "Default": {
    "GrantType": "password",
    "ClientId": "console-client-demo",
    "ClientSecret": "1q2w3e*",
    "UserName": "admin",
    "UserPassword": "1q2w3E*",
    "Authority": "http://localhost:64999",
    "Scope": "InternalGateway IdentityService ProductService"
  }
}
Resource Owner Password requires a UserName & UserPassword in addition to client credentials. This grant type is useful to call remote services on behalf of a user.
Scope declares the APIs (and the gateway) to grant access. This application uses the Internal Gateway.
HTTP Client Dependencies
ConsoleClientDemoModule has dependencies to AbpIdentityHttpApiClientModule and ProductManagementHttpApiClientModule in order to use Identity and Product APIs. It also has AbpHttpClientIdentityModelModule dependency to authenticate via IdentityServer.
Using the Services
Using the services is straightforward. See the ClientDemoService class which simply injects IIdentityUserAppService and IProductAppService and uses them. This class also shows a manual HTTP call using an HttpClient object. See source code of the ClientDemoService for details.
API Gateways / BFFs (Backend for Frontend)
Gateways are used to provide a single entry point to the applications. In this way, an application only deal with a single service address (API endpoint) instead of a different addresses for each services. Gateways are also used for rate limiting, security, authentication, load balancing and many more requirements.
"Backend for Frontend" (BFF) is a common architectural pattern which offers to build a dedicated and specialized gateway for each different application / client type. This solution uses this pattern and has multiple gateways.
This solution uses the Ocelot library to build API Gateways. It's a widely accepted API Gateway library for ASP.NET Core.
Backend Admin Application Gateway (BackendAdminAppGateway.Host)
This is backend (server side API) for the "Backend Admin Application" (don't confuse about the naming; Backend Admin Application is a frontend web application actually, but used by system admins rather than regular users).
Authentication
This gateway uses IdentityServer Bearer authentication and configured like that:
context.Services.AddAuthentication("Bearer")
.AddIdentityServerAuthentication(options =>
{
    options.Authority = configuration["AuthServer:Authority"];
    options.ApiName = configuration["AuthServer:ApiName"];
    options.RequireHttpsMetadata = false;
    options.InboundJwtClaimTypeMap["sub"] = AbpClaimTypes.UserId;
    options.InboundJwtClaimTypeMap["role"] = AbpClaimTypes.Role;
    options.InboundJwtClaimTypeMap["email"] = AbpClaimTypes.Email;
    options.InboundJwtClaimTypeMap["email_verified"] = AbpClaimTypes.EmailVerified;
    options.InboundJwtClaimTypeMap["phone_number"] = AbpClaimTypes.PhoneNumber;
    options.InboundJwtClaimTypeMap["phone_number_verified"] =
        AbpClaimTypes.PhoneNumberVerified;
    options.InboundJwtClaimTypeMap["name"] = AbpClaimTypes.UserName;
});
AddIdentityServerAuthentication extension method comes from the IdentityServer4.AccessTokenValidation package, part of the IdentityServer4 project (see its documentation).
ApiName is the API which is being protected, BackendAdminAppGateway in this case. So, this solution defines gateways as API resources. Rest of the configuration is related to claims mapping (which is planned to be automated in next ABP versions). The configuration related to authentication in the appsettings.json is simple:
"AuthServer": {
  "Authority": "http://localhost:64999",
  "ApiName": "BackendAdminAppGateway"
}
Ocelot Configuration
Ocelot needs to know the real URLs of the microservices to be able to redirect HTTP requests. The configuration for this gateway is like below:
"ReRoutes": [
  {
    "DownstreamPathTemplate": "/api/identity/{everything}",
    "DownstreamScheme": "http",
    "DownstreamHostAndPorts": [
      {
        "Host": "localhost",
        "Port": 63568
      }
    ],
    "UpstreamPathTemplate": "/api/identity/{everything}",
    "UpstreamHttpMethod": [ "Put", "Delete", "Get", "Post" ]
  },
  {
    "DownstreamPathTemplate": "/api/productManagement/{everything}",
    "DownstreamScheme": "http",
    "DownstreamHostAndPorts": [
      {
        "Host": "localhost",
        "Port": 60244
      }
    ],
    "UpstreamPathTemplate": "/api/productManagement/{everything}",
    "UpstreamHttpMethod": [ "Put", "Delete", "Get", "Post" ]
  }
],
"GlobalConfiguration": {
  "BaseUrl": "http://localhost:65115"
}
ReRoutes is an array of URL mappings. BaseUrl in the GlobalConfiguration section is the URL of this gateway (Ocelot needs to know its own URL). See its own documentation to better understand the configuration.
Ocelot is a finalizer ASP.NET Core middleware and should be written as the last item in the pipeline:
app.UseOcelot().Wait();
It handles and redirects requests based on the configuration above.
ABP Configuration Endpoints
ABP provides some built-in APIs to get some configuration and information from the server. Examples:
/api/abp/application-configurationreturns localization texts, permission and setting values (try http://localhost:65115/api/abp/application-configuration for this gateway)./Abp/ServiceProxyScriptreturns dynamic javascript proxies to call services from a javascript client (try http://localhost:65115/Abp/ServiceProxyScript for this gateway).
These endpoints should be served by the gateway service, not by microservices. A microservice can only know permissions related to that microservice. But, once properly configured, gateway can aggregate permission values for multiple services as a single list which is more suitable for clients.
For this purpose, the ASP.NET Core pipeline was configured to handle some specific routes via MVC, instead of Ocelot. To make this possible, MapWhen extension method is used like that:
app.MapWhen(ctx => ctx.Request.Path.ToString().StartsWith("/api/abp/") ||
                   ctx.Request.Path.ToString().StartsWith("/Abp/"),
    app2 =>
    {
        app2.UseConfiguredEndpoints();
    });

app.UseOcelot().Wait();
This configuration uses standard MVC middleware when request path starts with /api/abp/ or /Abp/.
Swagger
This gateway is configured to use the swagger UI, a popular tool to discover & test HTTP APIs. Normally, Ocelot does not support to show APIs on the swagger, because it can not know details of each microservice API. But it is possible when you follow ABP layered module architecture best practices.
BackendAdminAppGatewayHostModule adds dependency to AbpIdentityHttpApiModule (Volo.Abp.Identity.HttpApi package) and ProductManagementHttpApiModule (ProductManagement.HttpApi project) to include their HTTP API Controllers. In this way, swagger can discover them. While it references to the API layer, it does not reference to the implementation of application services, because they will be running in the related microservice endpoints and redirected by the Ocelot based on the request URL.
Anyway, when you open the URL http://localhost:65115/swagger/index.html, you will see APIs of all configured microservices.
Permission Management
Backend Admin Application provides a permission management UI (seen before) and uses this gateway to get/set permissions. Permission management API is hosted inside the gateway, instead of a separate service. This is a design decision, but it could be hosted as another microservice if you would like.
Dependencies
- RabbitMQ for messaging to other services.
- Redis for distributed/shared caching.
- Elasticsearch for storing logs.
Public Web Site Gateway (PublicWebSiteGateway.Host)
This is backend (server side API gateway) for the "Public Web Site" application.
Authentication
This gateway uses IdentityServer Bearer authentication and configured like that:
context.Services.AddAuthentication("Bearer")
.AddIdentityServerAuthentication(options =>
{
    options.Authority = configuration["AuthServer:Authority"];
    options.ApiName = configuration["AuthServer:ApiName"];
    options.RequireHttpsMetadata = false;
    options.InboundJwtClaimTypeMap["sub"] = AbpClaimTypes.UserId;
    options.InboundJwtClaimTypeMap["role"] = AbpClaimTypes.Role;
    options.InboundJwtClaimTypeMap["email"] = AbpClaimTypes.Email;
    options.InboundJwtClaimTypeMap["email_verified"] = AbpClaimTypes.EmailVerified;
    options.InboundJwtClaimTypeMap["phone_number"] = AbpClaimTypes.PhoneNumber;
    options.InboundJwtClaimTypeMap["phone_number_verified"] =
        AbpClaimTypes.PhoneNumberVerified;
    options.InboundJwtClaimTypeMap["name"] = AbpClaimTypes.UserName;
});
AddIdentityServerAuthentication extension method comes from the IdentityServer4.AccessTokenValidation package, part of the IdentityServer4 project (see its documentation).
ApiName is the API which is being protected, PublicWebSiteGateway in this case. Rest of the configuration is related to claims mapping (which is planned to be automated in next ABP versions). The configuration related to authentication in the appsettings.json is simple:
"AuthServer": {
  "Authority": "http://localhost:64999",
  "ApiName": "PublicWebSiteGateway"
}
Ocelot Configuration
Ocelot needs to know the real URLs of the microservices to be able to redirect HTTP requests. The configuration for this gateway is like below:
"ReRoutes": [
  {
    "DownstreamPathTemplate": "/api/productManagement/{everything}",
    "DownstreamScheme": "http",
    "DownstreamHostAndPorts": [
      {
        "Host": "localhost",
        "Port": 60244
      }
    ],
    "UpstreamPathTemplate": "/api/productManagement/{everything}",
    "UpstreamHttpMethod": [ "Put", "Delete", "Get", "Post" ]
  },
  {
    "DownstreamPathTemplate": "/api/blogging/{everything}",
    "DownstreamScheme": "http",
    "DownstreamHostAndPorts": [
      {
        "Host": "localhost",
        "Port": 62157
      }
    ],
    "UpstreamPathTemplate": "/api/blogging/{everything}",
    "UpstreamHttpMethod": [ "Put", "Delete", "Get", "Post" ]
  }
],
"GlobalConfiguration": {
  "BaseUrl": "http://localhost:64897"
}
See its own documentation to better understand the Ocelot configuration.
Other
See the "ABP Configuration Endpoints" and "Swagger" topics inside the "Backend Admin Application Gateway" section which are very similar for this gateway.
Dependencies
- RabbitMQ for messaging to other services.
- Redis for distributed/shared caching.
- Elasticsearch for storing logs.
Internal Gateway (InternalGateway.Host)
This gateway is not a BFF. It is designed for inter-microservice communication and is not exposed publicly.
Authentication
This gateway uses IdentityServer Bearer authentication and configured like that:
context.Services.AddAuthentication("Bearer")
.AddIdentityServerAuthentication(options =>
{
    options.Authority = configuration["AuthServer:Authority"];
    options.ApiName = configuration["AuthServer:ApiName"];
    options.RequireHttpsMetadata = false;
    options.InboundJwtClaimTypeMap["sub"] = AbpClaimTypes.UserId;
    options.InboundJwtClaimTypeMap["role"] = AbpClaimTypes.Role;
    options.InboundJwtClaimTypeMap["email"] = AbpClaimTypes.Email;
    options.InboundJwtClaimTypeMap["email_verified"] = AbpClaimTypes.EmailVerified;
    options.InboundJwtClaimTypeMap["phone_number"] = AbpClaimTypes.PhoneNumber;
    options.InboundJwtClaimTypeMap["phone_number_verified"] = AbpClaimTypes.PhoneNumberVerified;
    options.InboundJwtClaimTypeMap["name"] = AbpClaimTypes.UserName;
});
AddIdentityServerAuthentication extension method comes from the IdentityServer4.AccessTokenValidation package, part of the IdentityServer4 project (see its documentation).
ApiName is the API which is being protected, InternalGateway in this case. Rest of the configuration is related to claims mapping (which is planned to be automated in next ABP versions). The configuration related to authentication in the appsettings.json is simple:
"AuthServer": {
  "Authority": "http://localhost:64999",
  "ApiName": "InternalGateway"
}
Ocelot Configuration
Ocelot needs to know the real URLs of the microservices to be able to redirect HTTP requests. The configuration for this gateway is like below:
"ReRoutes": [
  {
    "DownstreamPathTemplate": "/api/identity/{everything}",
    "DownstreamScheme": "http",
    "DownstreamHostAndPorts": [
      {
        "Host": "localhost",
        "Port": 63568
      }
    ],
    "UpstreamPathTemplate": "/api/identity/{everything}",
    "UpstreamHttpMethod": [ "Put", "Delete", "Get", "Post" ]
  },
  {
    "DownstreamPathTemplate": "/api/productManagement/{everything}",
    "DownstreamScheme": "http",
    "DownstreamHostAndPorts": [
      {
        "Host": "localhost",
        "Port": 60244
      }
    ],
    "UpstreamPathTemplate": "/api/productManagement/{everything}",
    "UpstreamHttpMethod": [ "Put", "Delete", "Get", "Post" ]
  },
  {
    "DownstreamPathTemplate": "/api/blogging/{everything}",
    "DownstreamScheme": "http",
    "DownstreamHostAndPorts": [
      {
        "Host": "localhost",
        "Port": 62157
      }
    ],
    "UpstreamPathTemplate": "/api/blogging/{everything}",
    "UpstreamHttpMethod": [ "Put", "Delete", "Get", "Post" ]
  }
],
"GlobalConfiguration": {
  "BaseUrl": "http://localhost:65129"
}
ReRoutes configuration covers all microservices in the system. See its own documentation to better understand the Ocelot configuration.
Other
See the "ABP Configuration Endpoints" and "Swagger" topics inside the "Backend Admin Application Gateway" section which are very similar for this gateway.
Dependencies
- RabbitMQ for messaging to other services.
- Redis for distributed/shared caching.
- Elasticsearch for storing logs.
Microservices
Microservices are standalone HTTP APIs those implement the business of the system in a distributed manner.
- They are used by applications and other microservices through the gateways and HTTP APIs.
- They can raise or register to events in the system.
- They can communicate to each other via asynchronous messaging.
Identity Service (IdentityService.Host)
This service provides user and role management APIs.
Database
Shares the same database (MsDemo_Identity) with the AuthServer application.
Identity Module
This service actually just hosts the ABP Identity package/module. Does not include any API itself. In order to host it, adds the following dependencies:
AbpIdentityHttpApiModule(Volo.Abp.Identity.HttpApi package) to provide Identity APIs.AbpIdentityApplicationModule(Volo.Abp.Identity.Application package) to host the implementation of the application and domain layers of the module.AbpIdentityEntityFrameworkCoreModule(Volo.Abp.Identity.EntityFrameworkCore package) to use EF Core as database API.
See the module architecture best practice guide to understand the layering better.
Authentication
This microservice uses IdentityServer Bearer authentication and configured like that:
context.Services.AddAuthentication("Bearer")
.AddIdentityServerAuthentication(options =>
{
    options.Authority = configuration["AuthServer:Authority"];
    options.ApiName = configuration["AuthServer:ApiName"];
    options.RequireHttpsMetadata = false;
    options.InboundJwtClaimTypeMap["sub"] = AbpClaimTypes.UserId;
    options.InboundJwtClaimTypeMap["role"] = AbpClaimTypes.Role;
    options.InboundJwtClaimTypeMap["email"] = AbpClaimTypes.Email;
    options.InboundJwtClaimTypeMap["email_verified"] = AbpClaimTypes.EmailVerified;
    options.InboundJwtClaimTypeMap["phone_number"] = AbpClaimTypes.PhoneNumber;
    options.InboundJwtClaimTypeMap["phone_number_verified"] =
        AbpClaimTypes.PhoneNumberVerified;
    options.InboundJwtClaimTypeMap["name"] = AbpClaimTypes.UserName;
});
ApiName is the API which is being protected, IdentityService in this case. Rest of the configuration is related to claims mapping (which is planned to be automated in next ABP versions). The configuration related to authentication in the appsettings.json is simple:
"AuthServer": {
  "Authority": "http://localhost:64999",
  "ApiName": "IdentityService"
}
Swagger
Swagger UI is configured and is the default page for this service. If you navigate to the URL http://localhost:63568/, you are redirected to the swagger page to see and test the API.
Dependencies
- RabbitMQ for messaging to other services.
- Redis for distributed/shared caching.
- Elasticsearch for storing logs.
Blogging Service (BloggingService.Host)
This service hosts the blogging API.
Database
It has a dedicated MongoDB database (MsDemo_Blogging) to store blog and posts. It also uses the MsDemo_Identity SQL database for audit logs, permissions and settings. So, there are two connection strings in the appsettings.json file:
"ConnectionStrings": {
  "Default": "Server=localhost;Database=MsDemo_Identity;Trusted_Connection=True",
  "Blogging": "mongodb://localhost/MsDemo_Blogging"
}
Blogging Module
This service actually just hosts the ABP Blogging package/module. Does not include any API itself. In order to host it, adds the following dependencies:
BloggingHttpApiModule(Volo.Blogging.HttpApi package) to provide Blogging APIs.BloggingApplicationModule(Volo.Blogging.Application package) to host the implementation of the application and domain layers of the module.BloggingMongoDbModule(Volo.Blogging.MongoDB package) to use MongoDB as the database.
See the module architecture best practice guide to understand the layering better.
Authentication
This microservice uses IdentityServer Bearer authentication and configured like that:
context.Services.AddAuthentication("Bearer")
.AddIdentityServerAuthentication(options =>
{
    options.Authority = configuration["AuthServer:Authority"];
    options.ApiName = configuration["AuthServer:ApiName"];
    options.RequireHttpsMetadata = false;
    options.InboundJwtClaimTypeMap["sub"] = AbpClaimTypes.UserId;
    options.InboundJwtClaimTypeMap["role"] = AbpClaimTypes.Role;
    options.InboundJwtClaimTypeMap["email"] = AbpClaimTypes.Email;
    options.InboundJwtClaimTypeMap["email_verified"] = AbpClaimTypes.EmailVerified;
    options.InboundJwtClaimTypeMap["phone_number"] = AbpClaimTypes.PhoneNumber;
    options.InboundJwtClaimTypeMap["phone_number_verified"] =
        AbpClaimTypes.PhoneNumberVerified;
    options.InboundJwtClaimTypeMap["name"] = AbpClaimTypes.UserName;
});
ApiName is the API which is being protected, BloggingService in this case. Rest of the configuration is related to claims mapping (which is planned to be automated in next ABP versions). The configuration related to authentication in the appsettings.json is simple:
"AuthServer": {
  "Authority": "http://localhost:64999",
  "ApiName": "BloggingService"
}
IdentityServer Client
This microservice also uses the Identity microservice API through the Internal Gateway, because it needs to query user details (username, email, phone, name and surname) in some cases. So, it is also a client for the IdentityServer and defines a section in the appsettings.json file for that:
"IdentityClients": {
  "Default": {
    "GrantType": "client_credentials",
    "ClientId": "blogging-service-client",
    "ClientSecret": "1q2w3e*",
    "Authority": "http://localhost:64999",
    "Scope": "InternalGateway IdentityService"
  }
}
Since it uses the Internal Gateway, it should also configure the remote endpoint of the gateway:
"RemoteServices": {
  "Default": {
    "BaseUrl": "http://localhost:65129/",
    "UseCurrentAccessToken": "false"
  }
}
When you set UseCurrentAccessToken to false, ABP ignores the current access_token in the current HttpContext and authenticates to the AuthServer with the credentials defined above.
Why not using the token of the current user in the current request? Because, the user may not have required permissions on the Identity module, so it can not just pass the current authentication token directly to the Identity service. In addition, some of the blog service APIs are anonymous (not requires authenticated user), so in some cases there is no "current user" in the HTTP request. For these reasons, Blogging service should be defined as a client for the Identity service with its own credentials and permissions.
If you check the AbpPermissionGrants table in the MsDemo_Identity database, you can see the related permission for the blogging-service-client.

Swagger
Swagger UI is configured and is the default page for this service. If you navigate to the URL http://localhost:62157/, you are redirected to the swagger page to see and test the API.
Dependencies
- RabbitMQ for messaging to other services.
- Redis for distributed/shared caching.
- Elasticsearch for storing logs.
Product Service (ProductService.Host)
This service hosts the Product Management API.
Database & EF Core Migrations
It has a separated SQL database, named MsDemo_ProductManagement, for the product management module. It uses EF Core as the database provider and has a DbContext named ProductServiceMigrationDbContext:
public class ProductServiceMigrationDbContext : AbpDbContext<ProductServiceMigrationDbContext>
{
    public ProductServiceMigrationDbContext(
        DbContextOptions<ProductServiceMigrationDbContext> options
        ) : base(options)
    {

    }

    protected override void OnModelCreating(ModelBuilder modelBuilder)
    {
        base.OnModelCreating(modelBuilder);

        modelBuilder.ConfigureProductManagement();
    }
}
Actual model configuration is done inside the modelBuilder.ConfigureProductManagement() extension method. This project maintains the database schema using EF Core migrations.
Notice that this DbContext is only for database migrations. Product Management module has its own DbContext class that is used in the runtime (See ProductManagementDbContext class in the ProductManagement.EntityFrameworkCore project).
There are two connection strings in the appsettings.json file:
"ConnectionStrings": {
  "Default": "Server=localhost;Database=MsDemo_Identity;Trusted_Connection=True",
  "ProductManagement": "Server=localhost;Database=MsDemo_ProductManagement;Trusted_Connection=True"
}
Default connection strings points to the MsDemo_Identity database that is used for audit logging, permission and setting stores. ProductManagement connection string is used by the product module.
Product Module
This service actually just hosts the Product Management module. Does not include any API itself. In order to host it, adds the following dependencies:
ProductManagementHttpApiModuleto provide product management APIs.ProductManagementApplicationModuleto host the implementation of the application and domain layers of the module.ProductManagementEntityFrameworkCoreModuleto use EF Core as database API.
See the module architecture best practice guide to understand the layering better. See the Product Management module section below for more information about this module.
Authentication
This microservice uses IdentityServer Bearer authentication and configured like that:
context.Services.AddAuthentication("Bearer")
.AddIdentityServerAuthentication(options =>
{
    options.Authority = configuration["AuthServer:Authority"];
    options.ApiName = configuration["AuthServer:ApiName"];
    options.RequireHttpsMetadata = false;
    options.InboundJwtClaimTypeMap["sub"] = AbpClaimTypes.UserId;
    options.InboundJwtClaimTypeMap["role"] = AbpClaimTypes.Role;
    options.InboundJwtClaimTypeMap["email"] = AbpClaimTypes.Email;
    options.InboundJwtClaimTypeMap["email_verified"] = AbpClaimTypes.EmailVerified;
    options.InboundJwtClaimTypeMap["phone_number"] = AbpClaimTypes.PhoneNumber;
    options.InboundJwtClaimTypeMap["phone_number_verified"] =
        AbpClaimTypes.PhoneNumberVerified;
    options.InboundJwtClaimTypeMap["name"] = AbpClaimTypes.UserName;
});
ApiName is the API which is being protected, ProductService in this case. Rest of the configuration is related to claims mapping (which is planned to be automated in next ABP versions). The configuration related to authentication in the appsettings.json is simple:
"AuthServer": {
  "Authority": "http://localhost:64999",
  "ApiName": "ProductService"
}
Swagger
Swagger UI is configured and is the default page for this service. If you navigate to the URL http://localhost:60244/, you are redirected to the swagger page to see and test the API.
Dependencies
- RabbitMQ for messaging to other services.
- Redis for distributed/shared caching.
- Elasticsearch for storing logs.
Modules
ABP provides a strong infrastructure to make modular application development easier by providing services and architecture (see the module development best practices guide).
This solution demonstrate how to use prebuilt application modules in a distributed architecture. The solution also includes a simple "Product Management" module to show the implementation of a well layered module example.
Product Management
Product Management is a module that consists of several layers and packages/projects:
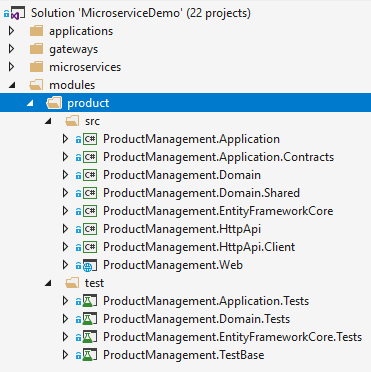
ProductManagement.Domain.Sharedcontains constants and types shared among all layers.ProductManagement.Domaincontains the domain logic and defines entities, domain services, domain events, business/domain exceptions.ProductManagement.Application.Contractscontains application service interfaces and DTOs.ProductManagement.Applicationcontains the implementation of application services.ProductManagement.EntityFrameworkCorecontains DbConext and other EF Core related classes and configuration.ProductManagement.HttpApicontains API Controllers.ProductManagement.HttpApi.Clientcontains C# proxies to directly use the HTTP API remotely. Uses Dynamic C# API Clients feature of the ABP framework.ProductManagement.Webcontains the UI elements (pages, scripts, styles... etc).
By the help of this layering, it is possible to use the same module as a package reference in a monolithic application or use as a service that runs in another server. It is possible to separate UI (Web) and API layers, so they run in different servers.
In this solution, Web layer runs in the Backend Admin Application while API layer is hosted by the Product microservice.
This tutorial will highlight some important aspects of the module. But, it's suggested to see the source code for a better understanding.
Domain Layer
Product is the main Aggregate Root of this module:
public class Product : AuditedAggregateRoot<Guid>
{
    /// <summary>
    /// A unique value for this product.
    /// ProductManager ensures the uniqueness of it.
    /// It can not be changed after creation of the product.
    /// </summary>
    [NotNull]
    public string Code { get; private set; }

    [NotNull]
    public string Name { get; private set; }

    public float Price { get; private set; }

    public int StockCount { get; private set; }

    //...
}
All of its properties have private setters which prevents any direct change of the properties from out of the class. Product class ensures its own integrity and validity by its own constructors and methods.
It has two constructors:
private Product()
{
    //Default constructor is needed for ORMs.
}

internal Product(
    Guid id,
    [NotNull] string code,
    [NotNull] string name,
    float price = 0.0f,
    int stockCount = 0)
{
    Check.NotNullOrWhiteSpace(code, nameof(code));

    if (code.Length >= ProductConsts.MaxCodeLength)
    {
        throw new ArgumentException(
            $"Product code can not be longer than {ProductConsts.MaxCodeLength}"
        );
    }

    Id = id;
    Code = code;
    SetName(Check.NotNullOrWhiteSpace(name, nameof(name)));
    SetPrice(price);
    SetStockCountInternal(stockCount, triggerEvent: false);
}
Default (parameterless) constructor is private and is not used in the application code. It is needed because most ORMs requires a parameterless constructor on deserializing entities while getting from the database.
Second constructor is internal that means it can only be used inside the domain layer. This enforces to use the ProductManager while creating a new Product. Because, ProductManager should implement a business rule on a new product creation. This constructor only requires the minimal required arguments to create a new product with some optional arguments. It checks some simple business rules to ensure that the entity is created as a valid product.
Rest of the class has methods to manipulate properties of the entity. Example:
public Product SetPrice(float price)
{
    if (price < 0.0f)
    {
        throw new ArgumentException($"{nameof(price)} can not be less than 0.0!");
    }

    Price = price;
    return this;
}
SetPrice method is used to change the price of the product in a safe manner (by checking a validation rule).
SetStockCount is another method that is used to change stock count of a product:
public Product SetStockCount(int stockCount)
{
    return SetStockCountInternal(stockCount);
}

private Product SetStockCountInternal(int stockCount, bool triggerEvent = true)
{
    if (StockCount < 0)
    {
        throw new ArgumentException($"{nameof(stockCount)} can not be less than 0!");
    }

    if (StockCount == stockCount)
    {
        return this;
    }

    if (triggerEvent)
    {
        AddDistributedEvent(
            new ProductStockCountChangedEto(
                Id, StockCount, stockCount
            )
        );
    }

    StockCount = stockCount;
    return this;
}
This method also triggers a distributed event with the ProductStockCountChangedEto parameter (Eto is a conventional postfix stands for Event Transfer Object, but not required) to notify listeners that stock count of a product has changed. Any subscriber can receive this event and perform an action based on that knowledge.
Events are distributed by RabbitMQ for this solution. But ABP is message broker independent by providing necessary abstractions (see the Event Bus document).
As said before, this module forces to always use the ProductManager to create a new Product. ProductManager is a simple domain service defined as shown:
public class ProductManager : DomainService
{
    private readonly IRepository<Product, Guid> _productRepository;

    public ProductManager(IRepository<Product, Guid> productRepository)
    {
        _productRepository = productRepository;
    }

    public async Task<Product> CreateAsync(
        [NotNull] string code,
        [NotNull] string name,
        float price = 0.0f,
        int stockCount = 0)
    {
        var existingProduct =
            await _productRepository.FirstOrDefaultAsync(p => p.Code == code);

        if (existingProduct != null)
        {
            throw new ProductCodeAlreadyExistsException(code);
        }

        return await _productRepository.InsertAsync(
            new Product(
                GuidGenerator.Create(),
                code,
                name,
                price,
                stockCount
            )
        );
    }
}
- It checks if given code is used before. Throws
ProductCodeAlreadyExistsExceptionso. - If uses the
GuidGenerator(IGuidGenerator) service to create a newGuid. - It inserts the entity to the repository.
So, with this design, uniqueness of the product code is guaranteed.
ProductCodeAlreadyExistsException is a domain/business exception defined as like below:
public class ProductCodeAlreadyExistsException : BusinessException
{
    public ProductCodeAlreadyExistsException(string productCode)
        : base("PM:000001", $"A product with code {productCode} has already exists!")
    {

    }
}
PM:000001 is a code for the exception type that is sent to the clients, so they can understand the error type. Not implemented for this case, but it is also possible to localize business exceptions. See the exception handling documentation.
Application Layer
Application layer of this module has two services:
ProductAppServiceis mainly used by the Backend Admin Application to manage (create, update, delete...) products. It requires permission to perform any operation.PublicProductAppServiceis used by the Public Web Site to show list of products to the visitors. It does not require any permission since most of the visitors are not logged in to the application.
Notice that; instead of putting two application service into the same project, it might be a better principle to have separated application layers per application. But we unified them for simplicity in this solution.
As an example, ProductAppService has the following method to update a product:
[Authorize(ProductManagementPermissions.Products.Update)]
public async Task<ProductDto> UpdateAsync(Guid id, UpdateProductDto input)
{
    var product = await _productRepository.GetAsync(id);

    product.SetName(input.Name);
    product.SetPrice(input.Price);
    product.SetStockCount(input.StockCount);

    return ObjectMapper.Map<Product, ProductDto>(product);
}
- It defines the required permission (ProductManagementPermissions.Products.Update is a constant with value
ProductManagement.Update) to perform this operation. - Gets the id of the product and a DTO contains the values to update.
- Gets the related product entity from the repository.
- Uses the related methods (like
SetName) of theProductclass to change properties, because they are with private setters and the only way to change a value is to use an entity method. - Returns an updated
ProductDtoto the client (client may need it for some reason) by using the ObjectMapper.
The implementation may vary based on the requirements. This implementation follows the best practices offered here.
Other Layers
See other layers from the source code.
Infrastructure
Messaging and RabbitMQ
Asynchronous Messaging is a key concept in distributed systems. It makes possible to communicate as a loosely coupled manner with fault tolerance. It does not require both sides to be online at the moment of messaging. So, it is a widely used communication pattern in microservice architecture.
Distributed Event Bus
Distributed Events (Event Bus) is a way of messaging where a service raise/trigger events while other services registers/listens to these events to be notified when an important event occurs. ABP makes distributed events easier to use by providing conventions, services and integrations.
You have seen that the Product class publishing an event using the following code line:
AddDistributedEvent(new ProductStockCountChangedEto(Id, StockCount, stockCount));
ProductStockCountChangedEto was defined as shown below:
[Serializable]
public class ProductStockCountChangedEto : EtoBase
{
    public Guid Id { get; }

    public int OldCount { get; set; }

    public int CurrentCount { get; set; }

    private ProductStockCountChangedEto()
    {
        //Default constructor is needed for deserialization.
    }

    public ProductStockCountChangedEto(Guid id, int oldCount, int currentCount)
    {
        Id = id;
        OldCount = oldCount;
        CurrentCount = currentCount;
    }
}
This object stores necessary information about the event. Another service can easily register to this event by implementing the IDistributedEventHandler interface with the generic ProductStockCountChangedEto parameter:
public class MyHandler : IDistributedEventHandler<ProductStockCountChangedEto>
{
    public async Task HandleEventAsync(ProductStockCountChangedEto eventData)
    {
        var productId = eventData.Id;
        //...
    }
}
All the integration and communication are done by the ABP framework when you use the Volo.Abp.EventBus.RabbitMQ package. If you need to publish events out of an entity, just inject the IDistributedEventBus and use the PublishAsync method.
See the Event Bus documentation for more information about the distributed event system.
RabbitMQ Configuration
In this solution, RabbitMQ is used for messaging & distributed events.
Volo.Abp.EventBus.RabbitMQ package is required to integrate to the RabbitMQ for distributed event system. Then you need to add dependency to the AbpEventBusRabbitMqModule for your module. For example, ProductServiceHostModule declares this dependency.
AbpEventBusRabbitMqModule gets configuration from the appsettings.json by default. For example, the Product Service has such a configuration:
"RabbitMQ": {
  "Connections": {
    "Default": {
      "HostName": "localhost"
    }
  },
  "EventBus": {
    "ClientName": "MsDemo_ProductService",
    "ExchangeName": "MsDemo"
  }
}
Caching and Redis
A distributed system obviously needs to a distributed and shared cache, instead of isolated in-memory caches for each service.
Redis is used as a distributed cache in this solution. The solution uses Microsoft's standard Microsoft.Extensions.Caching.Redis package for integration. All applications and services uses Redis cache when you use and configure this package. See Microsoft's documentation for more.
The solution also uses the Microsoft.AspNetCore.DataProtection.StackExchangeRedis package to share data protection keys between applications and services over Redis cache.
Logging, Serilog, Elasticsearch and Kibana
This solution uses Serilog as a logging library. It is a widely used library which has many data source integrations including Elasticsearch.
Logging configurations are done in Program.cs files using a code block similar to the given below:
Log.Logger = new LoggerConfiguration()
    .MinimumLevel.Debug()
    .MinimumLevel.Override("Microsoft", LogEventLevel.Information)
    .Enrich.WithProperty("Application", "ProductService")
    .Enrich.FromLogContext()
    .WriteTo.File("Logs/logs.txt")
    .WriteTo.Elasticsearch(
        new ElasticsearchSinkOptions(new Uri(configuration["ElasticSearch:Url"]))
        {
            AutoRegisterTemplate = true,
            AutoRegisterTemplateVersion = AutoRegisterTemplateVersion.ESv6,
            IndexFormat = "msdemo-log-{0:yyyy.MM}"
        })
    .CreateLogger();
This configures multiple log target: File and Elasticsearch. Application property is set to ProductService for this example. This is a way of distinguishing the logs of multiple services in a single database. You can then query logs by the Application name.
Elasticsearch URL is read from the appsettings.json configuration file:
"ElasticSearch": {
  "Url": "http://localhost:9200"
}
If you use Kibana, which is a Visualization tool that is well integrated to Elasticsearch, you can see some fancy UI about your logs:
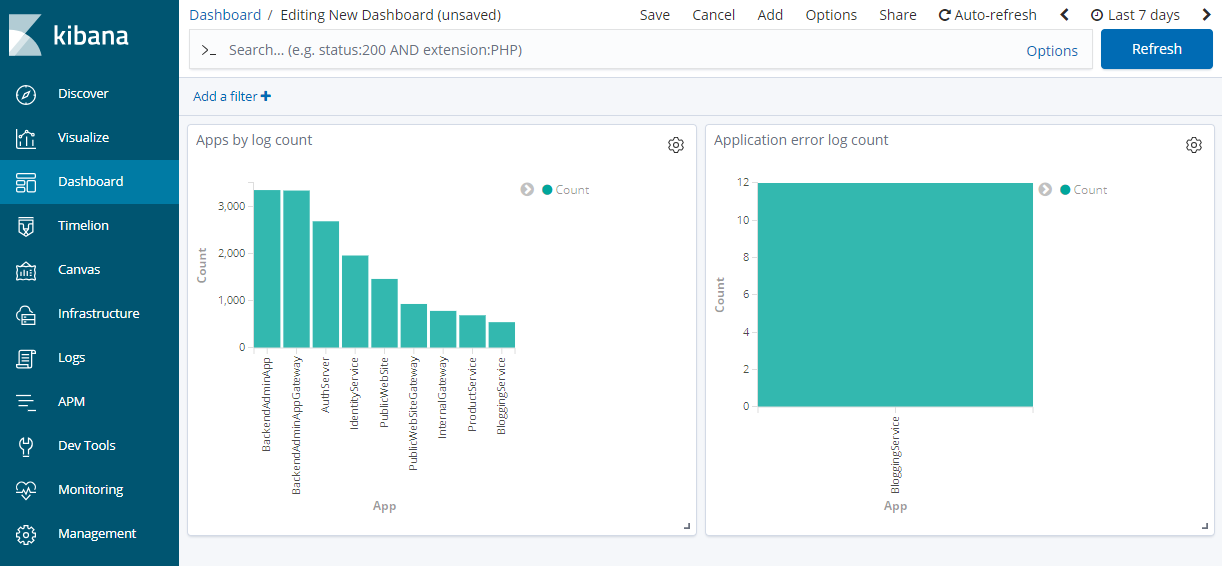
Figure - A dashboard that shows log and error counts by service/application.
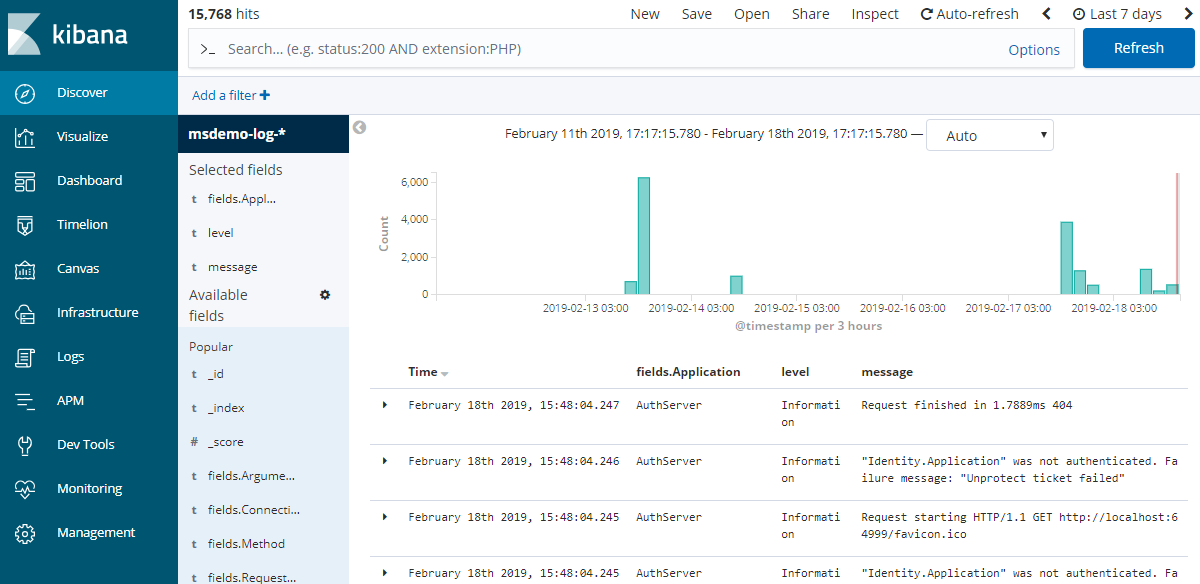
Figure - A list of log entries
Kibana URL is http://localhost:5601/ by default.
Audit Logging
ABP provides automatic audit logging which saves every request in detail (who is the current user, what is the browser/client, what actions performed, which entities changed, even which properties of entities has been updated). See the audit logging document for details.
All of the services and applications are configured to write audit logs. Audit logs are saved to the MsDemo_Identity SQL database. So, you can query all audit logs of all applications from a single point.
An Audit Log record has a CorrelationId property that can be used to track a request. When a service calls another service in a single web request, they both save audit logs with the same CorrelationId. See the AbpAuditLogs table in the database.
Multi-Tenancy
The solution has been configured to provide a multi-tenant system, where each tenant can have their isolated users, roles, permissions and other data.
 08-09 May


