Docs Module
What is Docs Module?
Docs module is an application module for ABP framework. It simplifies software documentation. This module is free and open-source.
Integration
Currently docs module provides you to store your docs both on GitHub and file system.
Hosting
Docs module is an application module and does not offer any hosting solution. You can host your docs on-premise or on cloud.
Versioning
When you use GitHub to store your docs, Docs Module supports versioning. If you have multiple versions for your docs, there will be a combo-box on the UI to switch between versions. If you choose file system to store your docs, it does not support multiple versions.
The documents for ABP framework is also using this module.
Docs module follows the module architecture best practices guide.
Installation
1- Download
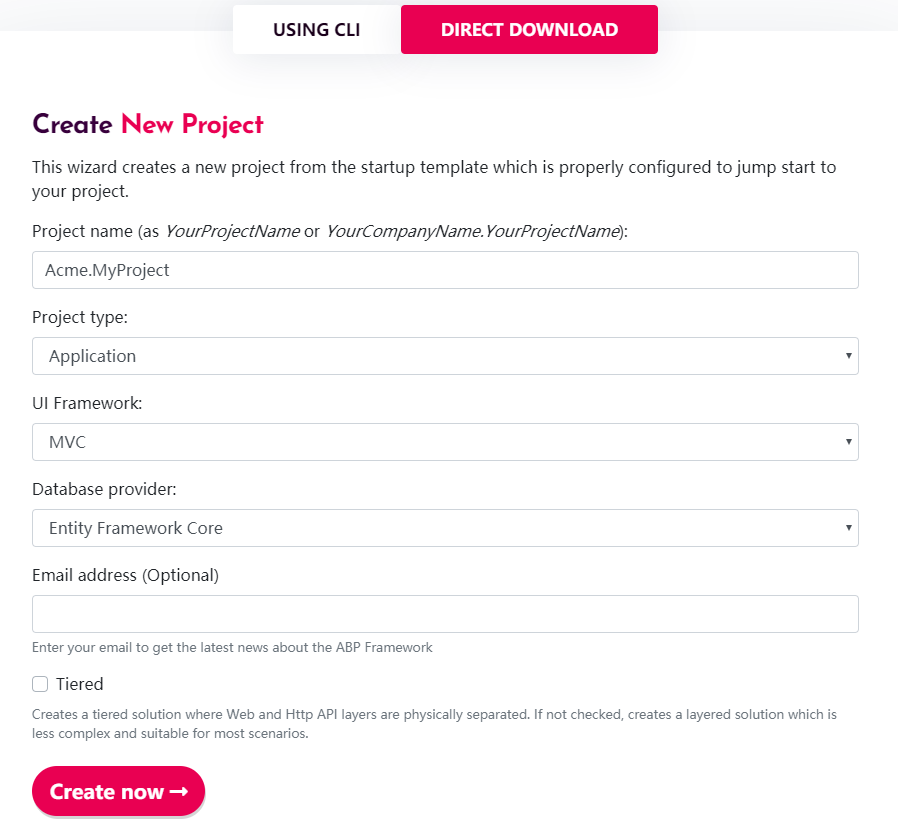
If you do not have an existing ABP project, this step shows you how to create a new project from abp.io to add the Docs Module. If you already have an ABP project, you can skip this step.
It is recommended to use ABP CLI to create new projects. Use the following command:
abp new Acme.MyProject
You can also navigate to https://abp.io/get-started. Enter your project name as Acme.MyProject, other use default options.
Note that this document covers Entity Framework Core provider but you can also select MongoDB as your database provider.
2- Running The Empty Application
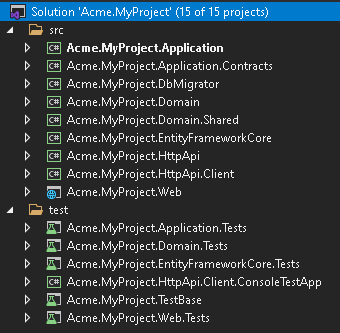
After you download the project, extract the ZIP file and open Acme.MyProject.sln. You will see that the solution consists of Application, Application.Contracts, DbMigrator, Domain, Domain.Shared, EntityFrameworkCore, HttpApi, HttpApi.Client and Web projects. Right click on Acme.MyProject.Web project and Set as StartUp Project.
The database connection string is located in appsettings.json of your Acme.MyProject.Web project. If you have a different database configuration, change the connection string.
{
  "ConnectionStrings": {
    "Default": "Server=(LocalDb)\\MSSQLLocalDB;Database=MyProject;Trusted_Connection=True"
  }
}
Run Acme.MyProject.DbMigrator project, it will be responsible for applying database migration and seed data. The database MyProject will be created in your database server.
Now an empty ABP project has been created! You can now run your project and see the empty website.
To login your website enter admin as the username and 1q2w3E* as the password.
3- Installation Module
Docs module packages are hosted on NuGet. There are 4 packages that needs be to installed to your application. Each package has to be installed to the relevant project.
3.1- Use ABP CLI
It is recommended to use the ABP CLI to install the module, open the CMD window in the solution file (.sln) directory, and run the following command:
abp add-module Volo.Docs
3.2- Manually install
Or you can also manually install nuget package to each project:
Install Volo.Docs.Domain nuget package to
Acme.MyProject.Domainproject.Install-Package Volo.Docs.DomainInstall Volo.Docs.EntityFrameworkCore nuget package to
Acme.MyProject.EntityFrameworkCoreproject.Install-Package Volo.Docs.EntityFrameworkCoreInstall Volo.Docs.Application nuget package to
Acme.MyProject.Applicationproject.Install-Package Volo.Docs.ApplicationInstall Volo.Docs.Web nuget package to
Acme.MyProject.Webproject.Install-Package Volo.Docs.Web
3.2.1- Adding Module Dependencies
An ABP module must declare [DependsOn] attribute if it has a dependency upon another module. Each module has to be added in[DependsOn] attribute to the relevant project.
Open
MyProjectDomainModule.csand addtypeof(DocsDomainModule)as shown below;[DependsOn( typeof(DocsDomainModule), typeof(AbpIdentityDomainModule), typeof(AbpAuditingModule), typeof(BackgroundJobsDomainModule), typeof(AbpAuditLoggingDomainModule) )] public class MyProjectDomainModule : AbpModule { //... }Open
MyProjectEntityFrameworkCoreModule.csand addtypeof(DocsEntityFrameworkCoreModule)as shown below;[DependsOn( typeof(DocsEntityFrameworkCoreModule), typeof(MyProjectDomainModule), typeof(AbpIdentityEntityFrameworkCoreModule), typeof(AbpPermissionManagementEntityFrameworkCoreModule), typeof(AbpSettingManagementEntityFrameworkCoreModule), typeof(AbpEntityFrameworkCoreSqlServerModule), typeof(BackgroundJobsEntityFrameworkCoreModule), typeof(AbpAuditLoggingEntityFrameworkCoreModule) )] public class MyProjectEntityFrameworkCoreModule : AbpModule { //... }Open
MyProjectApplicationModule.csand addtypeof(DocsApplicationModule)as shown below;[DependsOn( typeof(DocsApplicationModule), typeof(MyProjectDomainModule), typeof(AbpIdentityApplicationModule))] public class MyProjectApplicationModule : AbpModule { public override void ConfigureServices(ServiceConfigurationContext context) { Configure<AbpPermissionOptions>(options => { options.DefinitionProviders.Add<MyProjectPermissionDefinitionProvider>(); }); Configure<AbpAutoMapperOptions>(options => { options.AddProfile<MyProjectApplicationAutoMapperProfile>(); }); } }Open
MyProjectWebModule.csand addtypeof(DocsWebModule)as shown below;[DependsOn( typeof(DocsWebModule), typeof(MyProjectApplicationModule), typeof(MyProjectEntityFrameworkCoreModule), typeof(AbpAutofacModule), typeof(AbpIdentityWebModule), typeof(AbpAccountWebModule), typeof(AbpAspNetCoreMvcUiBasicThemeModule) )] public class MyProjectWebModule : AbpModule { //... }
3.2.2- Adding NPM Package
Open package.json and add @abp/docs": "^5.0.0 as shown below:
  {
      "version": "1.0.0",
      "name": "my-app",
      "private": true,
      "dependencies": {
          "@abp/aspnetcore.mvc.ui.theme.basic": "^5.0.0",
          "@abp/docs": "^5.0.0"
      }
  }
Then open the command line terminal in the Acme.MyProject.Web project folder and run the following command:
abp install-libs
4- Database Integration
4.1- Entity Framework Integration
If you choose Entity Framework as your database provider, you need to configure the Docs Module. To do this;
Open
MyProjectMigrationsDbContext.csand addbuilder.ConfigureDocs()to theOnModelCreating().public class MyProjectMigrationsDbContext : AbpDbContext<MyProjectMigrationsDbContext> { public MyProjectMigrationsDbContext(DbContextOptions<MyProjectMigrationsDbContext> options) : base(options) { } protected override void OnModelCreating(ModelBuilder builder) { base.OnModelCreating(builder); /* Include modules to your migration db context */ builder.ConfigurePermissionManagement(); builder.ConfigureSettingManagement(); builder.ConfigureBackgroundJobs(); builder.ConfigureAuditLogging(); builder.ConfigureIdentity(); builder.ConfigureIdentityServer(); builder.ConfigureFeatureManagement(); builder.ConfigureTenantManagement(); builder.ConfigureDocs(); //Add this line to configure the Docs Module /* Configure customizations for entities from the modules included */ builder.Entity<IdentityUser>(b => { b.ConfigureCustomUserProperties(); }); /* Configure your own tables/entities inside the ConfigureQaDoc method */ builder.ConfigureMyProject(); } }
Open
Package Manager ConsoleinVisual Studioand chooseAcme.MyProject.EntityFrameworkCoreas default project. Then write the below command to add the migration for Docs Module.add-migration Added_Docs_ModuleWhen the command successfully executes , you will see a new migration file named as
20181221111621_Added_Docs_Modulein the folderAcme.MyProject.EntityFrameworkCore\Migrations.Now, update the database for Docs module database changes. To do this run the below code on
Package Manager ConsoleinVisual Studio. Be sureAcme.MyProject.EntityFrameworkCoreis still default project.update-databaseFinally, you can check your database to see the newly created tables. For example you can see
DocsProjectstable must be added to your database.
5- Linking Docs Module
The default route for Docs module is;
/Documents
To add Docs module link to your application menu;
Open
MyProjectMenuContributor.csand add the below line to the methodConfigureMainMenuAsync().context.Menu.Items.Add(new ApplicationMenuItem("MyProject.Docs", l["Menu:Docs"], "/Documents"));Final look of MyProjectMenuContributor.cs
    private async Task ConfigureMainMenuAsync(MenuConfigurationContext context)
    {
        var l = context.ServiceProvider.GetRequiredService<IStringLocalizer<MyProjectResource>>();

        context.Menu.Items.Insert(0, new ApplicationMenuItem("MyProject.Home", l["Menu:Home"], "/"));

        context.Menu.Items.Add(new ApplicationMenuItem("MyProject.Docs", l["Menu:Docs"], "/Documents"));
    }
The Menu:Docs keyword is a localization key. To localize the menu text, open Localization\MyProject\en.json in the project Acme.MyProject.Domain. And add the below line
"Menu:Docs": "Documents"
Final look of en.json
{
  "culture": "en",
  "texts": {
    "Menu:Home": "Home",
    "Welcome": "Welcome",
    "LongWelcomeMessage": "Welcome to the application. This is a startup project based on the ABP framework. For more information, visit abp.io.",
    "Menu:Docs": "Documents"
  }
}
The new menu item for Docs Module is added to the menu. Run your web application and browse to http://localhost:YOUR_PORT_NUMBER/documents URL.
You will see a warning says;
There are no projects yet!
As we have not added any projects yet, this warning is normal.
6- Adding New Docs Project
Open DocsProjects in your database, and insert a new record with the following field information;
- Name: The display name of the document name which will be shown on the web page.
- ShortName: A short and URL friendly name that will be used in your docs URL.
- Format: The format of the document (for Markdown:
md, for HTML:html) - DefaultDocumentName: The document for the initial page.
- NavigationDocumentName: The document to be used for the navigation menu (Index).
- MinimumVersion: The minimum version to show the docs. Below version will not be listed.
- DocumentStoreType: The source of the documents (for GitHub:
GitHub, for file systemFileSystem) - ExtraProperties: A serialized
JSONthat stores special configuration for the selectedDocumentStoreType. - MainWebsiteUrl: The URL when user clicks to the logo of the Docs module page. You can simply set as
/to link to your website root address. - LatestVersionBranchName: This is a config for GitHub. It's the branch name which to retrieve the docs. You can set it as
master.
Sample Project Record for "GitHub"
You can use ABP Framework GitHub documents to configure your GitHub document store.
Name:
ABP framework (GitHub)ShortName:
abpFormat:
mdDefaultDocumentName:
IndexNavigationDocumentName:
docs-nav.jsonMinimumVersion:
<NULL>(no minimum version)DocumentStoreType:
GitHubExtraProperties:
{"GitHubRootUrl":"https://github.com/abpframework/abp/tree/{version}/docs","GitHubAccessToken":"***","GitHubUserAgent":""}Note that
GitHubAccessTokenis masked with***. It's a private token that you must get it from GitHub. See https://help.github.com/articles/creating-a-personal-access-token-for-the-command-line/MainWebsiteUrl:
/LatestVersionBranchName:
dev
For SQL databases, you can use the below T-SQL command to insert the specified sample into your DocsProjects table:
INSERT [dbo].[DocsProjects] ([Id], [Name], [ShortName], [Format], [DefaultDocumentName], [NavigationDocumentName], [MinimumVersion], [DocumentStoreType], [ExtraProperties], [MainWebsiteUrl], [LatestVersionBranchName], [ParametersDocumentName]) VALUES (N'12f21123-e08e-4f15-bedb-ae0b2d939658', N'ABP framework (GitHub)', N'abp', N'md', N'Index', N'docs-nav.json', NULL, N'GitHub', N'{"GitHubRootUrl":"https://github.com/abpframework/abp/tree/{version}/docs","GitHubAccessToken":"***","GitHubUserAgent":""}', N'/', N'dev', N'')
Be aware that GitHubAccessToken is masked. It's a private token and you must get your own token and replace the *** string.
Now you can run the application and navigate to /Documents.
Sample Project Record for "FileSystem"
You can use ABP Framework GitHub documents to configure your GitHub document store.
Name:
ABP framework (FileSystem)ShortName:
abpFormat:
mdDefaultDocumentName:
IndexNavigationDocumentName:
docs-nav.jsonMinimumVersion:
<NULL>(no minimum version)DocumentStoreType:
FileSystemExtraProperties:
{"Path":"C:\\Github\\abp\\docs"}Note that
Pathmust be replaced with your local docs directory. You can fetch the ABP Framework's documents from https://github.com/abpframework/abp/tree/master/docs and copy to the directoryC:\\Github\\abp\\docsto get it work.MainWebsiteUrl:
/LatestVersionBranchName:
<NULL>
For SQL databases, you can use the below T-SQL command to insert the specified sample into your DocsProjects table:
INSERT [dbo].[DocsProjects] ([Id], [Name], [ShortName], [Format], [DefaultDocumentName], [NavigationDocumentName], [MinimumVersion], [DocumentStoreType], [ExtraProperties], [MainWebsiteUrl], [LatestVersionBranchName], [ParametersDocumentName]) VALUES (N'12f21123-e08e-4f15-bedb-ae0b2d939659', N'ABP framework (FileSystem)', N'abp', N'md', N'Index', N'docs-nav.json', NULL, N'FileSystem', N'{"Path":"C:\\Github\\abp\\docs"}', N'/', NULL, N'')
Add one of the sample projects above and run the application. In the menu you will see Documents link, click the menu link to open the documents page.
So far, we have created a new application from abp.io website and made it up and ready for Docs module.
7- Creating a New Document
In the sample Project records, you see that Format is specified as md which refers to Mark Down. You can see the mark down cheat sheet following the below link;
https://github.com/adam-p/markdown-here/wiki/Markdown-Cheatsheet
ABP Docs Module can render mark down to HTML.
Now let's have a look a sample document in markdown format.
# This is a header
Welcome to Docs Module.
## This is a sub header
[This is a link](https://abp.io)

## This is a code block
```csharp
public class Person
{
public string Name { get; set; }
public string Address { get; set; }
}
```
As an example you can see ABP Framework documentation:
https://github.com/abpframework/abp/blob/master/docs/en/
Conditional sections feature (Using Scriban)
Docs module uses Scriban for conditionally show or hide some parts of a document. In order to use that feature, you have to create a JSON file as Parameter document per every language. It will contain all the key-values, as well as their display names.
For example, en/docs-params.json:
{
    "parameters": [{
        "name": "UI",
        "displayName": "UI",
		"values": {
			"MVC": "MVC / Razor Pages",
			"NG": "Angular"
		}
    },
	{
        "name": "DB",
        "displayName": "Database",
		"values": {
			"EF": "Entity Framework Core",
			"Mongo": "MongoDB"
		}
    },
	{
        "name": "Tiered",
        "displayName": "Tiered",
		"values": {
			"No": "Not Tiered",
			"Yes": "Tiered"
		}
    }]
}
Since not every single document in your projects may not have sections or may not need all of those parameters, you have to declare which of those parameters will be used for sectioning the document, as a JSON block anywhere on the document.
For example Getting-Started.md:
.....
........
This section will be automatically deleted during render. And f course, those key values must match with the ones in Parameter document.

Now you can use Scriban syntax to create sections in your document.
For example:
You can also use variables in a text, adding _Value postfix to its key:
This document assumes that you prefer to use **** as the UI framework and **** as the database provider.
Also, Document_Language_Code and Document_Version keys are pre-defined if you want to get the language code or the version of the current document (This may be useful for creating links that redirects to another documentation system in another domain).
IMPORTANT NOTICE: Scriban uses " and " for syntax. Therefore, you must use escape blocks if you are going to use those in your document (an Angular document, for example). See Scriban docs for more information.
8- Creating the Navigation Document
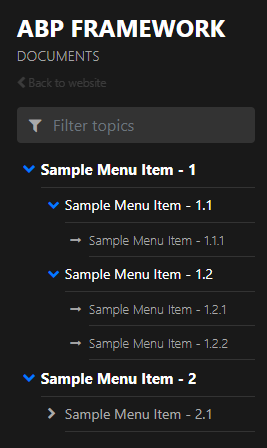
Navigation document is the main menu of the documents page. It is located on the left side of the page. It is a JSON file. Take a look at the below sample navigation document to understand the structure.
{
   "items":[
      {
         "text":"Sample Menu Item - 1",
         "items":[
            {
               "text":"Sample Menu Item - 1.1",
               "items":[
                  {
                     "text":"Sample Menu Item - 1.1.1",
                     "path":"SampleMenuItem_1_1_1.md"
                  }
               ]
            },
            {
               "text":"Sample Menu Item - 1.2",
               "items":[
                  {
                     "text":"Sample Menu Item - 1.2.1",
                     "path":"SampleMenuItem_1_2_1.md"
                  },
                  {
                     "text":"Sample Menu Item - 1.2.2",
                     "path":"SampleMenuItem_1_2_2.md"
                  }
               ]
            }
         ]
      },
      {
         "text":"Sample Menu Item - 2",
         "items":[
            {
               "text":"Sample Menu Item - 2.1",
               "items":[
                  {
                     "text":"Sample Menu Item - 2.1.1",
                     "path":"SampleMenuItem_2_1_1.md"
                  }
               ]
            }
         ]
      }
   ]
}
The upper sample JSON file renders the below navigation menu as HTML.
Finally a new Docs Module is added to your project which is feeded with GitHub.
Full-Text Search(Elastic Search)
The Docs module supports full-text search using Elastic Search. It is not enabled by default. You can configure DocsElasticSearchOptions to enable it.
Configure<DocsElasticSearchOptions>(options =>
{
    options.Enable = true;
    options.IndexName = "your_index_name"; //default IndexName is abp_documents
});
The Index is automatically created after the application starts if the Index does not exist.
DefaultElasticClientProvider is responsible for creating IElasticClient. By default, it reads Elastic Search's Url from IConfiguration.
If your IElasticClient needs additional configuration, please use override IElasticClientProvider service and replace it in the dependency injection system.
{
  "ElasticSearch": {
    "Url": "http://localhost:9200"
  }
}
Row Highlighting
You can apply highlight to specific code lines or a range of sequential lines. See the following examples:
	```C# {3, 5}
	public class Book : Entity<Guid>
	{
	    public string Name { get; set; }
	    public string Surname { get; set; }
	}
	```
	```C# {2-4}
	public class Book : Entity<Guid>
	{
	    public string Name { get; set; }
	    public string Surname { get; set; }
	}
	```
	```C# {1, 2-4}
	public class Book : Entity<Guid>
	{
	    public string Name { get; set; }
	    public string Surname { get; set; }
	}
	```
Next
Docs Module is also available as a standalone application. Check out VoloDocs.
 08-09 May


