Web Application Development Tutorial - Part 1: Creating the Server Side
About This Tutorial
In this tutorial series, you will build an ABP based web application named Acme.BookStore. This application is used to manage a list of books and their authors. It is developed using the following technologies:
- Entity Framework Core as the database provider.
- MVC / Razor Pages as the UI Framework.
This tutorial is organized as the following parts:
- Part 1: Creating the server side (this part)
- Part 2: The book list page
- Part 3: Creating, updating and deleting books
- Part 4: Integration tests
- Part 5: Authorization
- Part 6: Authors: Domain layer
- Part 7: Authors: Database Integration
- Part 8: Authors: Application Layer
- Part 9: Authors: User Interface
- Part 10: Book to Author Relation
Download the Source Code
This tutorial has multiple versions based on your UI and Database preferences. We've prepared a few combinations of the source code to be downloaded:
If you encounter the "filename too long" or "unzip" error on Windows, it's probably related to the Windows maximum file path limitation. Windows has a maximum file path limitation of 250 characters. To solve this, enable the long path option in Windows 10.
If you face long path errors related to Git, try the following command to enable long paths in Windows. See https://github.com/msysgit/msysgit/wiki/Git-cannot-create-a-file-or-directory-with-a-long-path
git config --system core.longpaths true
Video Tutorial
This part is also recorded as a video tutorial and published on YouTube.
Creating the Solution
Before starting the development, create a new solution named Acme.BookStore and run it by following the getting started tutorial.
Create the Book Entity
Domain layer in the startup template is separated into two projects:
Acme.BookStore.Domaincontains your entities, domain services and other core domain objects.Acme.BookStore.Domain.Sharedcontainsconstants,enumsor other domain related objects that can be shared with clients.
So, define your entities in the domain layer (Acme.BookStore.Domain project) of the solution.
The main entity of the application is the Book. Create a Books folder (namespace) in the Acme.BookStore.Domain project and add a Book class inside it:
using System;
using Volo.Abp.Domain.Entities.Auditing;

namespace Acme.BookStore.Books
{
    public class Book : AuditedAggregateRoot<Guid>
    {
        public string Name { get; set; }

        public BookType Type { get; set; }

        public DateTime PublishDate { get; set; }

        public float Price { get; set; }
    }
}
- ABP Framework has two fundamental base classes for entities:
AggregateRootandEntity. Aggregate Root is a Domain Driven Design concept which can be thought as a root entity that is directly queried and worked on (see the entities document for more). - The
Bookentity inherits from theAuditedAggregateRootwhich adds some base auditing properties (likeCreationTime,CreatorId,LastModificationTime...) on top of theAggregateRootclass. ABP automatically manages these properties for you. Guidis the primary key type of theBookentity.
This tutorial leaves the entity properties with public get/set for the sake of simplicity. See the entities document if you want to learn more about DDD best practices.
BookType Enum
The Book entity uses the BookType enum. Create a Books folder (namespace) in the Acme.BookStore.Domain.Shared project and add a BookType inside it:
namespace Acme.BookStore.Books
{
    public enum BookType
    {
        Undefined,
        Adventure,
        Biography,
        Dystopia,
        Fantastic,
        Horror,
        Science,
        ScienceFiction,
        Poetry
    }
}
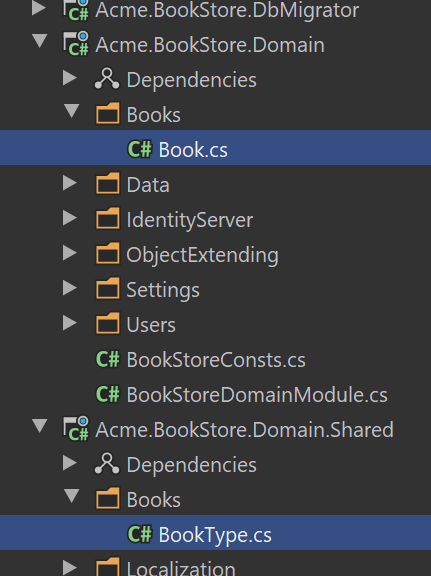
The final folder/file structure should be as shown below:
Add the Book Entity to the DbContext
EF Core requires that you relate the entities with your DbContext. The easiest way to do so is adding a DbSet property to the BookStoreDbContext class in the Acme.BookStore.EntityFrameworkCore project, as shown below:
public class BookStoreDbContext : AbpDbContext<BookStoreDbContext>
{
    public DbSet<Book> Books { get; set; }
    //...
}
Map the Book Entity to a Database Table
Navigate to the OnModelCreating method in the BookStoreDbContext class and add the mapping code for the Book entity:
using Acme.BookStore.Books;
...

namespace Acme.BookStore.EntityFrameworkCore
{
    public class BookStoreDbContext :
        AbpDbContext<BookStoreDbContext>,
        IIdentityDbContext,
        ITenantManagementDbContext
    {
        ...

        protected override void OnModelCreating(ModelBuilder builder)
        {
            base.OnModelCreating(builder);

            /* Include modules to your migration db context */

            builder.ConfigurePermissionManagement();
            ...

            /* Configure your own tables/entities inside here */

            builder.Entity<Book>(b =>
            {
                b.ToTable(BookStoreConsts.DbTablePrefix + "Books",
                    BookStoreConsts.DbSchema);
                b.ConfigureByConvention(); //auto configure for the base class props
                b.Property(x => x.Name).IsRequired().HasMaxLength(128);
            });
        }
    }
}
BookStoreConstshas constant values for the schema and table prefixes for your tables. You don't have to use it, but it's suggested to control the table prefixes in a single point.- The
ConfigureByConvention()method gracefully configures/maps the inherited properties. Always use it for all your entities.
Add Database Migration
The startup solution is configured to use Entity Framework Core Code First Migrations. Since we've changed the database mapping configuration, we should create a new migration and apply changes to the database.
Open a command-line terminal in the directory of the Acme.BookStore.EntityFrameworkCore project and type the following command:
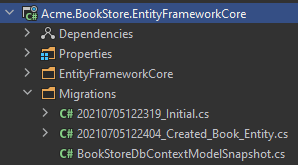
dotnet ef migrations add Created_Book_Entity
This will add a new migration class to the project:
If you are using Visual Studio, you may want to use the
Add-Migration Created_Book_Entity -c BookStoreDbContextandUpdate-Database -Context BookStoreDbContextcommands in the Package Manager Console (PMC). In this case, ensure thatAcme.BookStore.Webis the startup project andAcme.BookStore.EntityFrameworkCoreis the Default Project in PMC.
Add Sample Seed Data
It's good to have some initial data in the database before running the application. This section introduces the Data Seeding system of the ABP framework. You can skip this section if you don't want to create the data seeding, but it is suggested to follow along and learn this useful ABP Framework feature.
Create a class deriving from the IDataSeedContributor in the *.Domain project by copying the following code:
using System;
using System.Threading.Tasks;
using Acme.BookStore.Books;
using Volo.Abp.Data;
using Volo.Abp.DependencyInjection;
using Volo.Abp.Domain.Repositories;

namespace Acme.BookStore
{
    public class BookStoreDataSeederContributor
        : IDataSeedContributor, ITransientDependency
    {
        private readonly IRepository<Book, Guid> _bookRepository;

        public BookStoreDataSeederContributor(IRepository<Book, Guid> bookRepository)
        {
            _bookRepository = bookRepository;
        }

        public async Task SeedAsync(DataSeedContext context)
        {
            if (await _bookRepository.GetCountAsync() <= 0)
            {
                await _bookRepository.InsertAsync(
                    new Book
                    {
                        Name = "1984",
                        Type = BookType.Dystopia,
                        PublishDate = new DateTime(1949, 6, 8),
                        Price = 19.84f
                    },
                    autoSave: true
                );

                await _bookRepository.InsertAsync(
                    new Book
                    {
                        Name = "The Hitchhiker's Guide to the Galaxy",
                        Type = BookType.ScienceFiction,
                        PublishDate = new DateTime(1995, 9, 27),
                        Price = 42.0f
                    },
                    autoSave: true
                );
            }
        }
    }
}
- This code simply uses the
IRepository<Book, Guid>(the default repository) to insert two books to the database in case there weren't any books in it.
Update the Database
Run the Acme.BookStore.DbMigrator application to update the database:
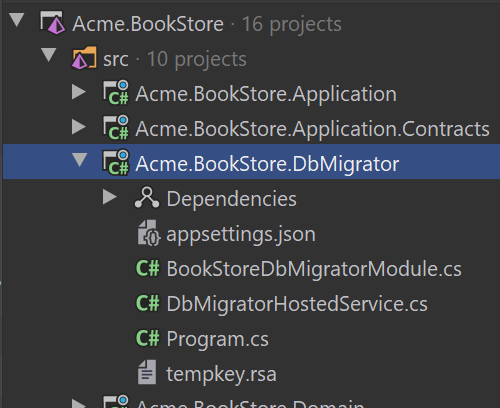
.DbMigrator is a console application that can be run to migrate the database schema and seed the data on development and production environments.
Create the Application Service
The application layer is separated into two projects:
Acme.BookStore.Application.Contractscontains your DTOs and application service interfaces.Acme.BookStore.Applicationcontains the implementations of your application services.
In this section, you will create an application service to get, create, update and delete books using the CrudAppService base class of the ABP Framework.
BookDto
CrudAppService base class requires to define the fundamental DTOs for the entity. Create a Books folder (namespace) in the Acme.BookStore.Application.Contracts project and add a BookDto class inside it:
using System;
using Volo.Abp.Application.Dtos;

namespace Acme.BookStore.Books
{
    public class BookDto : AuditedEntityDto<Guid>
    {
        public string Name { get; set; }

        public BookType Type { get; set; }

        public DateTime PublishDate { get; set; }

        public float Price { get; set; }
    }
}
- DTO classes are used to transfer data between the presentation layer and the application layer. See the Data Transfer Objects document for more details.
- The
BookDtois used to transfer the book data to the presentation layer in order to show the book information on the UI. - The
BookDtois derived from theAuditedEntityDto<Guid>which has audit properties just like theBookentity defined above.
It will be needed to map the Book entities to the BookDto objects while returning books to the presentation layer. AutoMapper library can automate this conversion when you define the proper mapping. The startup template comes with AutoMapper pre-configured. So, you can just define the mapping in the BookStoreApplicationAutoMapperProfile class in the Acme.BookStore.Application project:
using Acme.BookStore.Books;
using AutoMapper;

namespace Acme.BookStore
{
    public class BookStoreApplicationAutoMapperProfile : Profile
    {
        public BookStoreApplicationAutoMapperProfile()
        {
            CreateMap<Book, BookDto>();
        }
    }
}
See the object to object mapping document for details.
CreateUpdateBookDto
Create a CreateUpdateBookDto class in the Books folder (namespace) of the Acme.BookStore.Application.Contracts project:
using System;
using System.ComponentModel.DataAnnotations;

namespace Acme.BookStore.Books
{
    public class CreateUpdateBookDto
    {
        [Required]
        [StringLength(128)]
        public string Name { get; set; }

        [Required]
        public BookType Type { get; set; } = BookType.Undefined;

        [Required]
        [DataType(DataType.Date)]
        public DateTime PublishDate { get; set; } = DateTime.Now;

        [Required]
        public float Price { get; set; }
    }
}
- This
DTOclass is used to get a book information from the user interface while creating or updating the book. - It defines data annotation attributes (like
[Required]) to define validations for the properties.DTOs are automatically validated by the ABP framework.
As done to the BookDto above, we should define the mapping from the CreateUpdateBookDto object to the Book entity. The final class will be as shown below:
using Acme.BookStore.Books;
using AutoMapper;

namespace Acme.BookStore
{
    public class BookStoreApplicationAutoMapperProfile : Profile
    {
        public BookStoreApplicationAutoMapperProfile()
        {
            CreateMap<Book, BookDto>();
            CreateMap<CreateUpdateBookDto, Book>();
        }
    }
}
IBookAppService
Next step is to define an interface for the application service. Create an IBookAppService interface in the Books folder (namespace) of the Acme.BookStore.Application.Contracts project:
using System;
using Volo.Abp.Application.Dtos;
using Volo.Abp.Application.Services;

namespace Acme.BookStore.Books
{
    public interface IBookAppService :
        ICrudAppService< //Defines CRUD methods
            BookDto, //Used to show books
            Guid, //Primary key of the book entity
            PagedAndSortedResultRequestDto, //Used for paging/sorting
            CreateUpdateBookDto> //Used to create/update a book
    {

    }
}
- Defining interfaces for the application services are not required by the framework. However, it's suggested as a best practice.
ICrudAppServicedefines common CRUD methods:GetAsync,GetListAsync,CreateAsync,UpdateAsyncandDeleteAsync. It's not required to extend it. Instead, you could inherit from the emptyIApplicationServiceinterface and define your own methods manually (which will be done for the authors in the next parts).- There are some variations of the
ICrudAppServicewhere you can use separated DTOs for each method (like using different DTOs for create and update).
BookAppService
It is time to implement the IBookAppService interface. Create a new class, named BookAppService in the Books namespace (folder) of the Acme.BookStore.Application project:
using System;
using Volo.Abp.Application.Dtos;
using Volo.Abp.Application.Services;
using Volo.Abp.Domain.Repositories;

namespace Acme.BookStore.Books
{
    public class BookAppService :
        CrudAppService<
            Book, //The Book entity
            BookDto, //Used to show books
            Guid, //Primary key of the book entity
            PagedAndSortedResultRequestDto, //Used for paging/sorting
            CreateUpdateBookDto>, //Used to create/update a book
        IBookAppService //implement the IBookAppService
    {
        public BookAppService(IRepository<Book, Guid> repository)
            : base(repository)
        {

        }
    }
}
BookAppServiceis derived fromCrudAppService<...>which implements all the CRUD (create, read, update, delete) methods defined by theICrudAppService.BookAppServiceinjectsIRepository<Book, Guid>which is the default repository for theBookentity. ABP automatically creates default repositories for each aggregate root (or entity). See the repository document.BookAppServiceusesIObjectMapperservice (see) to map theBookobjects to theBookDtoobjects andCreateUpdateBookDtoobjects to theBookobjects. The Startup template uses the AutoMapper library as the object mapping provider. We have defined the mappings before, so it will work as expected.
Auto API Controllers
In a typical ASP.NET Core application, you create API Controllers to expose the application services as HTTP API endpoints. This allows browsers or 3rd-party clients to call them over HTTP.
ABP can automagically configure your application services as MVC API Controllers by convention.
Swagger UI
The startup template is configured to run the Swagger UI using the Swashbuckle.AspNetCore library. Run the application (Acme.BookStore.Web) by pressing CTRL+F5 and navigate to https://localhost:<port>/swagger/ on your browser. Replace <port> with your own port number.
You will see some built-in service endpoints as well as the Book service and its REST-style endpoints:
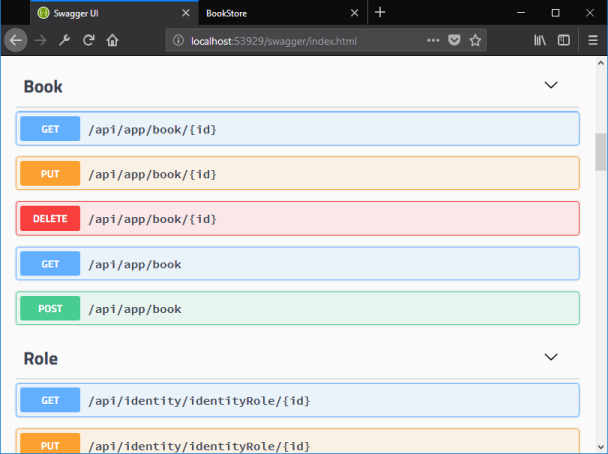
Swagger has a nice interface to test the APIs.
If you try to execute the [GET] /api/app/book API to get a list of books, the server returns such a JSON result:
{
  "totalCount": 2,
  "items": [
    {
      "name": "The Hitchhiker's Guide to the Galaxy",
      "type": 7,
      "publishDate": "1995-09-27T00:00:00",
      "price": 42,
      "lastModificationTime": null,
      "lastModifierId": null,
      "creationTime": "2020-07-03T21:04:18.4607218",
      "creatorId": null,
      "id": "86100bb6-cbc1-25be-6643-39f62806969c"
    },
    {
      "name": "1984",
      "type": 3,
      "publishDate": "1949-06-08T00:00:00",
      "price": 19.84,
      "lastModificationTime": null,
      "lastModifierId": null,
      "creationTime": "2020-07-03T21:04:18.3174016",
      "creatorId": null,
      "id": "41055277-cce8-37d7-bb37-39f62806960b"
    }
  ]
}
That's pretty cool since we haven't written a single line of code to create the API controller, but now we have a fully working REST API!
The Next Part
See the next part of this tutorial.
 08-09 May


