Application Startup Template
Introduction
This template provides a layered application structure based on the Domain Driven Design (DDD) practices.
This document explains the solution structure and projects in details. If you want to start quickly, follow the guides below:
- The getting started document explains how to create a new application in a few minutes.
- The application development tutorial explains step by step application development.
How to Start With?
You can use the ABP CLI to create a new project using this startup template. Alternatively, you can generate a CLI command from the Get Started page. CLI approach is used here.
First, install the ABP CLI if you haven't installed it before:
dotnet tool install -g Volo.Abp.Cli
Then use the abp new command in an empty folder to create a new solution:
abp new Acme.BookStore -t app
Acme.BookStoreis the solution name, like YourCompany.YourProduct. You can use single-level, two-level or three-level naming.- This example specified the template name (
-tor--templateoption). However,appis already the default template if you didn't specify it.
Specify the UI Framework
This template provides multiple UI frameworks:
mvc: ASP.NET Core MVC UI with Razor Pages (default)blazor: Blazor UIblazor-server: Blazor Server UIangular: Angular UI
Use the -u or --ui option to specify the UI framework:
abp new Acme.BookStore -u angular
Specify the Database Provider
This template supports the following database providers:
ef: Entity Framework Core (default)mongodb: MongoDB
Use -d (or --database-provider) option to specify the database provider:
abp new Acme.BookStore -d mongodb
Specify the Mobile Application Framework
This template supports the following mobile application frameworks:
react-native: React Native
Use the -m (or --mobile) option to specify the mobile application framework:
abp new Acme.BookStore -m react-native
If not specified, no mobile application will be created.
Solution Structure
Based on the options you've specified, you will get a slightly different solution structure.
Default Structure
If you don't specify any additional options, you will have a solution as shown below:
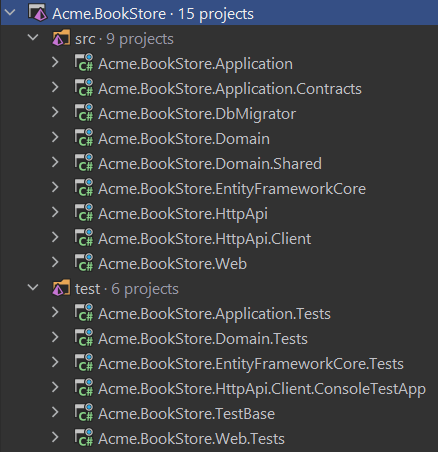
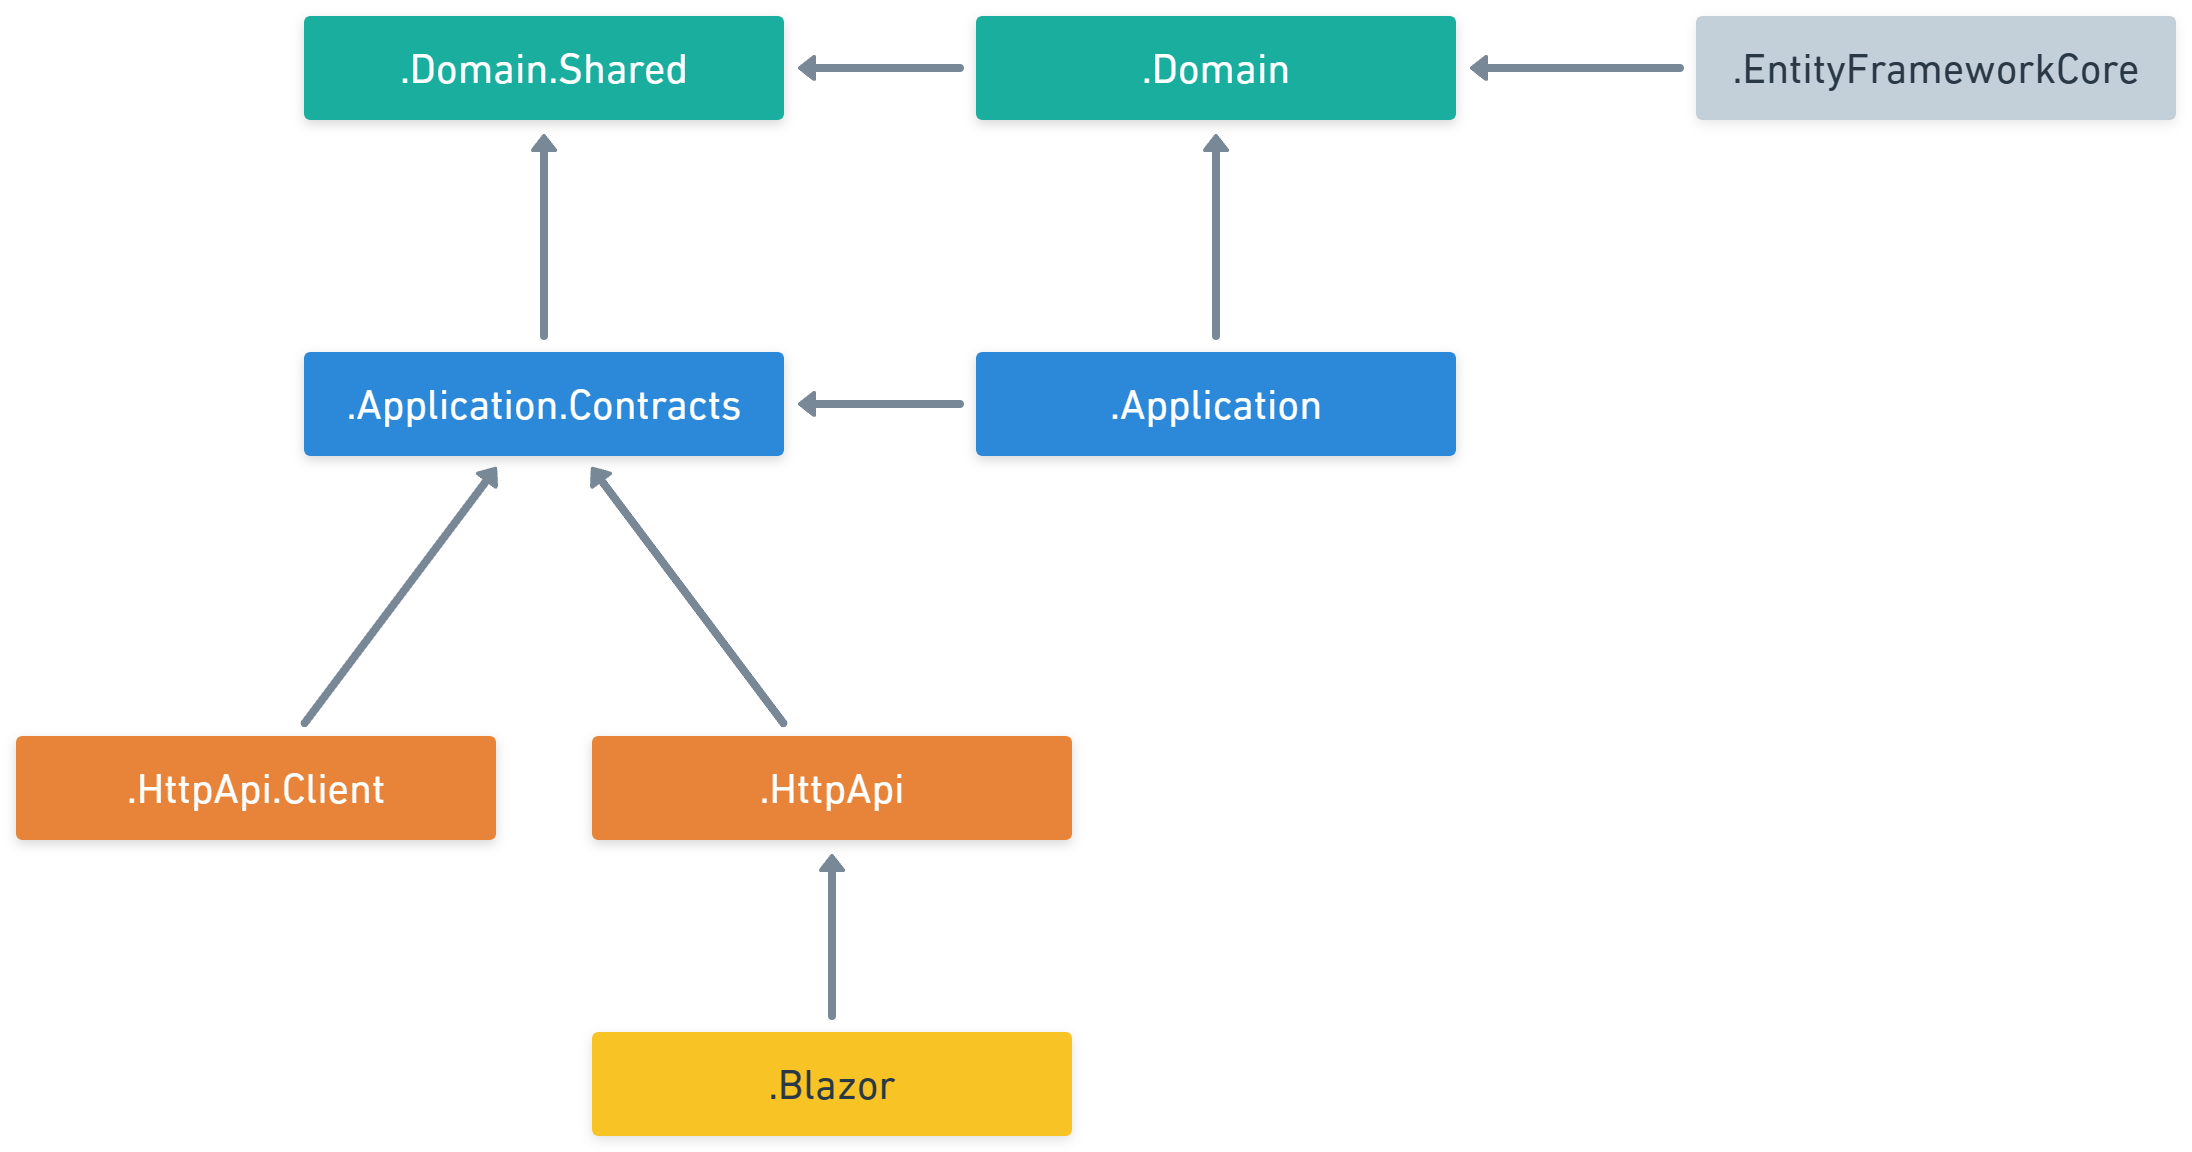
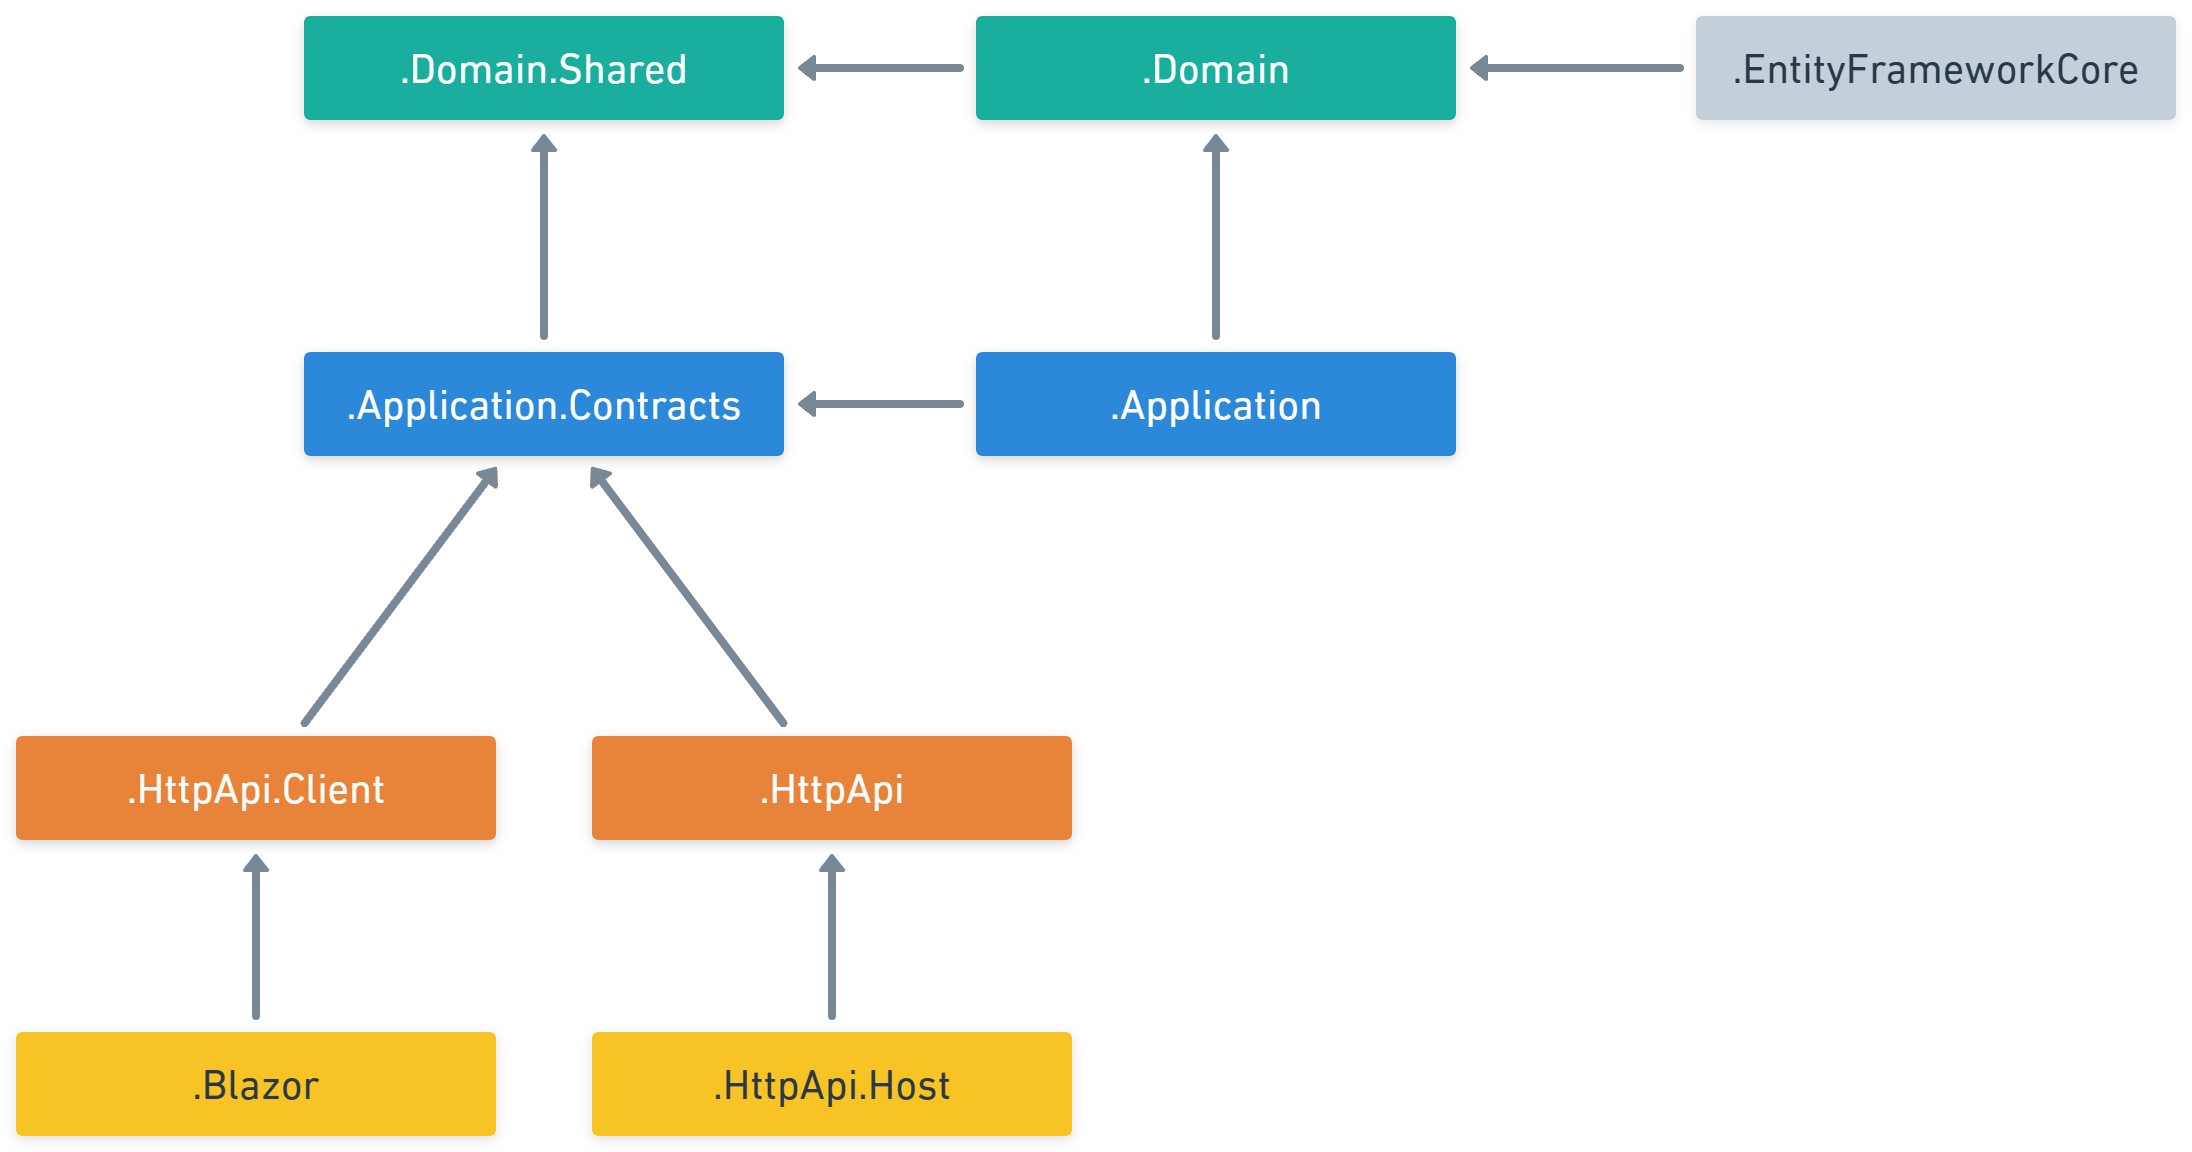
Projects are organized in src and test folders. src folder contains the actual application which is layered based on DDD principles as mentioned before.
The diagram below shows the layers & project dependencies of the application:
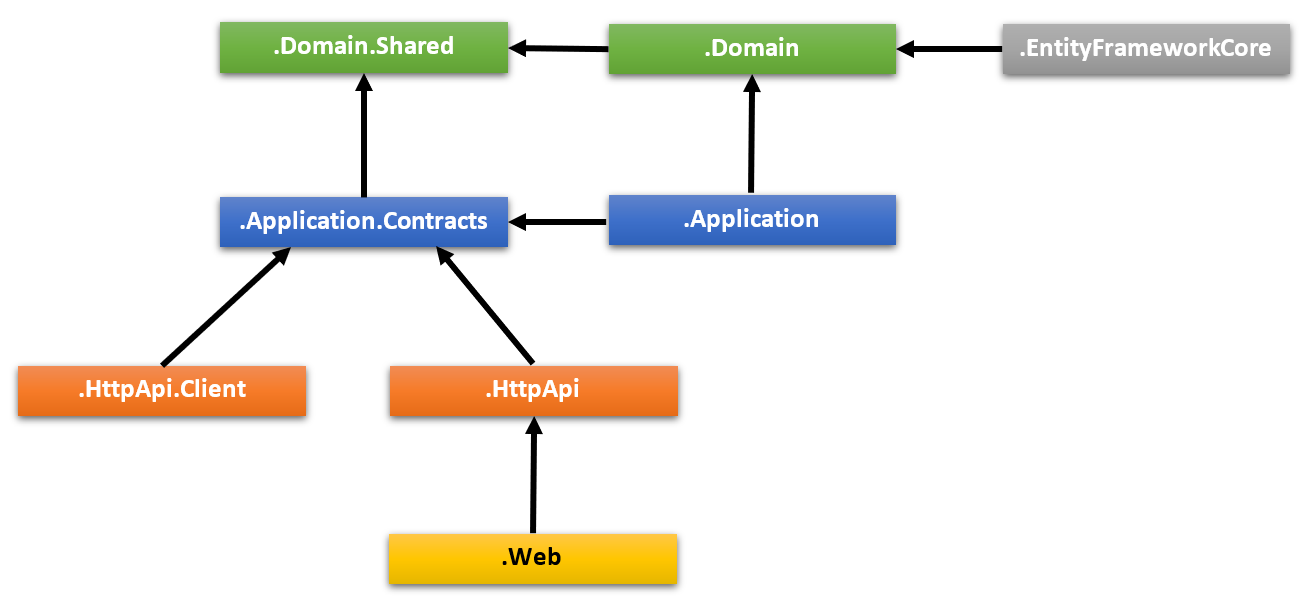
Each section below will explain the related project & its dependencies.
.Domain.Shared Project
This project contains constants, enums and other objects these are actually a part of the domain layer, but needed to be used by all layers/projects in the solution.
A BookType enum and a BookConsts class (which may have some constant fields for the Book entity, like MaxNameLength) are good candidates for this project.
- This project has no dependency on other projects in the solution. All other projects depend on this one directly or indirectly.
.Domain Project
This is the domain layer of the solution. It mainly contains entities, aggregate roots, domain services, value objects, repository interfaces and other domain objects.
A Book entity, a BookManager domain service and an IBookRepository interface are good candidates for this project.
- Depends on the
.Domain.Sharedbecause it uses constants, enums and other objects defined in that project.
.Application.Contracts Project
This project mainly contains application service interfaces and Data Transfer Objects (DTO) of the application layer. It exists to separate the interface & implementation of the application layer. In this way, the interface project can be shared to the clients as a contract package.
An IBookAppService interface and a BookCreationDto class are good candidates for this project.
- Depends on the
.Domain.Sharedbecause it may use constants, enums and other shared objects of this project in the application service interfaces and DTOs.
.Application Project
This project contains the application service implementations of the interfaces defined in the .Application.Contracts project.
A BookAppService class is a good candidate for this project.
- Depends on the
.Application.Contractsproject to be able to implement the interfaces and use the DTOs. - Depends on the
.Domainproject to be able to use domain objects (entities, repository interfaces... etc.) to perform the application logic.
.EntityFrameworkCore Project
This is the integration project for the EF Core. It defines the DbContext and implements repository interfaces defined in the .Domain project.
- Depends on the
.Domainproject to be able to reference to entities and repository interfaces.
This project is available only if you are using EF Core as the database provider. If you select another database provider, its name will be different.
.DbMigrator Project
This is a console application that simplifies the execution of database migrations on development and production environments. When you run this application, it:
- Creates the database if necessary.
- Applies the pending database migrations.
- Seeds initial data if needed.
This project has its own
appsettings.jsonfile. So, if you want to change the database connection string, remember to change this file too.
Especially, seeding initial data is important at this point. ABP has a modular data seed infrastructure. See its documentation for more about the data seeding.
While creating database & applying migrations seem only necessary for relational databases, this project comes even if you choose a NoSQL database provider (like MongoDB). In that case, it still seeds the initial data which is necessary for the application.
- Depends on the
.EntityFrameworkCoreproject (for EF Core) since it needs to access to the migrations. - Depends on the
.Application.Contractsproject to be able to access permission definitions, because the initial data seeder grants all permissions to the admin role by default.
.HttpApi Project
This project is used to define your API Controllers.
Most of the time you don't need to manually define API Controllers since ABP's Auto API Controllers feature creates them automagically based on your application layer. However, in case of you need to write API controllers, this is the best place to do it.
- Depends on the
.Application.Contractsproject to be able to inject the application service interfaces.
.HttpApi.Client Project
This is a project that defines C# client proxies to use the HTTP APIs of the solution. You can share this library to 3rd-party clients, so they can easily consume your HTTP APIs in their Dotnet applications (For other types of applications, they can still use your APIs, either manually or using a tool in their own platform)
Most of the time you don't need to manually create C# client proxies, thanks to ABP's Dynamic C# API Clients feature.
.HttpApi.Client.ConsoleTestApp project is a console application created to demonstrate the usage of the client proxies.
- Depends on the
.Application.Contractsproject to be able to share the same application service interfaces and DTOs with the remote service.
You can delete this project & dependencies if you don't need to create C# client proxies for your APIs.
.Web Project
This project contains the User Interface (UI) of the application if you are using ASP.NET Core MVC UI. It contains Razor pages, JavaScript files, CSS files, images and so on...
This project contains the main appsettings.json file that contains the connection string and other configurations of the application.
- Depends on the
.HttpApiproject since the UI layer needs to use APIs and the application service interfaces of the solution.
If you check the source code of the
.Web.csprojfile, you will see the references to the.Applicationand the.EntityFrameworkCoreprojects.These references are actually not needed while coding your UI layer, because the UI layer normally doesn't depend on the EF Core or the Application layer's implementation. These startup templates are ready for tiered deployment, where the API layer is hosted on a separate server than the UI layer.
However, if you don't choose the
--tieredoption, these references will be in the .Web project to be able to host the Web, API and application layers in a single application endpoint.This gives you the ability to use domain entities & repositories in your presentation layer. However, this is considered as a bad practice according to DDD.
Test Projects
The solution has multiple test projects, one for each layer:
.Domain.Testsis used to test the domain layer..Application.Testsis used to test the application layer..EntityFrameworkCore.Testsis used to test EF Core configuration and custom repositories..Web.Testsis used to test the UI (if you are using ASP.NET Core MVC UI)..TestBaseis a base (shared) project for all tests.
In addition, .HttpApi.Client.ConsoleTestApp is a console application (not an automated test project) which demonstrate the usage of HTTP APIs from a .NET application.
Test projects are prepared for integration testing;
- It is fully integrated into the ABP framework and all services in your application.
- It uses SQLite in-memory database for EF Core. For MongoDB, it uses the EphemeralMongo library.
- Authorization is disabled, so any application service can be easily used in tests.
You can still create unit tests for your classes which will be harder to write (because you will need to prepare mock/fake objects), but faster to run (because it only tests a single class and skips all the initialization processes).
How to Run?
Set .Web as the startup project and run the application. The default username is admin and the password is 1q2w3E*.
See Getting Started With the ASP.NET Core MVC Template for more information.
Tiered Structure
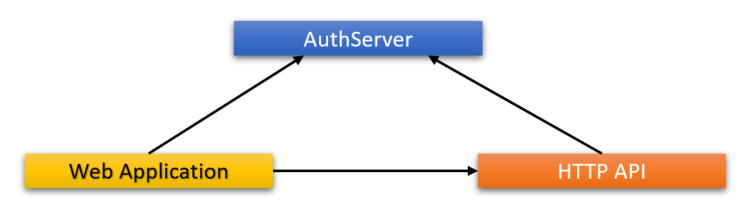
If you have selected the ASP.NET Core UI and specified the --tiered option, the solution created will be a tiered solution. The purpose of the tiered structure is to be able to deploy Web applications and HTTP API to different servers:
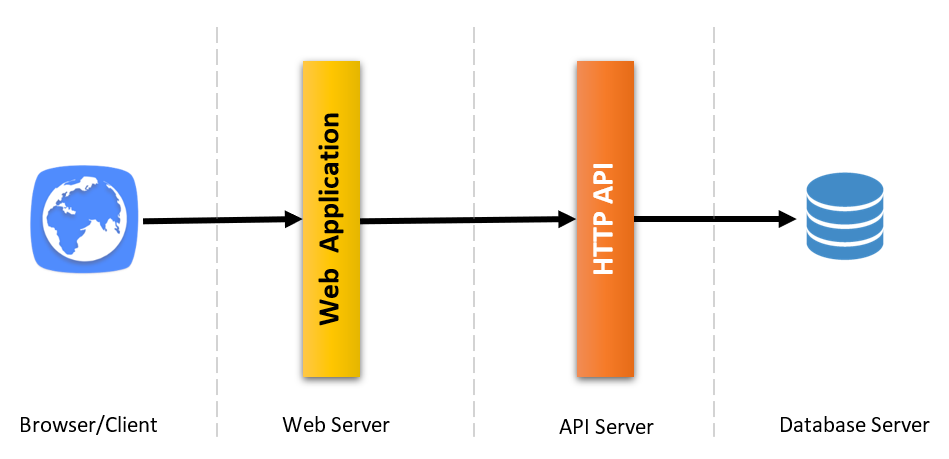
- Browser runs your UI by executing HTML, CSS & JavaScript.
- Web servers host static UI files (CSS, JavaScript, image... etc.) & dynamic components (e.g. Razor pages). It performs HTTP requests to the API server to execute the business logic of the application.
- The API Server hosts the HTTP APIs which then use the application & domain layers of the application to perform the business logic.
- Finally, database server hosts your database.
So, the resulting solution allows a 4-tiered deployment, by comparing to 3-tiered deployment of the default structure explained before.
Unless you actually need such a 4-tiered deployment, it's suggested to go with the default structure which is simpler to develop, deploy and maintain.
The solution structure is shown below:
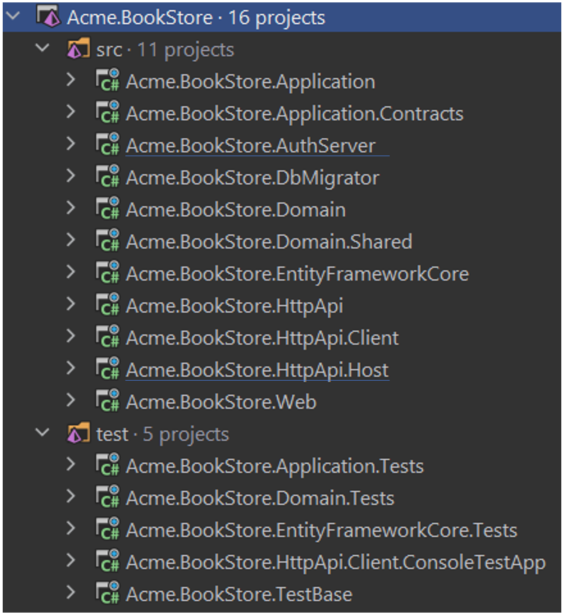
As different from the default structure, two new projects come into play: .AuthServer & .HttpApi.Host.
.AuthServer Project
This project is used as an authentication server for other projects. .Web project uses OpenId Connect Authentication to get identity and access tokens for the current user from the AuthServer. Then uses the access token to call the HTTP API server. HTTP API server uses bearer token authentication to obtain claims from the access token to authorize the current user.
ABP uses the OpenIddict Module that uses the open-source OpenIddict-core library for the authentication between applications. See OpenIddict documentation for details about the OpenIddict and OpenID Connect protocol.
It has its own appsettings.json that contains database connection and other configurations.
.HttpApi.Host Project
This project is an application that hosts the API of the solution. It has its own appsettings.json that contains database connection and other configurations.
.Web Project
Just like the default structure, this project contains the User Interface (UI) of the application. It contains razor pages, JavaScript files, style files, images and so on...
This project contains an appsettings.json file, but this time it does not have a connection string because it never connects to the database. Instead, it mainly contains the endpoint of the remote API server and the authentication server.
Pre-requirements
- Redis: The applications use Redis as a distributed cache. So, you need to have Redis installed & running.
How to Run?
You should run the application with the given order:
- First, run the
.AuthServersince other applications depend on it. - Then run the
.HttpApi.Hostsince it is used by the.Webapplication. - Finally, you can run the
.Webproject and login to the application (usingadminas the username and1q2w3E*as the password).
Blazor UI
If you choose Blazor as the UI Framework (using the -u blazor or -u blazor-server option), the solution will have a project named .Blazor. This project contains the Blazor UI application. According to your choice, it will be a Blazor WebAssembly or Blazor Server application. If Blazor WebAssembly is selected, the solution will also have a .HttpApi.Host. This project is an ASP.NET Core application that hosts the backend application for the Blazor single page application.
.Blazor Project (Server)
The Blazor Server project is similar to the ASP.NET Core MVC project. It replaces .Web project with .Blazor in the solution structure above. It has the same folder structure and the same application flow. Since it's an ASP.NET Core application, it can contain .cshtml files and .razor components at the same time. If routing matches a razor component, the Blazor UI will be used. Otherwise, the request will be handled by the MVC framework.
.Blazor Project (WebAssembly)
The Blazor WebAssembly project is a single page application that runs on the browser. You'll see it as .Blazor project in the solution. It uses the .HttpApi.Host project to communicate with the backend. It can't be used without the backend application. It contains only .razor components. It's a pure client-side application. It doesn't have any server-side code. Everything in this layer will be for the client side.
Angular UI
If you choose Angular as the UI framework (using the -u angular option), the solution is being separated into two folders:
angularfolder contains the Angular UI application, the client-side code.aspnet-corefolder contains the ASP.NET Core solution, the server-side code.
The server-side is similar to the solution described above. *.HttpApi.Host project serves the API, so the Angular application consumes it.
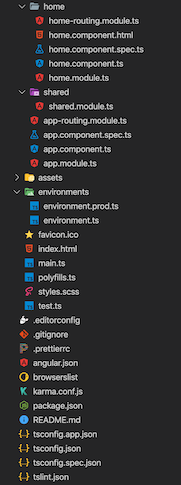
Angular application folder structure looks like below:
Each of ABP Commercial modules is an NPM package. Some ABP modules are added as a dependency in package.json. These modules install with their dependencies. To see all ABP packages, you can run the following command in the angular folder:
yarn list --pattern abp
Angular application module structure:
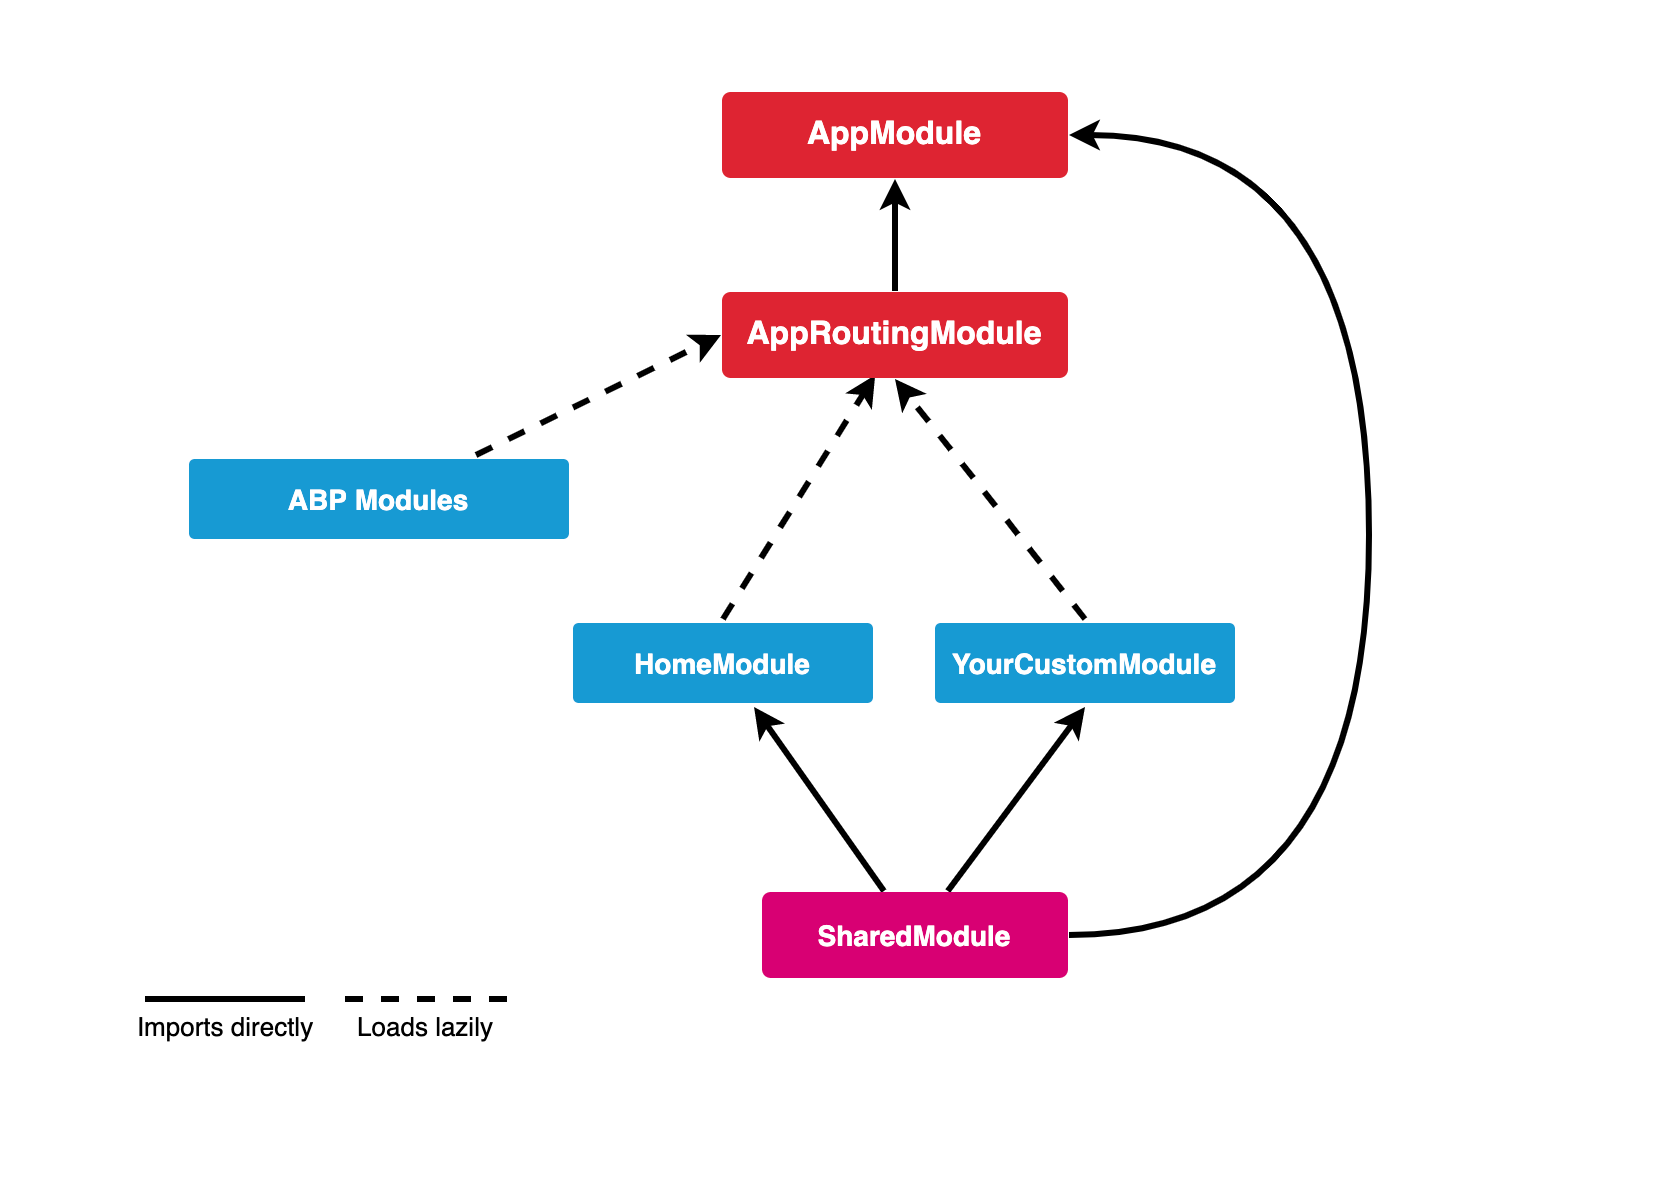
AppModule
AppModule is the root module of the application. Some of the ABP modules and some essential modules are imported to AppModule.
ABP Config modules have also been imported to AppModule for initial requirements of the lazy-loadable ABP modules.
AppRoutingModule
There are lazy-loadable ABP modules in the AppRoutingModule as routes.
Paths of ABP Modules should not be changed.
You should add routes property in the data object to add a link on the menu to redirect to your custom pages.
{
   path: 'dashboard',
   loadChildren: () => import('./dashboard/dashboard.module').then(m => m.DashboardModule),
   canActivate: [authGuard, permissionGuard],
   data: {
      routes: {
         name: 'ProjectName::Menu:Dashboard',
         order: 2,
         iconClass: 'fa fa-dashboard',
         requiredPolicy: 'ProjectName.Dashboard.Host'
      } as ABP.Route
   }
}
In the above example;
- If the user is not logged in, authGuard blocks access and redirects to the login page.
- permissionGuard checks the user's permission with the
requiredPolicyproperty of theroutesobject. If the user is not authorized to access the page, the 403 page appears. - The
nameproperty ofroutesis the menu link label. A localization key can be defined. - The
iconClassproperty of theroutesobject is the menu link icon class. - The
requiredPolicyproperty of theroutesobject is the required policy key to access the page.
After the above routes definition, if the user is authorized, the dashboard link will appear on the menu.
Shared Module
The modules that may be required for all modules have been imported to the SharedModule. You should import SharedModule to all modules.
See the Sharing Modules document.
Environments
The files under the src/environments folder have the essential configuration of the application.
Home Module
Home module is an example lazy-loadable module that loads on the root address of the application.
Styles
The required style files are added to the styles array in angular.json. AppComponent loads some style files lazily via LazyLoadService after the main bundle is loaded to shorten the first rendering time.
Testing
You should create your tests in the same folder as the file you want to test.
See the testing document.
Depended Packages
- NG Bootstrap is used as UI component library.
- NGXS is used as state management library.
- angular-oauth2-oidc is used to support for OAuth 2 and OpenId Connect (OIDC).
- Chart.js is used to create widgets.
- ngx-validate is used for dynamic validation of reactive forms.
React Native
If the -m react-native option is specified in the new project command, the solution includes the React Native application in the react-native folder.
The server-side is similar to the solution described above. *.HttpApi.Host project serves the API, so the React Native application consumes it.
The React Native application was generated with Expo. Expo is a set of tools built around React Native to help you quickly start an app and, while it has many features.
React Native application folder structure as like below:
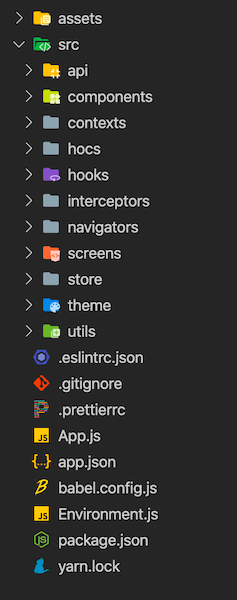
App.jsis the bootstrap component of the application.Environment.jsfile has the essential configuration of the application.prodanddevconfigurations are defined in this file.- Contexts are created in the
src/contextsfolder. - Higher order components are created in the
src/hocsfolder. - Custom hooks are created in
src/hooks. - Axios interceptors are created in the
src/interceptorsfolder. - Utility functions are exported from
src/utilsfolder.
Components
Components that can be used on all screens are created in the src/components folder. All components have been created as a function that is able to use hooks.
Screens
Screens are created by creating folders that separate their names in the src/screens folder. Certain parts of some screens can be split into components.
Each screen is used in a navigator in the src/navigators folder.
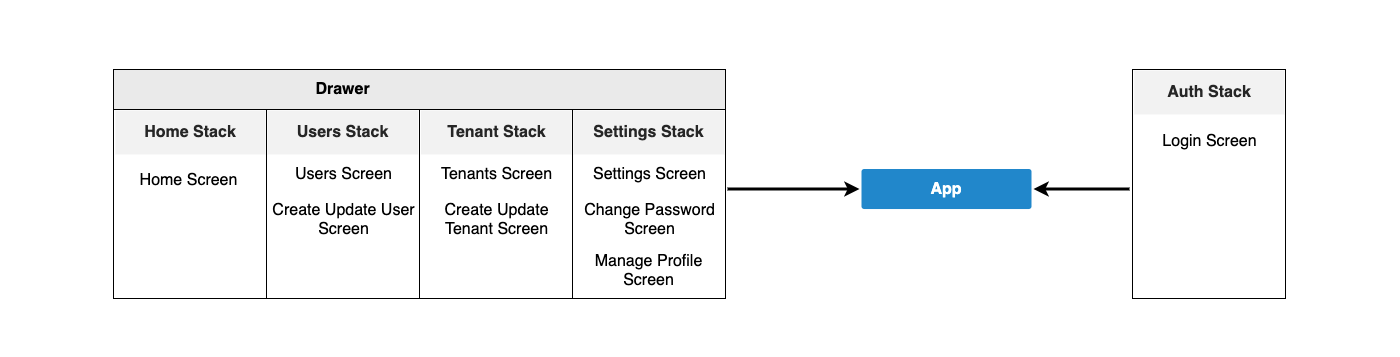
Navigation
React Navigation is used as a navigation library. Navigators are created in the src/navigators. A drawer navigator and several stack navigators have been created in this folder. See the above diagram for the navigation structure.
State Management
Redux is used as a state management library. Redux Toolkit library is used as a toolset for efficient Redux development.
Actions, reducers, sagas and selectors are created in the src/store folder. Store folder is as below:
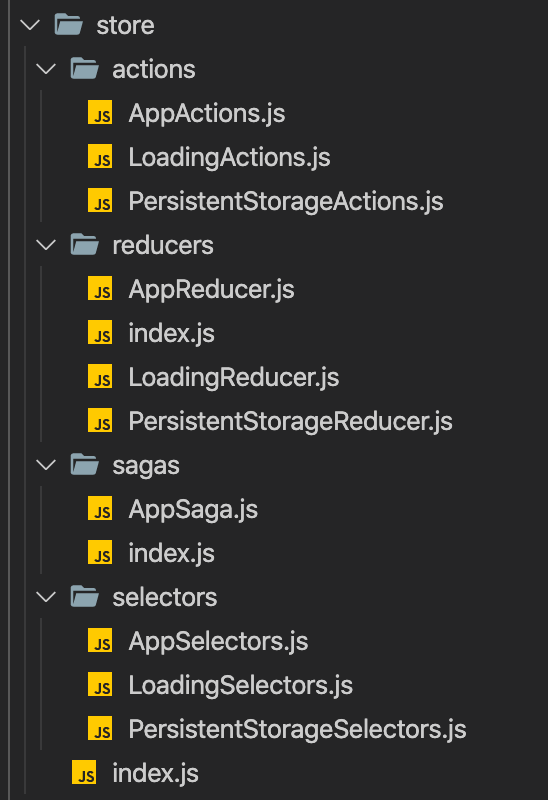
- Store is defined in the
src/store/index.jsfile. - Actions are payloads of information that send data from your application to your store.
- Reducers specify how the application's state changes in response to actions sent to the store.
- Redux-Saga is a library that aims to make application side effects (i.e. asynchronous things like data fetching and impure things like accessing the browser cache) easier to manage. Sagas are created in the
src/store/sagasfolder. - Reselect library is used to create memoized selectors. Selectors are created in the
src/store/selectorsfolder.
APIs
Axios is used as an HTTP client library. An Axios instance has exported from src/api/API.js file to make HTTP calls with the same config. src/api folder also has the API files that have been created for API calls.
Theming
Native Base is used as UI components library. Native Base components can customize easily. See the Native Base customize documentation. We followed the same way.
- Native Base theme variables are in the
src/theme/variablesfolder. - Native Base component styles are in the
src/theme/componentsfolder. These files have been generated with Native Base'sejectThemescript. - Styles of components override with the files under the
src/theme/overridesfolder.
Testing
Unit tests will be created.
See the Testing Overview document.
Depended Libraries
- Native Base is used as UI components library.
- React Navigation is used as navigation library.
- Axios is used as an HTTP client library.
- Redux is used as state management library.
- Redux Toolkit library is used as a toolset for efficient Redux development.
- Redux-Saga is used to manage asynchronous processes.
- Redux Persist is used as state persistence.
- Reselect is used to create memoized selectors.
- i18n-js is used as i18n library.
- expo-font library allows loading fonts easily.
- Formik is used to build forms.
- Yup is used for form validations.
Social / External Logins
If you want to configure social/external logins for your application, please follow the Social/External Logins document.
What's Next?
- The getting started document explains how to create a new application in a few minutes.
- The application development tutorial explains step by step application development.
 08-09 May


