文档模块
什么是文档模块?
文档模块是ABP框架的一个应用程序模块. 它简化了软件文档的制作. 这个模块是开源免费的.
集成
目前文档模块提供提供了两种支持的存储,Github与文件系统.
托管
文档模块是一个应用程序模块,不提供任何托管的解决方案,你可以在本地或云上托管文档.
版本
当你使用GitHub存储文档时,文档模块支持多版本. 如果你的文档具有多个版本, UI上有一个组合框,用于切换版本. 如果你选择使用文件系统存储文档, 那么它不支持多版本.
ABP框架的文档也是使用的此模块.
文档模块遵循 模块化架构最佳实践 指南.
安装
1- 下载
如果你没有现有的ABP项目, 这个步骤向你展示如何在abp.io创建一个新项目并添加文档模块. 如果你本地已经有了一个ABP项目, 那么你可以跳过这一步.
推荐使用ABP CLI创建新项目,使用以下命令行:
abp new Acme.MyProject
你也可以在浏览器中导航到 https://abp.io/get-started. 输入项目名称为 Acme.MyProject, 其它保持默认选项.
请注意,本文档包含了 Entity Framework Core 提供者 不过你也可以选择 MongoDB 做为数据库提供者.

2- 运行这个空项目
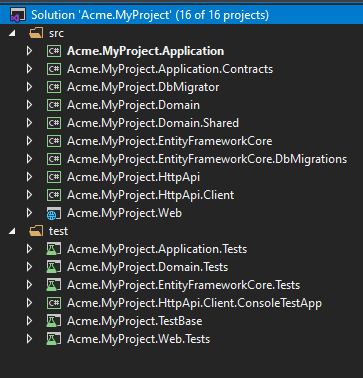
下载项目后, 解压压缩文档并且打开 Acme.MyProject.sln. 你可以看到这个解决方案包含了 Application, Application.Contrawcts, DbMigrator, Domain, Domain.Shared, EntityFrameworkCore, EntityFrameworkCore.DbMigations, HttpApi, HttpApi.Client 和 Web 项目. 右键选择 Acme.MyProject.Web 项目设置为启动项目.
数据库连接字符串位于Acme.MyProject.Web项目的appsettings.json中. 如果你有不同的数据库配置, 可以修改这个连接字符串.
{
  "ConnectionStrings": {
    "Default": "Server=(LocalDb)\\MSSQLLocalDB;Database=MyProject;Trusted_Connection=True;MultipleActiveResultSets=true"
  }
}
运行 Acme.MyProject.DbMigrator 项目,它会负责应用迁移与初始化种子数据. 数据库MyProject将在数据库服务器中创建.
现在一个空的ABP项目已经创建完成! 现在你可以运行项目并且查看网站.
输入用户名 admin 密码 1q2w3E* 登录到网站.
3- 安装模块
文档模块包托管在Nuget上面. 需要有四个包安装到你的应用程序中. 每个包必须安装到相关的项目.
3.1- 使用ABP CLI
建议使用ABP CLI安装模块,在解决方案文件 (.sln) 目录打开 CMD 窗口,运行以下命令:
abp add-module Volo.Docs
3.2- 手动安装
或者你也可以手动安装nuget包到每个项目:
安装Volo.Docs.Domain nuget包到
Acme.MyProject.Domain项目.Install-Package Volo.Docs.Domain安装Volo.Docs.EntityFrameworkCore nuget包到
Acme.MyProject.EntityFrameworkCore项目.Install-Package Volo.Docs.EntityFrameworkCore安装Volo.Docs.Application nuget包到
Acme.MyProject.Application项目.Install-Package Volo.Docs.Application安装Volo.Docs.Web nuget包到
Acme.MyProject.Web项目.Install-Package Volo.Docs.Web
3.2.1- 添加模块依赖
一个ABP模块必须声明 [DependsOn] attribute 如果它依赖于另一个模块. 每个模块都必须在相关的项目的[DependsOn]Attribute 中添加.
打开
MyProjectDomainModule.cs并且添加typeof(DocsDomainModule)如下所示;[DependsOn( typeof(DocsDomainModule), typeof(AbpIdentityDomainModule), typeof(AbpAuditingModule), typeof(BackgroundJobsDomainModule), typeof(AbpAuditLoggingDomainModule) )] public class MyProjectDomainModule : AbpModule { //... }打开
MyProjectEntityFrameworkCoreModule.cs并且添加typeof(DocsEntityFrameworkCoreModule)如下所示;[DependsOn( typeof(DocsEntityFrameworkCoreModule), typeof(MyProjectDomainModule), typeof(AbpIdentityEntityFrameworkCoreModule), typeof(AbpPermissionManagementEntityFrameworkCoreModule), typeof(AbpSettingManagementEntityFrameworkCoreModule), typeof(AbpEntityFrameworkCoreSqlServerModule), typeof(BackgroundJobsEntityFrameworkCoreModule), typeof(AbpAuditLoggingEntityFrameworkCoreModule) )] public class MyProjectEntityFrameworkCoreModule : AbpModule { //... }打开
MyProjectApplicationModule.cs并且添加typeof(DocsApplicationModule)如下所示;[DependsOn( typeof(DocsApplicationModule), typeof(MyProjectDomainModule), typeof(AbpIdentityApplicationModule))] public class MyProjectApplicationModule : AbpModule { public override void ConfigureServices(ServiceConfigurationContext context) { Configure<PermissionOptions>(options => { options.DefinitionProviders.Add<MyProjectPermissionDefinitionProvider>(); }); Configure<AbpAutoMapperOptions>(options => { options.AddProfile<MyProjectApplicationAutoMapperProfile>(); }); } }打开
MyProjectWebModule.cs并且添加typeof(DocsWebModule)如下所示;[DependsOn( typeof(DocsWebModule), typeof(MyProjectApplicationModule), typeof(MyProjectEntityFrameworkCoreModule), typeof(AbpAutofacModule), typeof(AbpIdentityWebModule), typeof(AbpAccountWebModule), typeof(AbpAspNetCoreMvcUiBasicThemeModule) )] public class MyProjectWebModule : AbpModule { //... }
3.2.2- 添加NPM包
打开 package.json 添加 @abp/docs 如下所示:
  {
      "version": "1.0.0",
      "name": "my-app",
      "private": true,
      "dependencies": {
          "@abp/aspnetcore.mvc.ui.theme.basic": "^2.9.0",
          "@abp/docs": "^2.9.0"
      }
  }
然后在 Acme.MyProject.Web 项目目录打开命令行终端运行以下命令:
yarngulp
4- 数据库集成
4.1- Entity Framework 集成
如果你选择了Entity Framework 做为数据库供应者,你需要配置文档模块. 做以下操作;
打开
MyProjectMigrationsDbContext.cs并且添加builder.ConfigureDocs()到OnModelCreating()方法中public class MyProjectMigrationsDbContext : AbpDbContext<MyProjectMigrationsDbContext> { public MyProjectMigrationsDbContext(DbContextOptions<MyProjectMigrationsDbContext> options) : base(options) { } protected override void OnModelCreating(ModelBuilder builder) { base.OnModelCreating(builder); /* Include modules to your migration db context */ builder.ConfigurePermissionManagement(); builder.ConfigureSettingManagement(); builder.ConfigureBackgroundJobs(); builder.ConfigureAuditLogging(); builder.ConfigureIdentity(); builder.ConfigureIdentityServer(); builder.ConfigureFeatureManagement(); builder.ConfigureTenantManagement(); builder.ConfigureDocs(); //Add this line to configure the Docs Module /* Configure customizations for entities from the modules included */ builder.Entity<IdentityUser>(b => { b.ConfigureCustomUserProperties(); }); /* Configure your own tables/entities inside the ConfigureQaDoc method */ builder.ConfigureMyProject(); } }打开
Visual Studio的包管理控制台选择Acme.MyProject.EntityFrameworkCore.DbMigrations做为默认项目. 然后编写以下命令为文档模块添加迁移.add-migration Added_Docs_Module当命令执行成功后 , 你会看到
Acme.MyProject.EntityFrameworkCore.DbMigrations\Migrations目录下有名为20181221111621_Added_Docs_Module的迁移文件.现在更新数据库. 在
Visual Studio的包管理控制台中执行以下代码. 要确认已Acme.MyProject.EntityFrameworkCore.DbMigrations项目设置为默认项目.update-database最后你可以查看数据库中创建的新表,例如你可以看到
DocsProjects表已经添加到数据库中.
5- 链接文档模块
文档模块的默认路由是;
/Documents
添加文档模块的链接到你的应用程序菜单中;
打开
MyProjectMenuContributor.cs并且在ConfigureMainMenuAsync()方法方法中添加以下代码.context.Menu.Items.Add(new ApplicationMenuItem("MyProject.Docs", l["Menu:Docs"], "/Documents"));最后 MyProjectMenuContributor.cs 有以下内容
    private async Task ConfigureMainMenuAsync(MenuConfigurationContext context)
    {
        var l = context.ServiceProvider.GetRequiredService<IStringLocalizer<MyProjectResource>>();

        context.Menu.Items.Insert(0, new ApplicationMenuItem("MyProject.Home", l["Menu:Home"], "/"));

        context.Menu.Items.Add(new ApplicationMenuItem("MyProject.Docs", l["Menu:Docs"], "/Documents"));
    }
Menu:Docs 关键词是本地化的Key. 要本地化菜单文本, 打开Acme.MyProject.Domain 中的 Localization\MyProject\zh-Hans.json. 添加以下行.
"Menu:Docs": "文档"
最后 zh-Hans.json 有以下内容
{
  "culture": "zh-Hans",
  "texts": {
    "Menu:Home": "首页",
      "Welcome": "欢迎",
      "LongWelcomeMessage": "欢迎来到该应用程序. 这是一个基于ABP框架的启动项目. 有关更多信息, 请访问 abp.io.",
    "Menu:Docs": "文档"
  }
}
现在菜单中已经添加了文档模块项. 运行Web应用程序并且在浏览器中打开 http://localhost:YOUR_PORT_NUMBER/documents URL.
你会看到一个警告;
There are no projects yet!
这个警告是正常的,因为我们还没有添加任何项目.
6- 添加文档项目
在数据库中打开 DocsProjects, 并且插入包含以下字段的新记录;
- Name: 在Web页面上文档的显示名称.
- ShortName: 在文档URL中使用的友好的简短URL名称.
- Format: 文档的格式 ( Markdown:
md, HTML:html) - DefaultDocumentName: 文档的初始页面.
- NavigationDocumentName: 导航菜单(索引)的文档.
- MinimumVersion: 显示文档的最低版本. 低于此的版本不会列出.
- DocumentStoreType: 文档的来源 ( GitHub:
GitHub,文件系统FileSystem). - ExtraProperties: 序列化的
JSON, 它存储所选DocumentStoreType的特殊配置. - MainWebsiteUrl: 用户单击文档模块页面Logo时跳转的URL.你只需设置为
/即可链接到网站根地址. - LatestVersionBranchName: 这是GitHub的配置.它是检索文档的分支名称.你可以将其设置为
master.
"GitHub" 项目的示例记录
你可以使用 ABP Framework GitHub文档来配置Github文档存储.
Name:
ABP framework (GitHub)ShortName:
abpFormat:
mdDefaultDocumentName:
IndexNavigationDocumentName:
docs-nav.jsonMinimumVersion:
<NULL>(no minimum version)DocumentStoreType:
GitHubExtraProperties:
{"GitHubRootUrl":"https://github.com/abpframework/abp/tree/{version}/docs/zh-Hans/","GitHubAccessToken":"***","GitHubUserAgent":""}注意
GitHubAccessToken用***掩盖. 这是一个私人令牌,你必须从GitHub获取它. 请参阅 https://help.github.com/articles/creating-a-personal-access-token-for-the-command-line/MainWebsiteUrl:
/LatestVersionBranchName:
master
对于 SQL 数据库,你可以使用下面的 T-SQL 命令将指定的示例插入到 DocsProjects 表中:
INSERT [dbo].[DocsProjects] ([Id], [Name], [ShortName], [Format], [DefaultDocumentName], [NavigationDocumentName], [MinimumVersion], [DocumentStoreType], [ExtraProperties], [MainWebsiteUrl], [LatestVersionBranchName], [ParametersDocumentName]) VALUES (N'12f21123-e08e-4f15-bedb-ae0b2d939658', N'ABP framework (GitHub)', N'abp', N'md', N'Index', N'docs-nav.json', NULL, N'GitHub', N'{"GitHubRootUrl":"https://github.com/abpframework/abp/tree/{version}/docs","GitHubAccessToken":"***","GitHubUserAgent":""}', N'/', N'master', N'')
请注意,GitHubAccessToken 被屏蔽了.它是一个私人令牌,你必须获得自己的令牌并替换 *** 字符串.
现在你可以运行应用程序并导航到 /Documents.
"FileSystem" 项目的示例记录
你可以使用 ABP Framework GitHub文档来配置你的文件系统存储.
Name:
ABP framework (FileSystem)ShortName:
abpFormat:
mdDefaultDocumentName:
IndexNavigationDocumentName:
docs-nav.jsonMinimumVersion:
<NULL>(no minimum version)DocumentStoreType:
FileSystemExtraProperties:
{"Path":"C:\\Github\\abp\\docs"}请注意
Path必须使用本地docs目录替换. 你可以从https://github.com/abpframework/abp/tree/master/docs获取ABP Framework的文档并且复制到该目录C:\\Github\\abp\\docs使其正常工作.MainWebsiteUrl:
/LatestVersionBranchName:
<NULL>
对于 SQL 数据库,你可以使用下面的 T-SQL 命令将指定的示例插入到 DocsProjects 表中:
INSERT [dbo].[DocsProjects] ([Id], [Name], [ShortName], [Format], [DefaultDocumentName], [NavigationDocumentName], [MinimumVersion], [DocumentStoreType], [ExtraProperties], [MainWebsiteUrl], [LatestVersionBranchName], [ParametersDocumentName]) VALUES (N'12f21123-e08e-4f15-bedb-ae0b2d939659', N'ABP framework (FileSystem)', N'abp', N'md', N'Index', N'docs-nav.json', NULL, N'FileSystem', N'{"Path":"C:\\Github\\abp\\docs"}', N'/', NULL, N'')
添加上面的一个示例项目后运行该应用程序. 在菜单中你会看到文档 链接,点击菜单链接打开文档页面.
到目前为止, 我们已经从abp.io网站创建了一个新的应用程序,并为Docs模块做好准备.
7- 添加一个新文档
在示例项目记录中, 你可以看到 Format 被指定为 md 指的是 Mark Down. 你可以打开下面的链接查看语法;
https://github.com/adam-p/markdown-here/wiki/Markdown-Cheatsheet
ABP文档模块可以把MarkDown渲染为HTML.
现在让我们看一下Markdown格式的示例文档.
# This is a header
Welcome to Docs Module.
## This is a sub header
[This is a link](https://abp.io)

## This is a code block
```csharp
public class Person
{
public string Name { get; set; }
public string Address { get; set; }
}
```
你可以使用 ABP Framework 的文档做为示例:
https://github.com/abpframework/abp/blob/master/docs/zh-Hans/
有条件的部分功能(使用Scriban)
文档模块使用Scriban有条件的显示或隐藏文档的某些部分. 使用该功能你需要为每一种语言创建一个JSON文件做为参数文档. 它包含所有键值以及它们的显示名称.
{
    "parameters": [{
        "name": "UI",
        "displayName": "UI",
        "values": {
          "MVC": "MVC / Razor Pages",
          "NG": "Angular"
        }
      },
      {
        "name": "DB",
        "displayName": "Database",
        "values": {
          "EF": "Entity Framework Core",
          "Mongo": "MongoDB"
        }
      },
      {
        "name": "Tiered",
        "displayName": "Tiered",
        "values": {
          "No": "Not Tiered",
          "Yes": "Tiered"
        }
      }]
}
因为并不是项目中的每个文档都有章节或者不需要所有的参数,你必须声明哪些参数将用于对文档进行分段,在文档的任何地方都可以使用JSON块.
.....
........
这个部分会在渲染时自动删除.前提是这些键值必须与参数文档中的键值匹配.

现在你可以使用 Scriban 语法在文档中创建章节.
示例 :
还可以在文本中使用变量,在其键中添加 _Value 后缀:
This document assumes that you prefer to use **** as the UI framework and **** as the database provider.
如果你想要得到的当前文档的语言或版本,可以使用预定义的 Document_Language_Code 和 DOCUMENT_VERSION 键(这对于创建重定向到另一个地区中另一个文档系统的链接很有用).
重要提示: Scriban 的语法是 " and ". 如果要在文档(如Angular文档)中使用转义,则必须使用转义块. 参阅 Scriban文档 了解更多信息.
8- 创建文档导航
导航文档是文档页面的主菜单. 它位于页面的左侧,是一个JSON 文件. 请查看以下示例导航文档以了解结构.
{
   "items":[
      {
         "text":"Sample Menu Item - 1",
         "items":[
            {
               "text":"Sample Menu Item - 1.1",
               "items":[
                  {
                     "text":"Sample Menu Item - 1.1.1",
                     "path":"SampleMenuItem_1_1_1.md"
                  }
               ]
            },
            {
               "text":"Sample Menu Item - 1.2",
               "items":[
                  {
                     "text":"Sample Menu Item - 1.2.1",
                     "path":"SampleMenuItem_1_2_1.md"
                  },
                  {
                     "text":"Sample Menu Item - 1.2.2",
                     "path":"SampleMenuItem_1_2_2.md"
                  }
               ]
            }
         ]
      },
      {
         "text":"Sample Menu Item - 2",
         "items":[
            {
               "text":"Sample Menu Item - 2.1",
               "items":[
                  {
                     "text":"Sample Menu Item - 2.1.1",
                     "path":"SampleMenuItem_2_1_1.md"
                  }
               ]
            }
         ]
      }
   ]
}
上面的示例 JSON 文件将下面的导航菜单呈现为 HTML .

最后,为你的项目添加了一个新的Docs模块, 该模块由GitHub提供.
全文搜索(Elastic Search)
文档模块支持使用Elastic Search对内容进行全文搜索. 默认没有启用, 你可以配置DocsElasticSearchOptions启用它.
Configure<DocsElasticSearchOptions>(options =>
{
    options.Enable = true;
    options.IndexName = "your_index_name"; //default IndexName is abp_documents
});
应用程序启动后如果Index不存在则会自动创建Index.
DefaultElasticClientProvider负责创建IElasticClient, 默认情况下它会从IConfiguration中读取Elastic Search的Url.
如果你的 IElasticClient 需要其它配置请使用重写 IElasticClientProvider 服务并在依赖注入系统中替换它.
{
  "ElasticSearch": {
    "Url": "http://localhost:9200"
  }
}
下一步
文档模块也可以做为独立的应用程序. 查看 VoloDocs.
 08-09 五月


