Angular Tutorial - Part II
About this Tutorial
This is the second part of the Angular tutorial series. See all parts:
- Part I: Create the project and a book list page
- Part II: Create, Update and Delete books (this tutorial)
- Part III: Integration Tests
You can access to the source code of the application from the GitHub repository.
Creating a New Book
In this section, you will learn how to create a new modal dialog form to create a new book.
Type Definition
Create an interface, named CreateUpdateBookInput in the books.ts as shown below:
export namespace Books {
  //...
  export interface CreateUpdateBookInput {
    name: string;
    type: BookType;
    publishDate: string;
    price: number;
  }
}
CreateUpdateBookInput interface matches the CreateUpdateBookDto in the backend.
Service Method
Open the books.service.ts and add a new method, named create to perform an HTTP POST request to the server:
create(createBookInput: Books.CreateUpdateBookInput): Observable<Books.Book> {
  return this.restService.request<Books.CreateUpdateBookInput, Books.Book>({
    method: 'POST',
    url: '/api/app/book',
    body: createBookInput
  });
}
restService.requestfunction gets generic parameters for the types sent to and received from the server. This example sends aCreateUpdateBookInputobject and receives aBookobject (you can setvoidfor request or return type if not used).
State Definitions
Add the CreateUpdateBook action to the books.actions.ts as shown below:
import { Books } from '../models';

export class CreateUpdateBook {
  static readonly type = '[Books] Create Update Book';
  constructor(public payload: Books.CreateUpdateBookInput) {}
}
Open books.state.ts and define the save method that will listen to a CreateUpdateBook action to create a book:
import { ... , CreateUpdateBook } from '../actions/books.actions';
import { ... , switchMap } from 'rxjs/operators';
//...
@Action(CreateUpdateBook)
save(ctx: StateContext<Books.State>, action: CreateUpdateBook) {
  return this.booksService
      .create(action.payload)
      .pipe(switchMap(() => ctx.dispatch(new GetBooks())));
}
When the SaveBook action dispatched, the save method is executed. It call create method of the BooksService defined before. After the service call, BooksState dispatches the GetBooks action to get books again from the server to refresh the page.
Add a Modal to BookListComponent
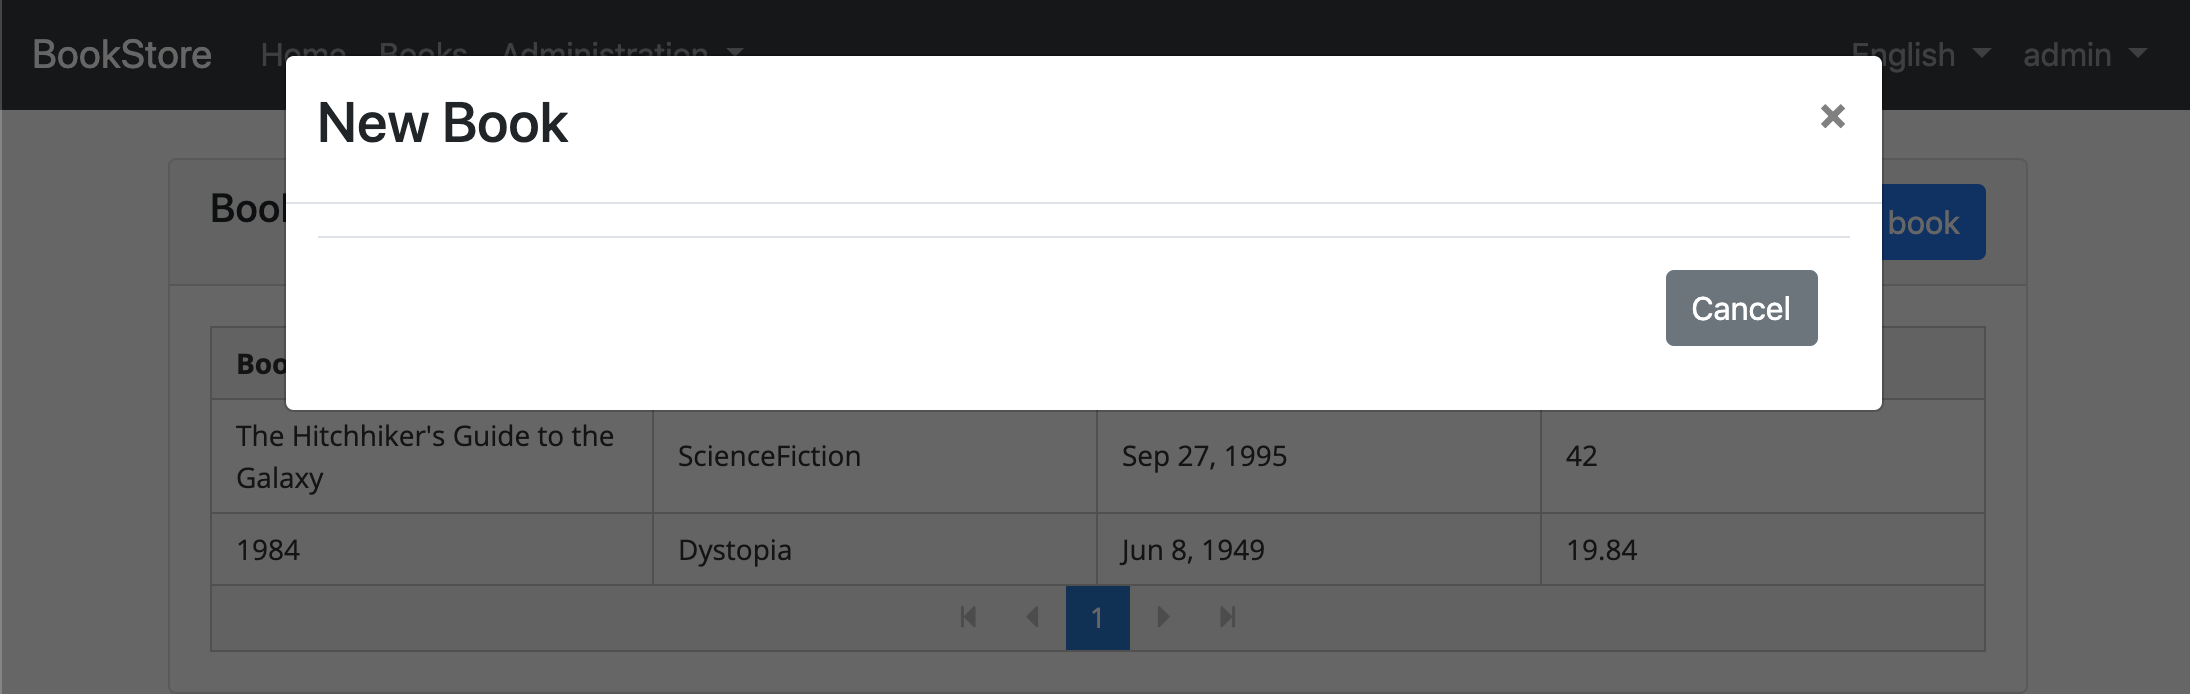
Open the book-list.component.html and add the abp-modal to show/hide the modal to create a new book.
<abp-modal [(visible)]="isModalOpen">
  <ng-template #abpHeader>
    <h3>New Book</h3>
  </ng-template>

  <ng-template #abpBody> </ng-template>

  <ng-template #abpFooter>
    <button type="button" class="btn btn-secondary" #abpClose>
      Cancel
    </button>
  </ng-template>
</abp-modal>
abp-modal is a pre-built component to show modals. While you could use another approach to show a modal, abp-modal provides additional benefits.
Add a button, labeled New book to show the modal:
<div class="row">
  <div class="col col-md-6">
    <h5 class="card-title">
      Books
    </h5>
  </div>
  <div class="text-right col col-md-6">
    <button id="create-role" class="btn btn-primary" type="button" (click)="createBook()">
      <i class="fa fa-plus mr-1"></i> <span>New book</span>
    </button>
  </div>
</div>
Open the book-list.component.ts and add isModalOpen variable and createBook method to show/hide the modal.
isModalOpen = false;

//...

createBook() {
  this.isModalOpen = true;
}
Create a Reactive Form
Reactive forms provide a model-driven approach to handling form inputs whose values change over time.
Add a form variable and inject a FormBuilder service to the book-list.component.ts as shown below (remember add the import statement).
import { FormGroup, FormBuilder, Validators } from '@angular/forms';

form: FormGroup;

constructor(
  //...
  private fb: FormBuilder
) {}
The FormBuilder service provides convenient methods for generating controls. It reduces the amount of boilerplate needed to build complex forms.
Add the buildForm method to create book form.
buildForm() {
  this.form = this.fb.group({
    name: ['', Validators.required],
    type: [null, Validators.required],
    publishDate: [null, Validators.required],
    price: [null, Validators.required],
  });
}
- The
groupmethod ofFormBuilder(fb) creates aFormGroup. - Added
Validators.requiredstatic method that validates the related form element.
Modify the createBook method as shown below:
createBook() {
  this.buildForm();
  this.isModalOpen = true;
}
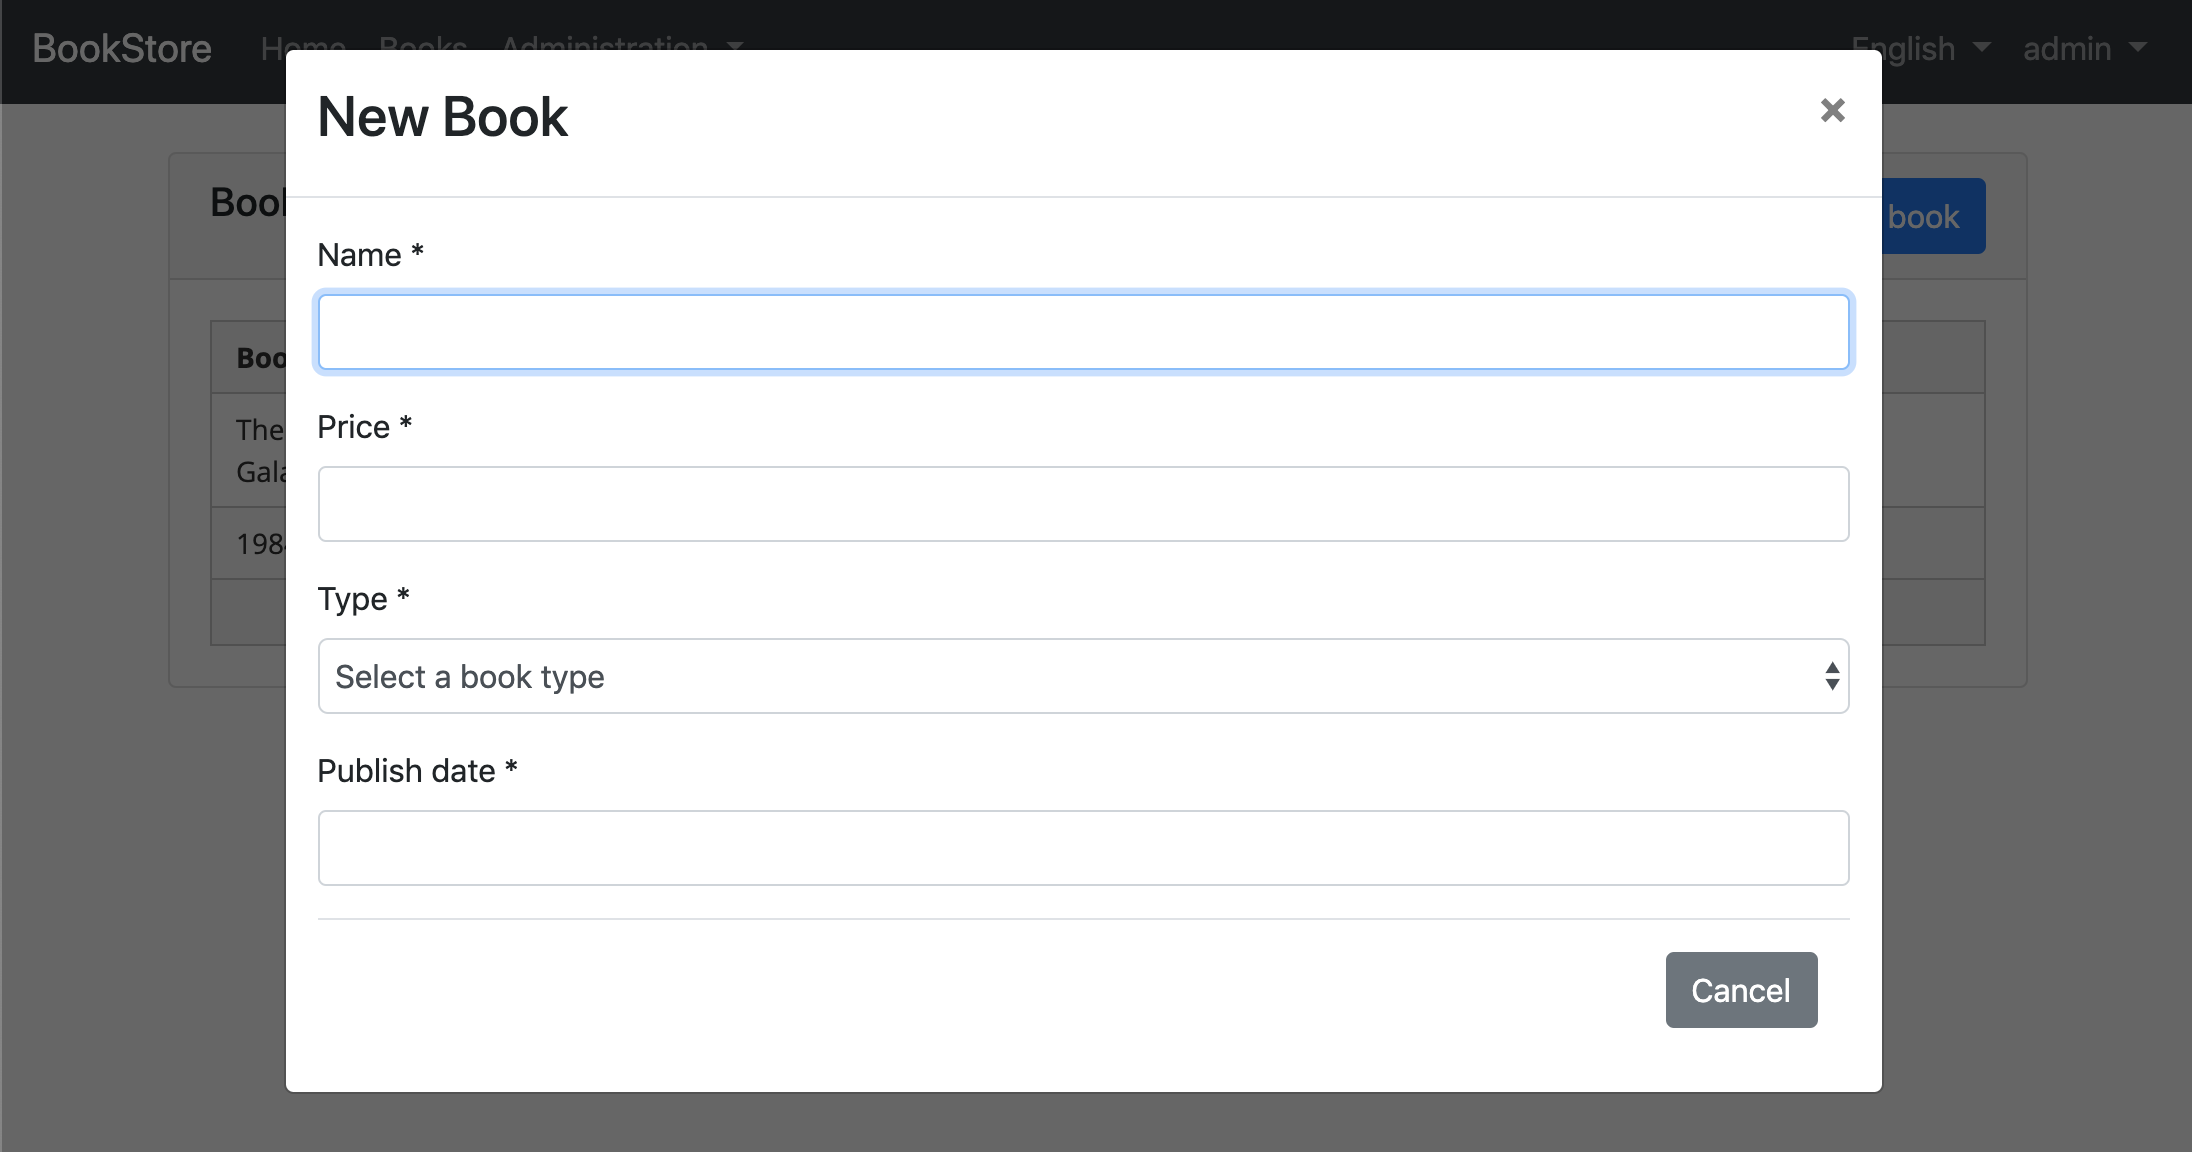
Create the DOM Elements of the Form
Open book-list.component.html and add the form in the body template of the modal.
<ng-template #abpBody>
  <form [formGroup]="form">
    <div class="form-group">
      <label for="book-name">Name</label><span> * </span>
      <input type="text" id="book-name" class="form-control" formControlName="name" autofocus />
    </div>

    <div class="form-group">
      <label for="book-price">Price</label><span> * </span>
      <input type="number" id="book-price" class="form-control" formControlName="price" />
    </div>

    <div class="form-group">
      <label for="book-type">Type</label><span> * </span>
      <select class="form-control" id="book-type" formControlName="type">
        <option [ngValue]="null">Select a book type</option>
        <option [ngValue]="booksType[type]" *ngFor="let type of bookTypeArr"> {{ type }}</option>
      </select>
    </div>

    <div class="form-group">
      <label>Publish date</label><span> * </span>
      <input
        #datepicker="ngbDatepicker"
        class="form-control"
        name="datepicker"
        formControlName="publishDate"
        ngbDatepicker
        (click)="datepicker.toggle()"
      />
    </div>
  </form>
</ng-template>
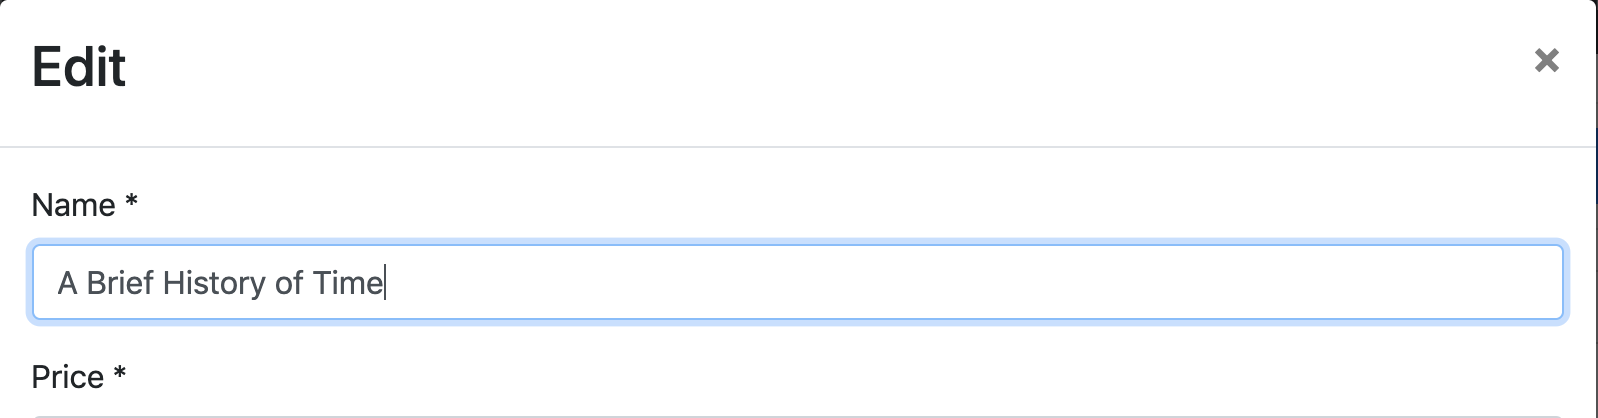
- This template creates a form with Name, Price, Type and Publish date fields.
We've used NgBootstrap datepicker in this component.
Datepicker Requirements
You need to import NgbDatepickerModule to the books.module.ts:
import { NgbDatepickerModule } from '@ng-bootstrap/ng-bootstrap';

@NgModule({
  imports: [
    // ...
    NgbDatepickerModule,
  ],
})
export class BooksModule {}
Then open the book-list.component.ts and add providers as shown below:
import { NgbDateNativeAdapter, NgbDateAdapter } from '@ng-bootstrap/ng-bootstrap';

@Component({
  // ...
  providers: [{ provide: NgbDateAdapter, useClass: NgbDateNativeAdapter }],
})
export class BookListComponent implements OnInit {
// ...
The
NgbDateAdapterconverts Datepicker value toDatetype. See the datepicker adapters for more details.
Create the Book Type Array
Open the book-list.component.ts and then create an array, named bookTypeArr:
//...
booksType = Books.BookType;

bookTypeArr = Object.keys(Books.BookType).filter(
    bookType => typeof this.booksType[bookType] === 'number'
);
The bookTypeArr contains the fields of the BookType enum. Resulting array is shown below:
['Adventure', 'Biography', 'Dystopia', 'Fantastic' ...]
This array was used in the previous form template (in the ngFor loop).
Saving the Book
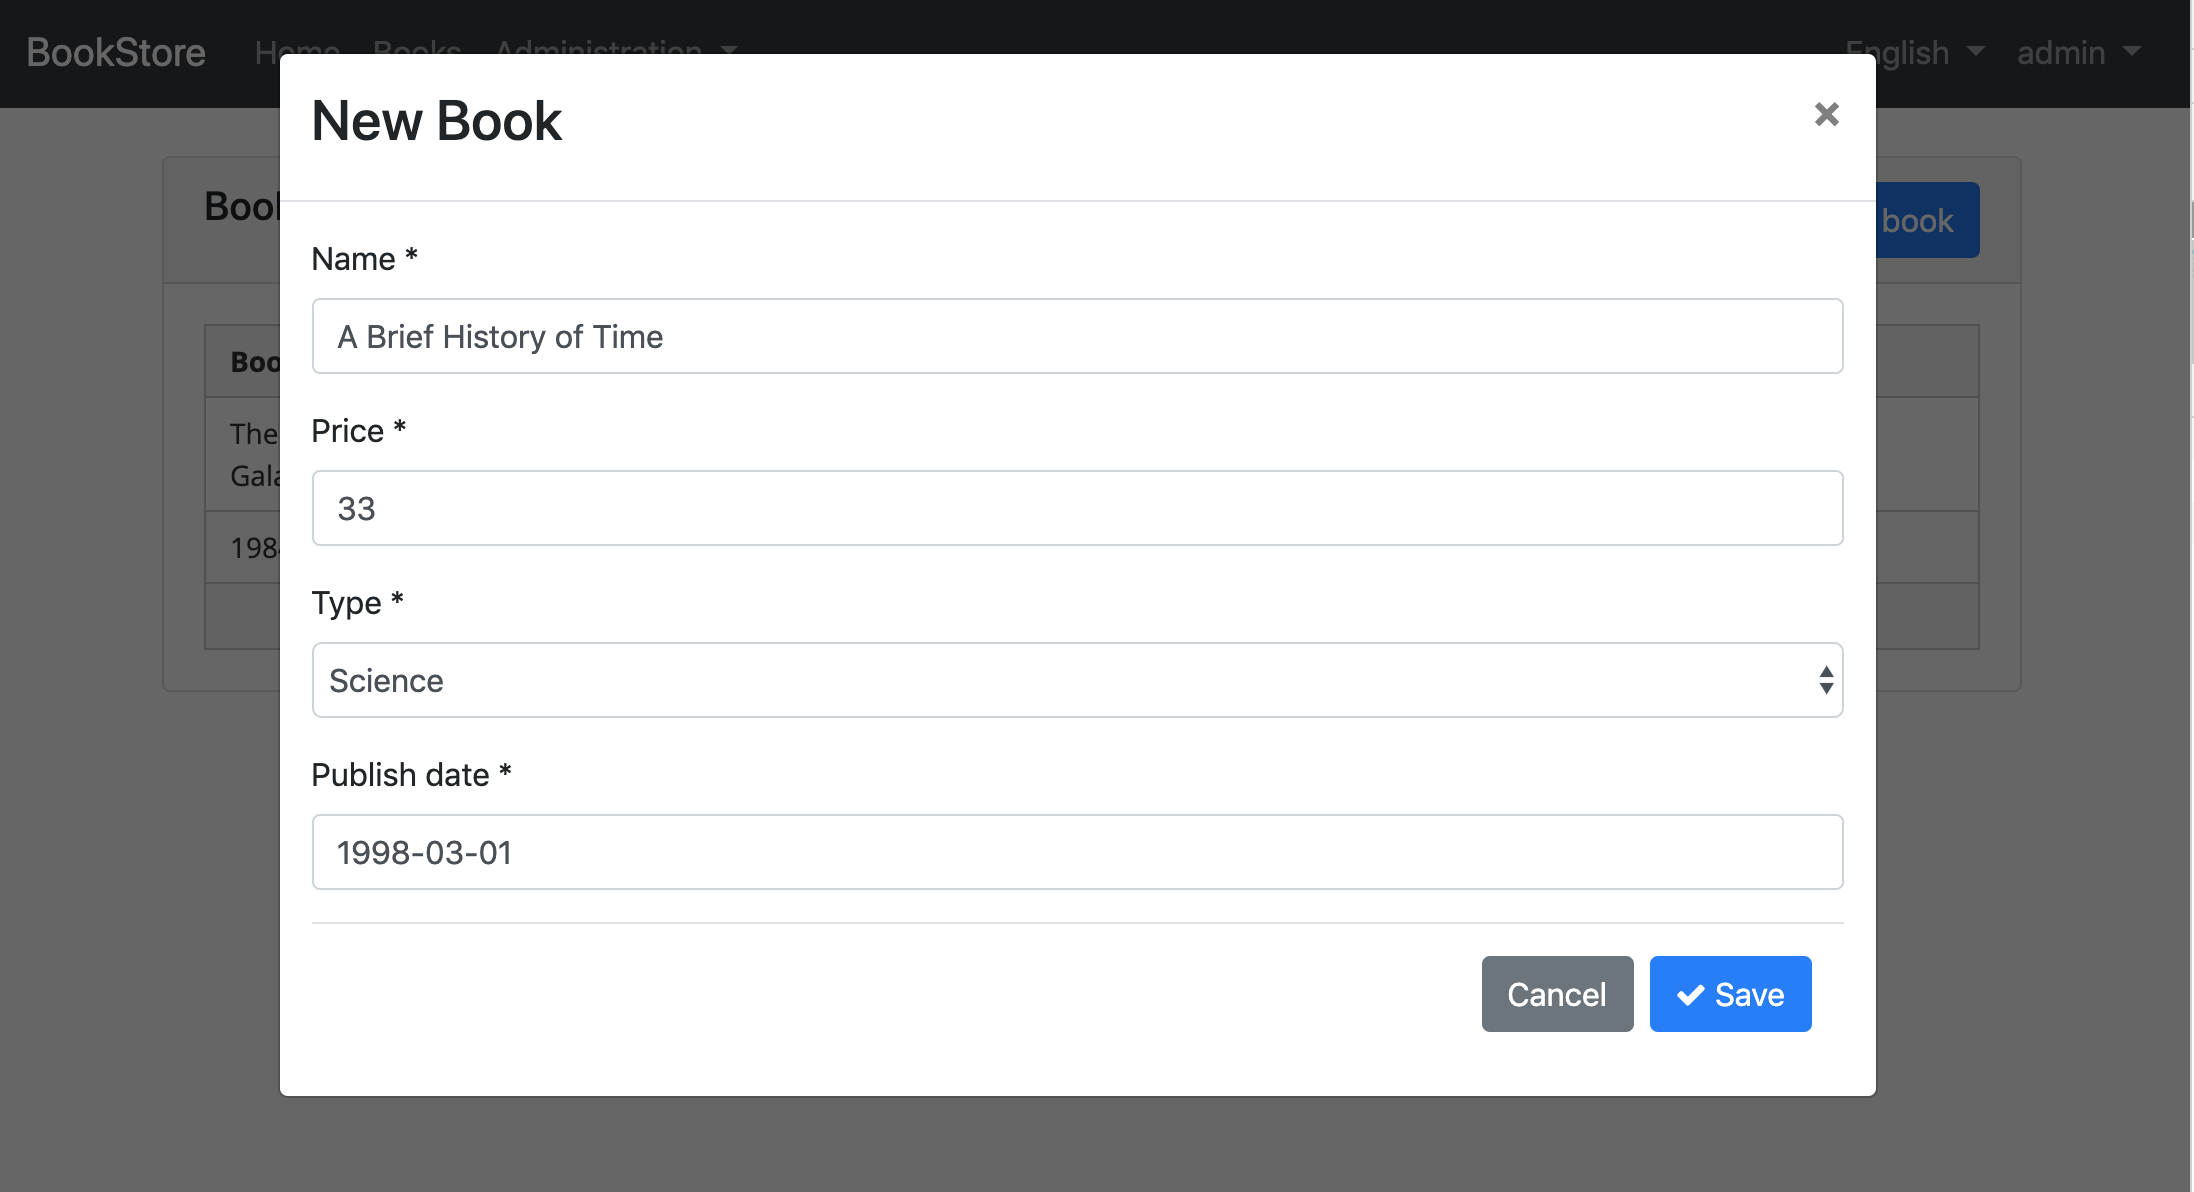
Open the book-list.component.html and add an abp-button to save the form.
<ng-template #abpFooter>
  <button type="button" class="btn btn-secondary" #abpClose>
    Cancel
  </button>
  <button class="btn btn-primary" (click)="save()">
    <i class="fa fa-check mr-1"></i>
    Save
  </button>
</ng-template>
This adds a save button to the bottom area of the modal:
Then define a save method in the BookListComponent:
//...
import { ..., CreateUpdateBook } from '../../store/actions';
//...
save() {
  if (this.form.invalid) {
    return;
  }

  this.store.dispatch(new CreateUpdateBook(this.form.value)).subscribe(() => {
    this.isModalOpen = false;
    this.form.reset();
  });
}
Updating An Existing Book
BooksService
Open the books.service.ts and then add the getById and update methods.
getById(id: string): Observable<Books.Book> {
  return this.restService.request<void, Books.Book>({
    method: 'GET',
    url: `/api/app/book/${id}`
  });
}

update(updateBookInput: Books.CreateUpdateBookInput, id: string): Observable<Books.Book> {
  return this.restService.request<Books.CreateUpdateBookInput, Books.Book>({
    method: 'PUT',
    url: `/api/app/book/${id}`,
    body: updateBookInput
  });
}
CreateUpdateBook Action
Open the books.actions.ts and add id parameter to the CreateUpdateBook action:
export class CreateUpdateBook {
  static readonly type = '[Books] Create Update Book';
  constructor(public payload: Books.CreateUpdateBookInput, public id?: string) {}
}
Open books.state.ts and modify the save method as show below:
@Action(CreateUpdateBook)
save(ctx: StateContext<Books.State>, action: CreateUpdateBook) {
  let request;

  if (action.id) {
    request = this.booksService.update(action.payload, action.id);
  } else {
    request = this.booksService.create(action.payload);
  }

  return request.pipe(switchMap(() => ctx.dispatch(new GetBooks())));
}
BookListComponent
Inject BooksService dependency by adding it to the book-list.component.ts constructor and add a variable named selectedBook.
import { BooksService } from '../shared/books.service';
//...
selectedBook = {} as Books.Book;

constructor(
  //...
  private booksService: BooksService
)
booksService is used to get the editing book to prepare the form. Modify the buildForm method to reuse the same form while editing a book.
buildForm() {
  this.form = this.fb.group({
    name: [this.selectedBook.name || '', Validators.required],
    type: this.selectedBook.type || null,
    publishDate: this.selectedBook.publishDate ? new Date(this.selectedBook.publishDate) : null,
    price: this.selectedBook.price || null,
  });
}
Add the editBook method as shown below:
  editBook(id: string) {
    this.booksService.getById(id).subscribe(book => {
      this.selectedBook = book;
      this.buildForm();
      this.isModalOpen = true;
    });
  }
Added editBook method to get the editing book, build the form and show the modal.
Now, add the selectedBook definition to createBook method to reuse the same form while creating a new book:
  createBook() {
    this.selectedBook = {} as Books.Book;
    //...
  }
Modify the save method to pass the id of the selected book as shown below:
save() {
  if (this.form.invalid) {
    return;
  }

  this.store.dispatch(new CreateUpdateBook(this.form.value, this.selectedBook.id))
    .subscribe(() => {
      this.isModalOpen = false;
      this.form.reset();
    });
}
Add "Actions" Dropdown to the Table
Open the book-list.component.html and add modify the p-table as shown below:
<p-table [value]="books$ | async" [loading]="loading" [paginator]="true" [rows]="10">
  <ng-template pTemplate="header">
    <tr>
      <th>Actions</th>
      <th>Book name</th>
      <th>Book type</th>
      <th>Publish date</th>
      <th>Price</th>
    </tr>
  </ng-template>
  <ng-template pTemplate="body" let-data>
    <tr>
      <td>
        <div ngbDropdown class="d-inline-block">
          <button
            class="btn btn-primary btn-sm dropdown-toggle"
            data-toggle="dropdown"
            aria-haspopup="true"
            ngbDropdownToggle
          >
            <i class="fa fa-cog mr-1"></i>Actions
          </button>
          <div ngbDropdownMenu>
            <button ngbDropdownItem (click)="editBook(data.id)">Edit</button>
          </div>
        </div>
      </td>
      <td>{{ data.name }}</td>
      <td>{{ booksType[data.type] }}</td>
      <td>{{ data.publishDate | date }}</td>
      <td>{{ data.price }}</td>
    </tr>
  </ng-template>
</p-table>
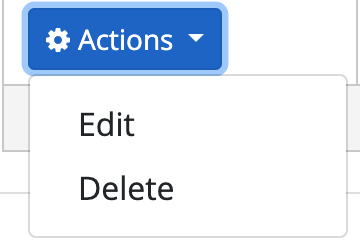
- Added a
thfor the "Actions" column. - Added
buttonwithngbDropdownToggleto open actions when clicked the button.
We've used to NgbDropdown for the dropdown menu of actions.
The final UI looks like:
Update the modal header to change the title based on the current operation:
<ng-template #abpHeader>
  <h3>{{ selectedBook.id ? 'Edit' : 'New Book' }}</h3>
</ng-template>
Deleting an Existing Book
BooksService
Open books.service.ts and add a delete method to delete a book with the id by performing an HTTP request to the related endpoint:
delete(id: string): Observable<void> {
  return this.restService.request<void, void>({
    method: 'DELETE',
    url: `/api/app/book/${id}`
  });
}
DeleteBook Action
Add an action named DeleteBook to books.actions.ts:
export class DeleteBook {
  static readonly type = '[Books] Delete';
  constructor(public id: string) {}
}
Open the books.state.ts and add the delete method that will listen to the DeleteBook action to delete a book:
import { ... , DeleteBook } from '../actions/books.actions';
//...
@Action(DeleteBook)
delete(ctx: StateContext<Books.State>, action: DeleteBook) {
  return this.booksService.delete(action.id).pipe(switchMap(() => ctx.dispatch(new GetBooks())));
}
- Added
DeleteBookto the import list. - Uses
bookServiceto delete the book.
#### Add a Delete Button
Open book-list.component.html and modify the ngbDropdownMenu to add the delete button as shown below:
<div ngbDropdownMenu>
  ...
  <button ngbDropdownItem (click)="delete(data.id, data.name)">
    Delete
  </button>
</div>
The final actions dropdown UI looks like below:
#### Delete Confirmation Dialog
Open book-list.component.ts and inject the ConfirmationService.
import { ConfirmationService } from '@abp/ng.theme.shared';
//...
constructor(
	//...
  private confirmationService: ConfirmationService
)
ConfirmationServiceis a simple service provided by ABP framework that internally uses the PrimeNG.
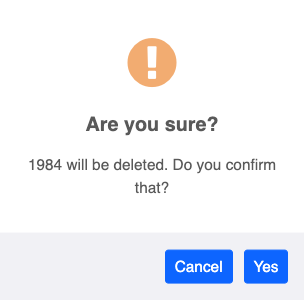
Add a delete method to the BookListComponent:
import { ... , DeleteBook } from '../../store/actions';
import { ... , Toaster } from '@abp/ng.theme.shared';
//...
delete(id: string, name: string) {
  this.confirmationService
    .error(`${name} will be deleted. Do you confirm that?`, 'Are you sure?')
    .subscribe(status => {
      if (status === Toaster.Status.confirm) {
        this.store.dispatch(new DeleteBook(id));
      }
    });
}
The delete method shows a confirmation popup and subscribes for the user response. DeleteBook action dispatched only if user clicks to the Yes button. The confirmation popup looks like below:
Next Part
See the next part of this tutorial.
