IIS Deployment
This document assumes that you prefer to use MVC / Razor Pages as the UI framework and Entity Framework Core as the database provider. For other options, please change the preference on top of this document.
Prerequisites
An IIS Server that is ready for deployment.
Install the hosting bundle.
Entity Framework Core database must be ready to use with your project.
If you want to publish in a local environment, this guide will use mkcert to create self-signed certificates. Follow the installation guide to install mkcert.
Generate an Authentication Certificate
If you're using OpenIddict, you need to generate an authentication certificate. You can execute this command in Web folder.
dotnet dev-certs https -v -ep authserver.pfx -p 00000000-0000-0000-0000-000000000000
00000000-0000-0000-0000-000000000000is the password of the certificate, you can change it to any password you want.
Creating the Publish Files
You can execute this commands in your project root folder.
dotnet publish ./src/Volo.Sample.DbMigrator/Volo.Sample.DbMigrator.csproj -c Release -o ./publish/dbmigrator # Replace with your project name
dotnet publish ./src/Volo.Sample.Web/Volo.Sample.Web.csproj -c Release -o ./publish/web # Replace with your project name
Run the DbMigrator With Your Custom Settings
Update the connection string and OpenIddict section with your domain names. Run the DbMigrator app.
For example, in a tiered MVC project.
{
  "ConnectionStrings": {
    "Default": "Server=volo.sample;Database=Sample;User Id=sa;Password=1q2w3E**;TrustServerCertificate=true"
  },
  "Redis": {
    "Configuration": "volo.sample"
  },
  "OpenIddict": {
    "Applications": {
      "Sample_Web": {
        "ClientId": "Sample_Web",
        "ClientSecret": "1q2w3e*",
        "RootUrl": "https://web.sample"
      },
      "Sample_Swagger": {
        "ClientId": "Sample_Swagger",
        "RootUrl": "https://api.sample"
      }
    }
  }
}
Preparing for Local Deployment
You can skip this part if you're going to deploy on a server with real domain names.
Creating a Self-Signed Certificate with mkcert
You can execute this command in your command prompt.
cd Desktop # or another path
mkcert -pkcs12 auth.sample api.sample web.sample # Replace with your domain names
Rename the created file extension to ".pfx"
Import the certificate to IIS
Add domain names to hosts file
Add domain names to hosts file(in Windows: C:\Windows\System32\drivers\etc\hosts, in Linux and macOS: /etc/hosts).
For example, in a tiered MVC project.
127.0.0.1 auth.sample
127.0.0.1 api.sample
127.0.0.1 web.sample
Publish the Application(s) On IIS
Update the appsettings
Update the appsettings according to your project type and domain names.
For example, in a tiered MVC project.
//AuthServer
{
  "App": {
    "SelfUrl": "https://auth.sample",
    "CorsOrigins": "https://api.sample,https://web.sample",
    "RedirectAllowedUrls": "https://api.sample,https://web.sample",
    "DisablePII": "false"
  },
  "ConnectionStrings": {
    "Default": "Server=volo.sample;Database=Sample;User Id=sa;Password=1q2w3E**;TrustServerCertificate=true"
  },
  "AuthServer": {
    "Authority": "https://auth.sample",
    "RequireHttpsMetadata": "true"
  },
  "StringEncryption": {
    "DefaultPassPhrase": "f9uRkTLdtAZLmlh3"
  },
  "Redis": {
    "Configuration": "volo.sample"
  }
}
//HttpApi.Host
{
  "App": {
    "SelfUrl": "https://api.sample",
    "CorsOrigins": "https://web.sample",
    "DisablePII": "false",
    "HealthCheckUrl": "/health-status"
  },
  "ConnectionStrings": {
    "Default": "Server=volo.sample;Database=Sample;User Id=sa;Password=1q2w3E**;TrustServerCertificate=true"
  },
  "Redis": {
    "Configuration": "volo.sample"
  },
  "AuthServer": {
    "Authority": "https://auth.sample",
    "RequireHttpsMetadata": "true",
    "SwaggerClientId": "Sample_Swagger"
  },
  "StringEncryption": {
    "DefaultPassPhrase": "f9uRkTLdtAZLmlh3"
  }
}
//Web
{
  "App": {
    "SelfUrl": "https://web.sample",
    "DisablePII": "false"
  },
  "RemoteServices": {
    "Default": {
      "BaseUrl": "https://api.sample/"
    },
    "AbpAccountPublic": {
      "BaseUrl": "https://auth.sample/"
    }
  },
  "Redis": {
    "Configuration": "volo.sample"
  },
  "AuthServer": {
    "Authority": "https://auth.sample",
    "RequireHttpsMetadata": "true",
    "ClientId": "Sample_Web",
    "ClientSecret": "1q2w3e*"
  },
  "StringEncryption": {
    "DefaultPassPhrase": "f9uRkTLdtAZLmlh3"
  }
}
Copy the .pfx file
You need to copy pfx file from ./src/Web to ./publish/web folder.
Publish the Applications(s)
You can add as website from IIS.
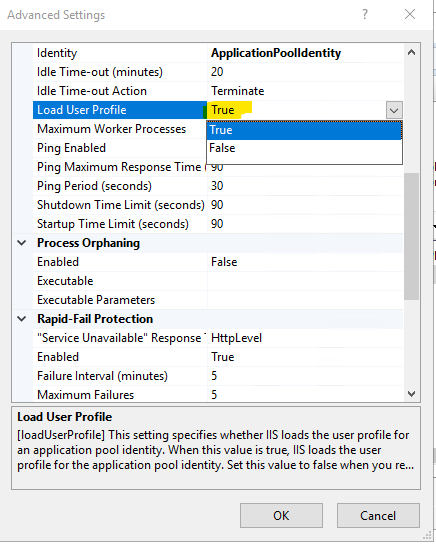
For web we need to enable load user profile to true from application pool for created web site.
For local deployment select the SSL certificate when you add the web site.

The final result should look like this (depending on your project type).
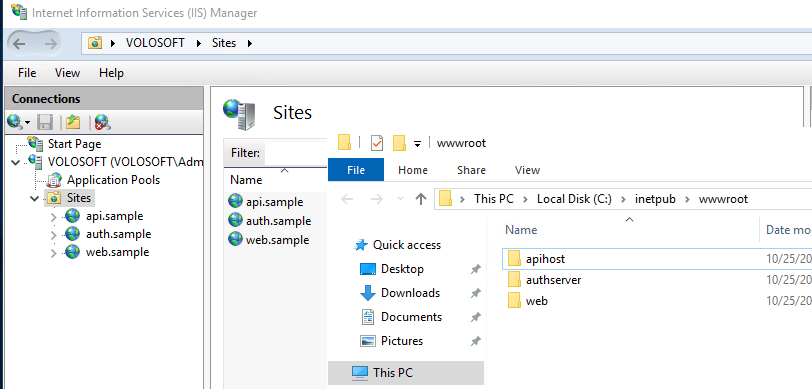
We can visit the websites from a browser.
 08-09 May


