Add new Microservices to the Solution
This documentation introduces guidance for creating a new microservice for your microservice startup template. Eventually, these steps will be automated in the future however learning these steps may provide insight to learn the relations between microservices.
Creating new service
You can create a new service (sub microservice) into your microservice solution by using the ABP CLI. Use the following command to create a new service:
abp new OrderService -t microservice-service-pro
The new service is created in the services folder of your solution. Build the new service with the following command. Run this command in the \services\order directory:
dotnet build
Add the new service to the solution (Optional)
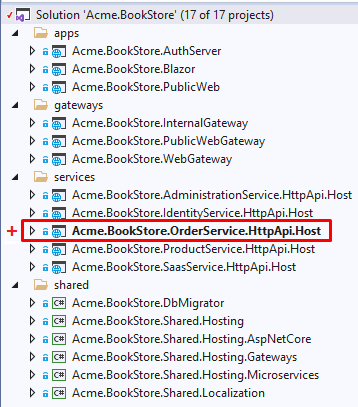
This is an optional step. If you want to see the OrderService in the main solution, add Acme.BookStore.OrderService.HttpApi.Host.csproj as an existing project to your main solution under the services folder. This will help you manage the host projects from single solution. While you can add it by Visual Studio (or any other IDE you are using), you can also run the following dotnet CLI command to add the Host project.
dotnet sln add services/order/src/Acme.BookStore.OrderService.HttpApi.Host/Acme.BookStore.OrderService.HttpApi.Host.csproj --solution-folder services
Your solution can have errors when you try to build the main solution. This is because your newly added project has references out of your current solution. To restore your main application solution, use
dotnet build /graphBuilddotnet tooling to restore it.
You need to update other dependent projects in order to integrate your new service into your composition. Follow the next steps to integrate your new service.
AuthServer Authentication Configuration
The newly added microservice has JwtBearer authentication configured with the OrderService audience under the OrderServiceHttpApiHostModule ConfigureServices class:
JwtBearerConfigurationHelper.Configure(context, "OrderService");
To be able to consume this microservice, you will need to configure the AuthServer with this new scope.
There are 2 ways to add the newly added scope the the AuthServer environment. Using the OpenIddict Management UI or the OpenIddictDataSeeder.
- Configuration using the OpenIddict Manager UI
Navigate to the Administration section and OpenId->Scopes then add New Scope:
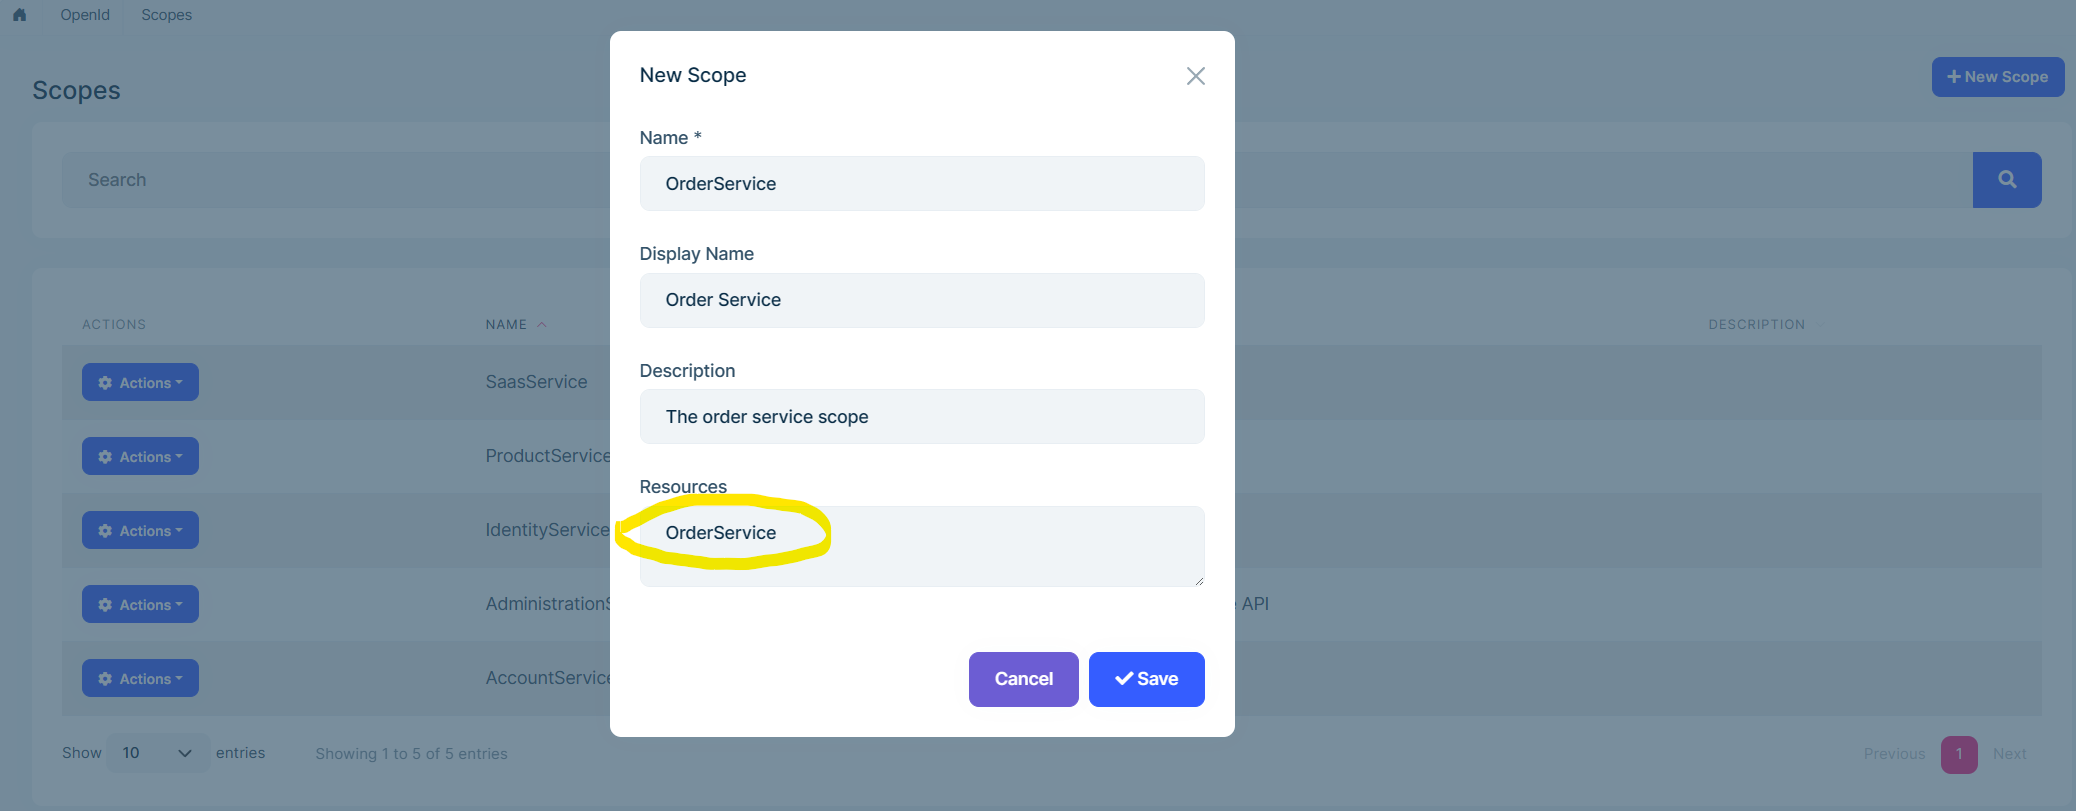
The Resources section is the audience of the microservice. It must be the same with the JwtBearer authentication configuration of the new microservice.
- Configuration using the OpenIddictDataSeeder
To keep OpenIddictDataSeeder updated, you need to do the following steps in the OpenIddictDataSeeder.cs class. Note that there are 2 OpenIddictDataSeeder.cs classes in the solution:
Acme.BookStore.DbMigrator\OpenIddictDataSeeder.csAcme.BookStore.IdentityService.HttpApi.Host\DbMigrations\OpenIddictDataSeeder.cs.
If you will use the DbMigrator application you need to do the same steps in both classes.
Create ApiScope:
To make OrderService to be consumable for other clients (applications/gateways/microservices), you should add it as a new scope by updating CreateApiScopesAsync method with:
await CreateScopesAsync("OrderService");
Now the newly created scope is available for your clients (applications, gateways, microservices).
Client Configuration
Now the AuthServer must define which clients can be able to make a request to this newly created scope. Again, you can use both OpenIddict Management UI or the OpenIddictDataSeeder to configure it.
- Configuration using the OpenIddict Managment UI
By default, there are 3 different clients exist in the microservice template. The Public-Web (landing page) application, the back-office application (web, angular, blazor or blazor-server based on your UI selection) and the WebGateway_Swagger client which is used for all the Swagger UIs (gateways and microservices).
Add the OrderService scope to the clients you want to make a request from. Navigate to the Administration section and OpenId->Applications then edit WebGateway_Swagger:
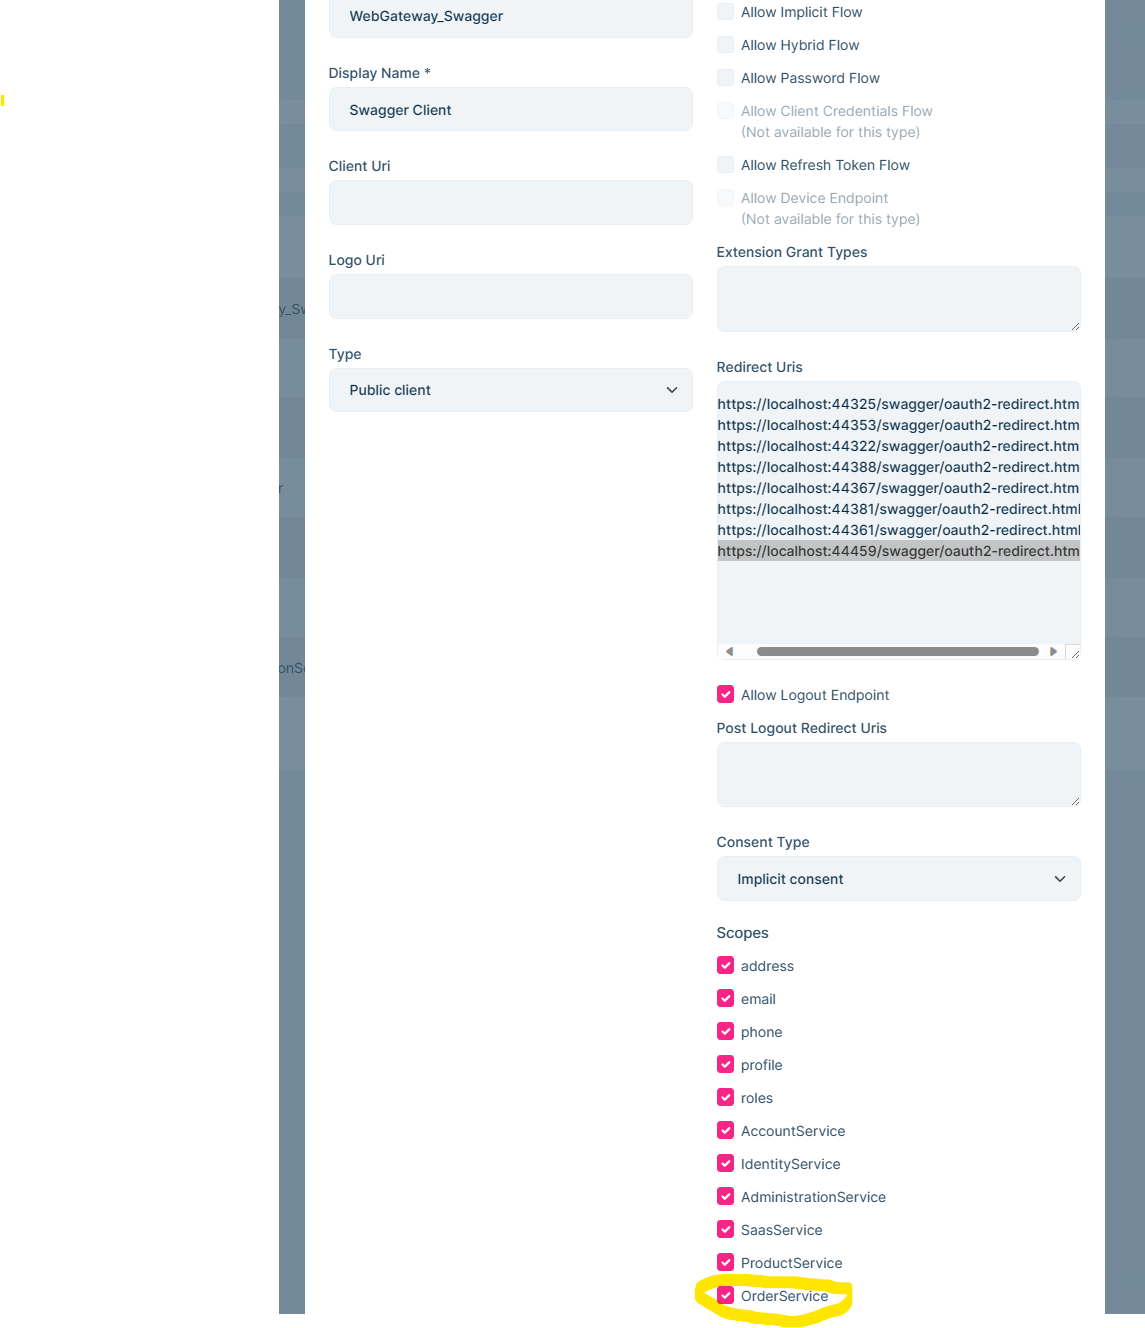
Spesific to the WebGateway_Swagger client, you need to add the OrderService microservice URL to the redirect Uris.
https://localhost:44459/swagger/oauth2-redirect.html. Because the same client is used for all the microservices and the gateways.
For the back-office application or the public-web application, you don't need to add extra redirect Uri.
- Configuration using the OpenIddictDataSeeder
Add Swagger Client Scopes:
WebGatewayswagger client is used to authorize the microservice endpoints via authorization code flow for the swagger endpoints. You need to update the swagger client scopes by adding the OrderService scope. You can select the gateways you want to grant for new service to be reached. Keep in mind that you need to add route configuration for each gateway.Update Clients:
Update Web and/or Public (angular or blazor if application is not mvc) client creations in CreateClientsAsync method. Add OrderService scope. If you want to call OrderService from an other service, add OrderService scope to caller service client as well.
Create New Client:
If you want OrderService to be able call the other services, you need to add the OrderService as a client under CreateClientsAsync as well. Then, update appsettings.json of the OrderService with IdentityClients section with the ClientId and granted scopes you have defined in CreateClientAsync method for client credential flow. For more information, see Microservice Synchronous Interservice Communication document.
AdministrationService microservice has configuration for making sync calls to IdentityService which can be examined if you are planning sync communication for your new microservice.
Hint: You can search for "Product" keyword in this class to find the places where you will add the OrderService.
- Update file appsetting.json: Add OrderService with its address and port in the OpenIddict/Resources schema, the appsettings.json must be updated in Acme.BookStore.DbMigrator and Acme.BookStore.IdentityService.HttpApi.Host.DbMigrations.
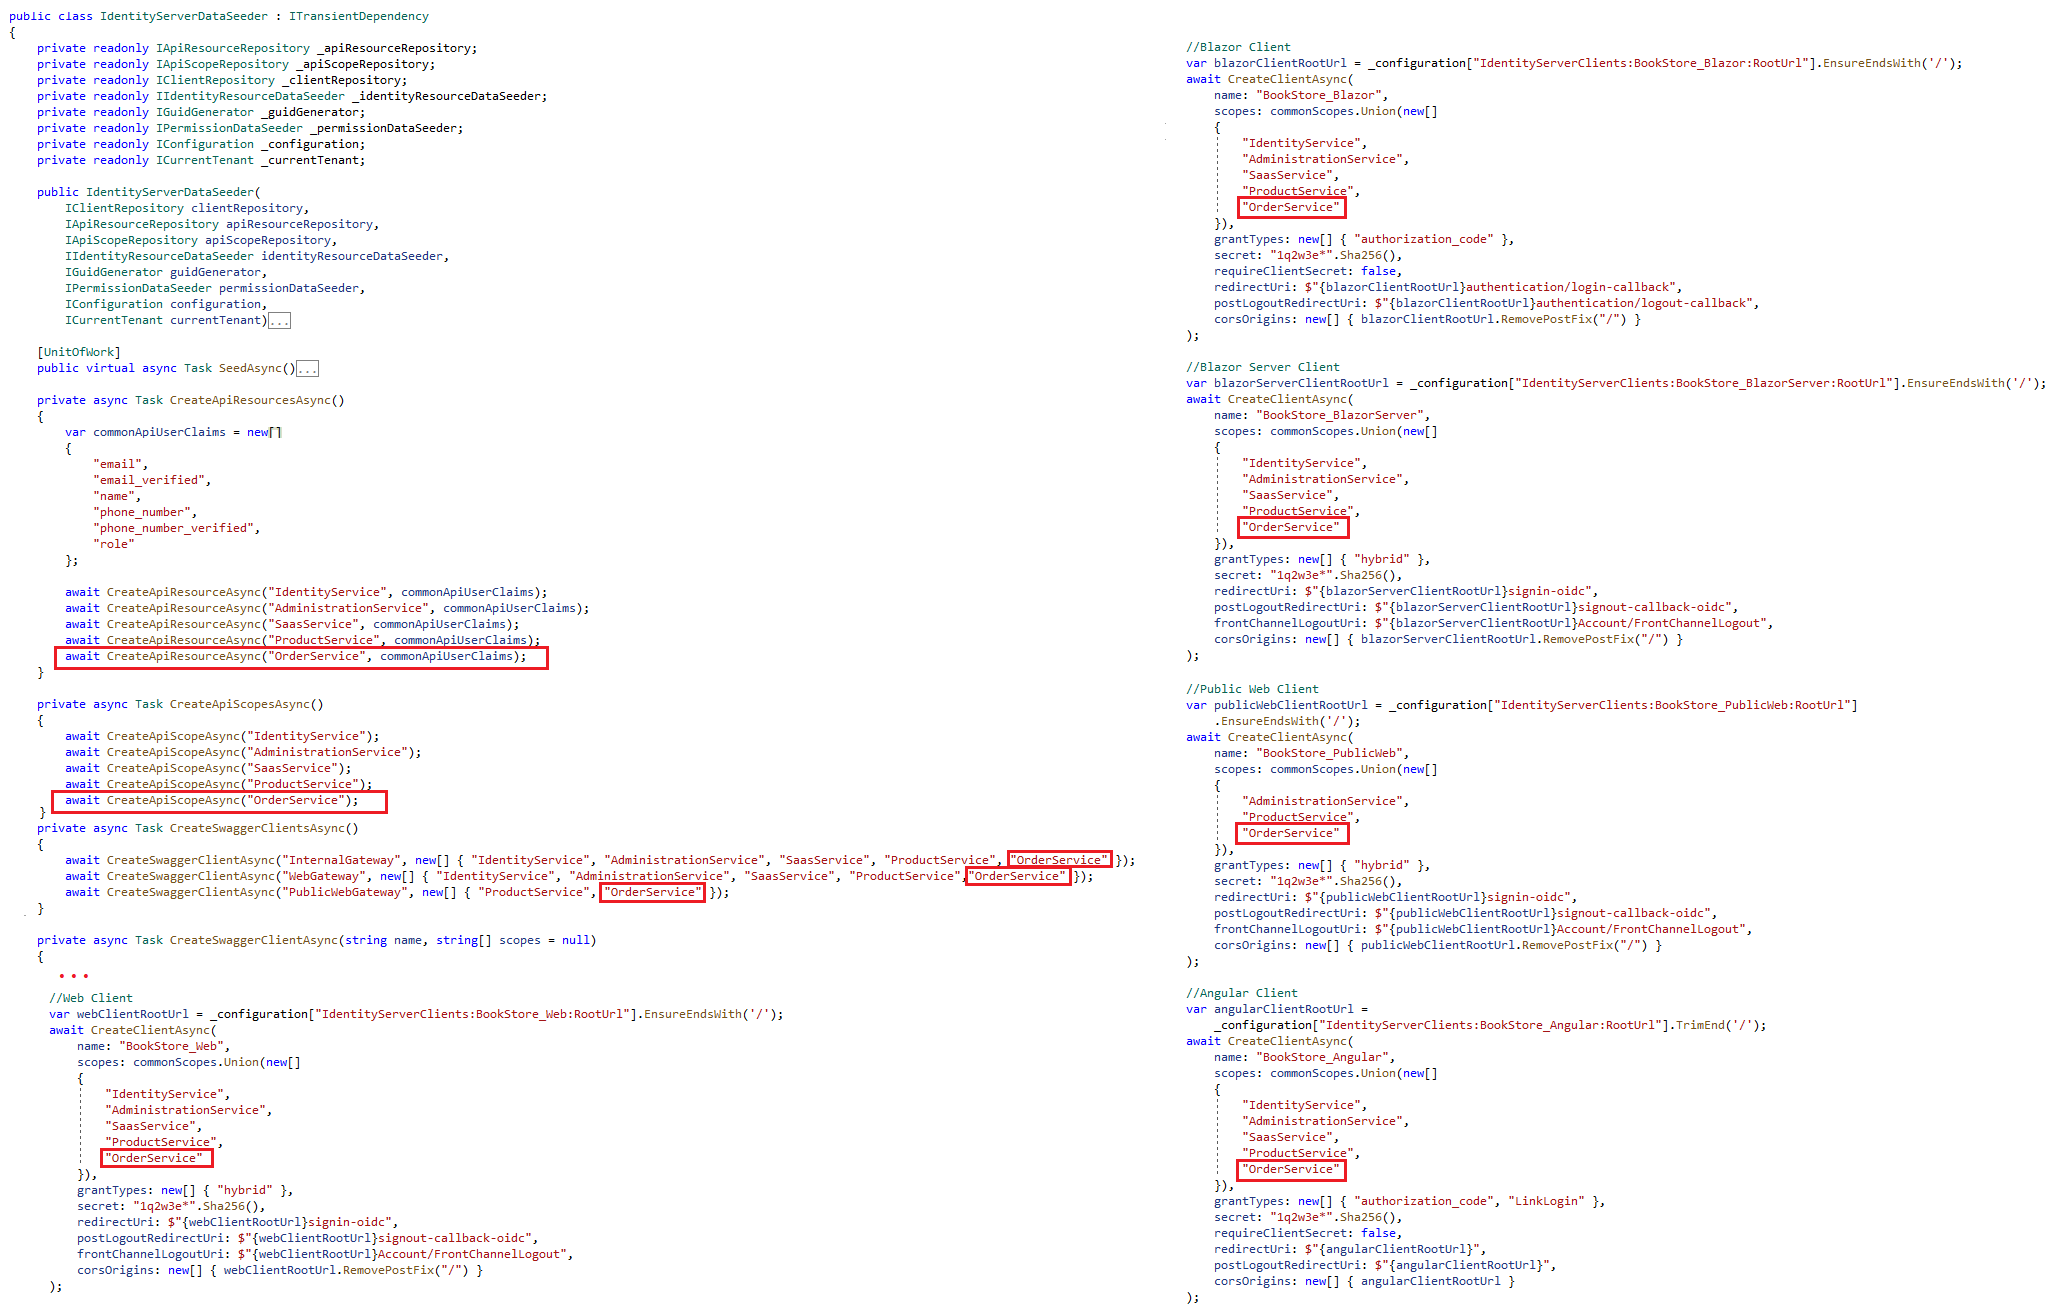
Below you can see a screenshot of the final OpenIddictDataSeeder.cs , creating OrderService ApiScope and granting it the WebGateway and other back-office clients.
Update the Swagger Client
There is a single swagger client called WebGateway_Swagger under the OpenIddictDataSeeder.cs. Create the orderServiceRootUrl which is used by the Swagger client for the OrderService swagger UI.
private async Task CreateWebGatewaySwaggerClientsAsync()
{
    await CreateSwaggerClientAsync("WebGateway",
        new[] { "AccountService", "IdentityService", "AdministrationService", "SaasService", "ProductService", "OrderService" });
}

private async Task CreateSwaggerClientAsync(string name, string[]? scopes = null)
{
    var commonScopes = new List<string> {
        OpenIddictConstants.Permissions.Scopes.Address,
        OpenIddictConstants.Permissions.Scopes.Email,
        OpenIddictConstants.Permissions.Scopes.Phone,
        OpenIddictConstants.Permissions.Scopes.Profile,
        OpenIddictConstants.Permissions.Scopes.Roles
    };

    scopes ??= new[] { name };

    // Swagger Client
    var swaggerClientId = $"{name}_Swagger";
    if (!swaggerClientId.IsNullOrWhiteSpace())
    {
        var webGatewaySwaggerRootUrl = _configuration[$"OpenIddict:Applications:{name}:RootUrl"]?.EnsureEndsWith('/');
        var publicWebGatewayRootUrl = _configuration[$"OpenIddict:Applications:PublicWebGateway:RootUrl"]?.EnsureEndsWith('/');
        var accountServiceRootUrl = _configuration[$"OpenIddict:Resources:AccountService:RootUrl"]?.EnsureEndsWith('/');
        var identityServiceRootUrl = _configuration[$"OpenIddict:Resources:IdentityService:RootUrl"]?.EnsureEndsWith('/');
        var administrationServiceRootUrl = _configuration[$"OpenIddict:Resources:AdministrationService:RootUrl"]?.EnsureEndsWith('/');
        var saasServiceRootUrl = _configuration[$"OpenIddict:Resources:SaasService:RootUrl"]?.EnsureEndsWith('/');
        var productServiceRootUrl = _configuration[$"OpenIddict:Resources:ProductService:RootUrl"]?.EnsureEndsWith('/');
        var orderServiceRootUrl = _configuration[$"OpenIddict:Resources:OrderService:RootUrl"]?.EnsureEndsWith('/');

        await CreateApplicationAsync(
            name: swaggerClientId!,
            type: OpenIddictConstants.ClientTypes.Public,
            consentType: OpenIddictConstants.ConsentTypes.Implicit,
            displayName: "Swagger Client",
            secret: null,
            grantTypes: new List<string> { OpenIddictConstants.GrantTypes.AuthorizationCode, },
            scopes: commonScopes.Union(scopes).ToList(),
            redirectUris: new List<string> {
                $"{webGatewaySwaggerRootUrl}swagger/oauth2-redirect.html", // WebGateway redirect uri
                $"{publicWebGatewayRootUrl}swagger/oauth2-redirect.html", // PublicWebGateway redirect uri
                $"{accountServiceRootUrl}swagger/oauth2-redirect.html", // AccountService redirect uri
                $"{identityServiceRootUrl}swagger/oauth2-redirect.html", // IdentityService redirect uri
                $"{administrationServiceRootUrl}swagger/oauth2-redirect.html", // AdministrationService redirect uri
                $"{saasServiceRootUrl}swagger/oauth2-redirect.html", // SaasService redirect uri
                $"{productServiceRootUrl}swagger/oauth2-redirect.html", // ProductService redirect uri
                $"{orderServiceRootUrl}swagger/oauth2-redirect.html", // OrderService redirect uri
            }
        );
    }
}
Update the appsettings.json file of the IdentityService and the DbMigrator projects to add the OrderService URL as a redirect URI for the Swagger client:
"OpenIddict": {
    "Applications": {
      ...
    },
    "Resources": {
      ...
      "OrderService": {
        "RootUrl": "https://localhost:44459" // Add your OrderService URL
      }
    }
  }
You can check the OrderService.HttpApi.Host appsettings.json
App:SelfUrlkey to find your OrderService URL.
AuthServer CORS Configuration
When using the SwaggerUI from either gateway or the OrderService itself, the CORS for the AuthServer must be configured or you can come across the following error when you try to Authorize the Swagger UI:
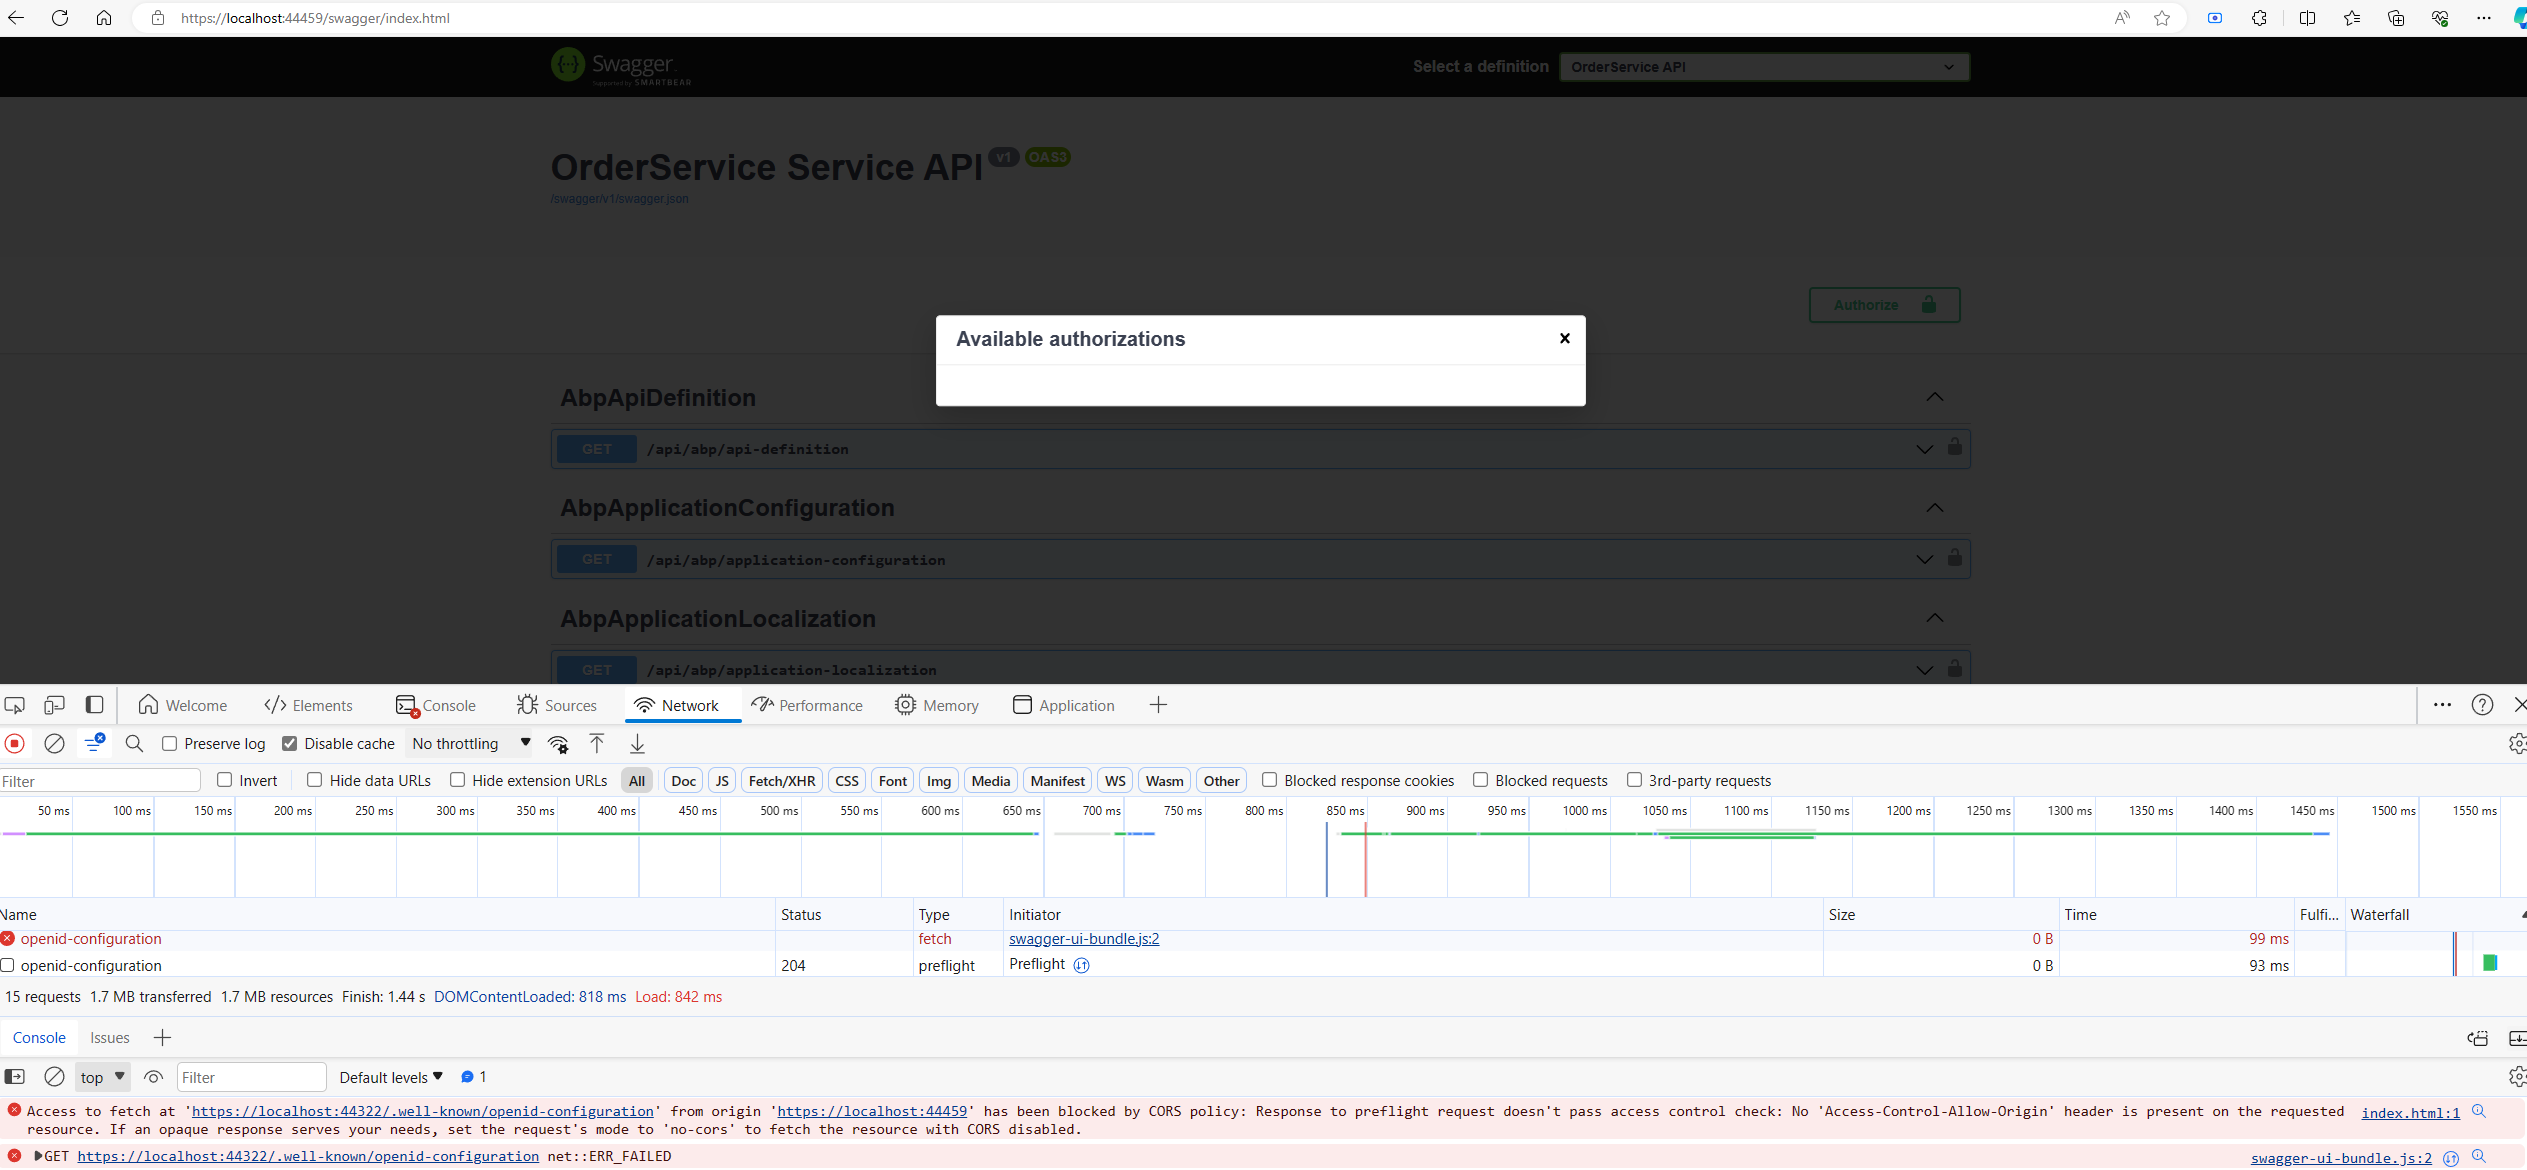
To solve this problem, add the OrderService URL (https://localhost:44459) to the CorsOrigins of the AuthServer under the appsettings.json file:
  "App": {
    "SelfUrl": "https://localhost:44322",
    "CorsOrigins": "https://*.MvcStore.com,http://localhost:4200,https://localhost:44307,https://localhost:44325,https://localhost:44353,https://localhost:44367,https://localhost:44388,https://localhost:44381,https://localhost:44361,https://localhost:44459",
    ...
Updating Gateways
If you need to expose the new service endpoints, you need to configure the gateway of your choosing or all the gateways:
- WebGateway
- PublicWebGateway
Gateway Authorization
Add the OrderService scope to the Swagger configuration of your gateways.
SwaggerConfigurationHelper
    .ConfigureWithOidc(
        context: context,
        authority: configuration["AuthServer:Authority"]!,
        scopes: new[] {
            /* Requested scopes for authorization code request and descriptions for swagger UI only */
            "AccountService", "IdentityService", "AdministrationService", "SaasService", "ProductService", "OrderService"
        },
        apiTitle: "Web Gateway API",
        discoveryEndpoint: configuration["AuthServer:MetaAddress"]
    );
Update yarp.json for the route configuration:
You need to add a new Routes and the Cluster for the new OrderService as shown below.
{
  "ReverseProxy": {
    "Routes": {
      ...
      "Order": {
        "ClusterId": "Order",
        "Match": {
          "Path": "/api/order-service/{**catch-all}"
        }
      },
      "OrderSwagger": {
        "ClusterId": "Order",
        "Match": {
          "Path": "/swagger-json/Order/swagger/v1/swagger.json"
        },
        "Transforms": [
          { "PathRemovePrefix": "/swagger-json/Order" }
        ]
      }
    },
    "Clusters": {
      ...
      "Order": {
        "Destinations": {
          "Order": {
            "Address": "https://localhost:44459/" <-- Your generated OrderService URL
          }
        }
      }
    }
  }
}
Important: The port 44459 is not same for all services. You can get your service port from \services\order\src\Acme.BookStore.OrderService.HttpApi.Host\Properties\launchSettings.json or the OrderService.HttpApi.Host appsettings.json App:SelfUrl key to find your OrderService URL.
The Transforms are used for the Swagger UI to obtain the correct swagger.json endpoints. See YARP transforms docs for more information.
Updating DbMigrator
You can skip this step if you do not want to use the DbMigrator to migrate the database of the OrderService. If you want to use the DbMigrator to migrate all microservices in a central project, you should add the OrderService to the DbMigrator project as well to handle the new service migrations and data seeding.
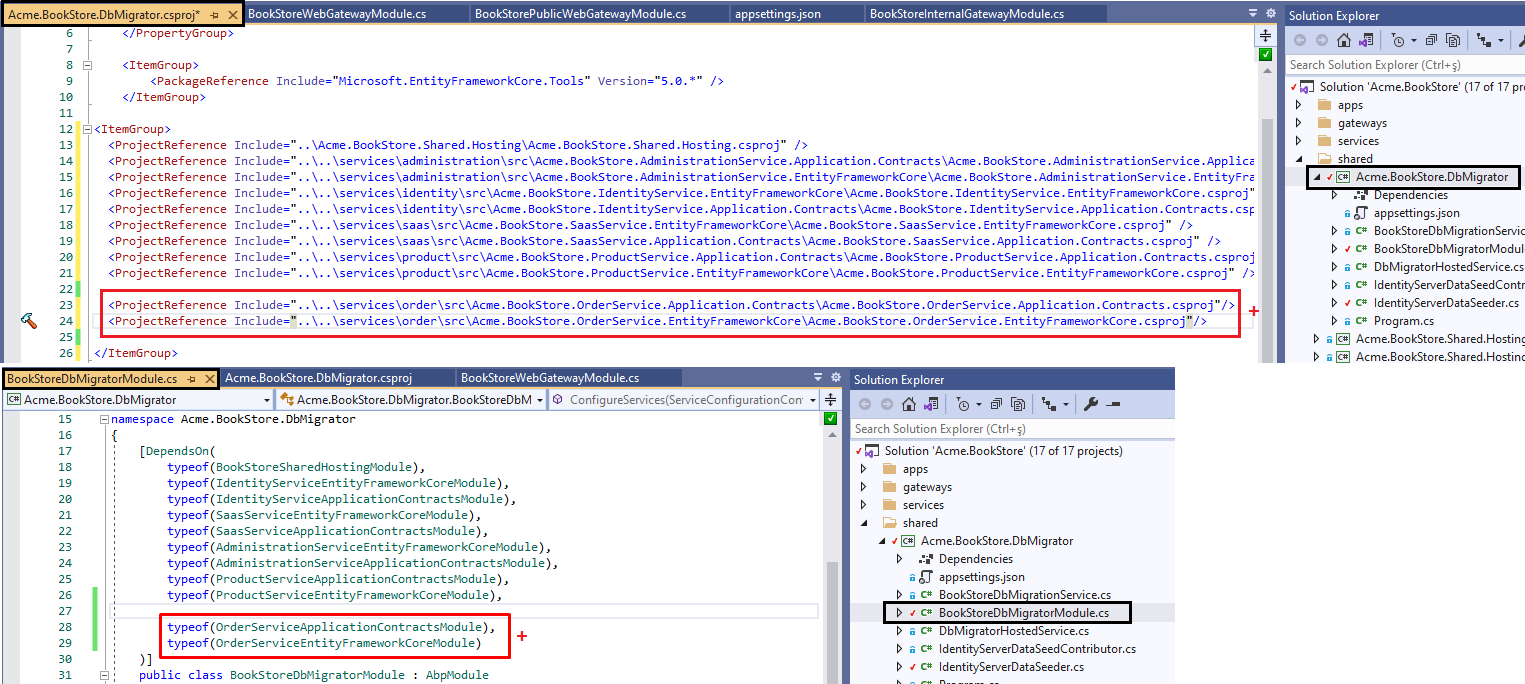
Add OrderService Dependencies:
Add Acme.BookStore.OrderService.Application.Contracts and Acme.BookStore.OrderService.EntityFrameworkCore project references to the DbMigrator project. The
EntityFrameworkCorelayer is required to migrate the OrderServiceDbContext and theApplication.Contractsis used to migrate the permissions, features of the OrderService.Add the below
DependsOntypes to the DbMigratorModule as below:
- Add csproj references:
<ProjectReference Include="..\..\services\order\src\Acme.BookStore.OrderService.Application.Contracts\Acme.BookStore.OrderService.Application.Contracts.csproj"/>

<ProjectReference Include="..\..\services\order\src\Acme.BookStore.OrderService.EntityFrameworkCore\Acme.BookStore.OrderService.EntityFrameworkCore.csproj"/>
- Add DependsOn attributes:
typeof(OrderServiceApplicationContractsModule),
typeof(OrderServiceEntityFrameworkCoreModule)
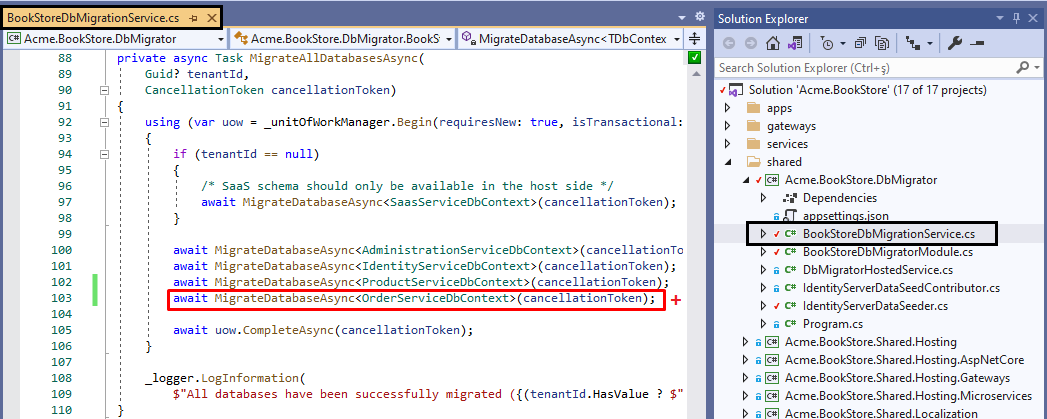
Update DbMigrationService:
DbMigratorHostedService runs the MigrateAsync() method which eventually runs the MigrateAllDatabasesAsync method. Add the new database migration with the others:
await MigrateDatabaseAsync<OrderServiceDbContext>(cancellationToken);
Add connection string:
DbMigrator gets connection string from configuration (
appsettings.json). Each service has its own connection string. Add the OrderService connection string to theappsettings.jsonof the DbMigrator project. This name is defined inOrderServiceDbProperties.ConnectionStringName.
"OrderService": "Server=(LocalDb)\\MSSQLLocalDB,1434;Database=BookStore_OrderService;User Id=sa;password=myPassw0rd;MultipleActiveResultSets=true"

Adding UI to Applications
You can develop UI for your application in two different ways:
1-) Modular UI Development:
Develop your application UI like any ABP application template; add your pages under OrderService.Web project. This way, the back-office application will show the UI without hosting the microservice application just by using as a remote service. You can check Module Architecture Best Practices & Conventions Section C for more information.
Add your service UI to the back-office application:
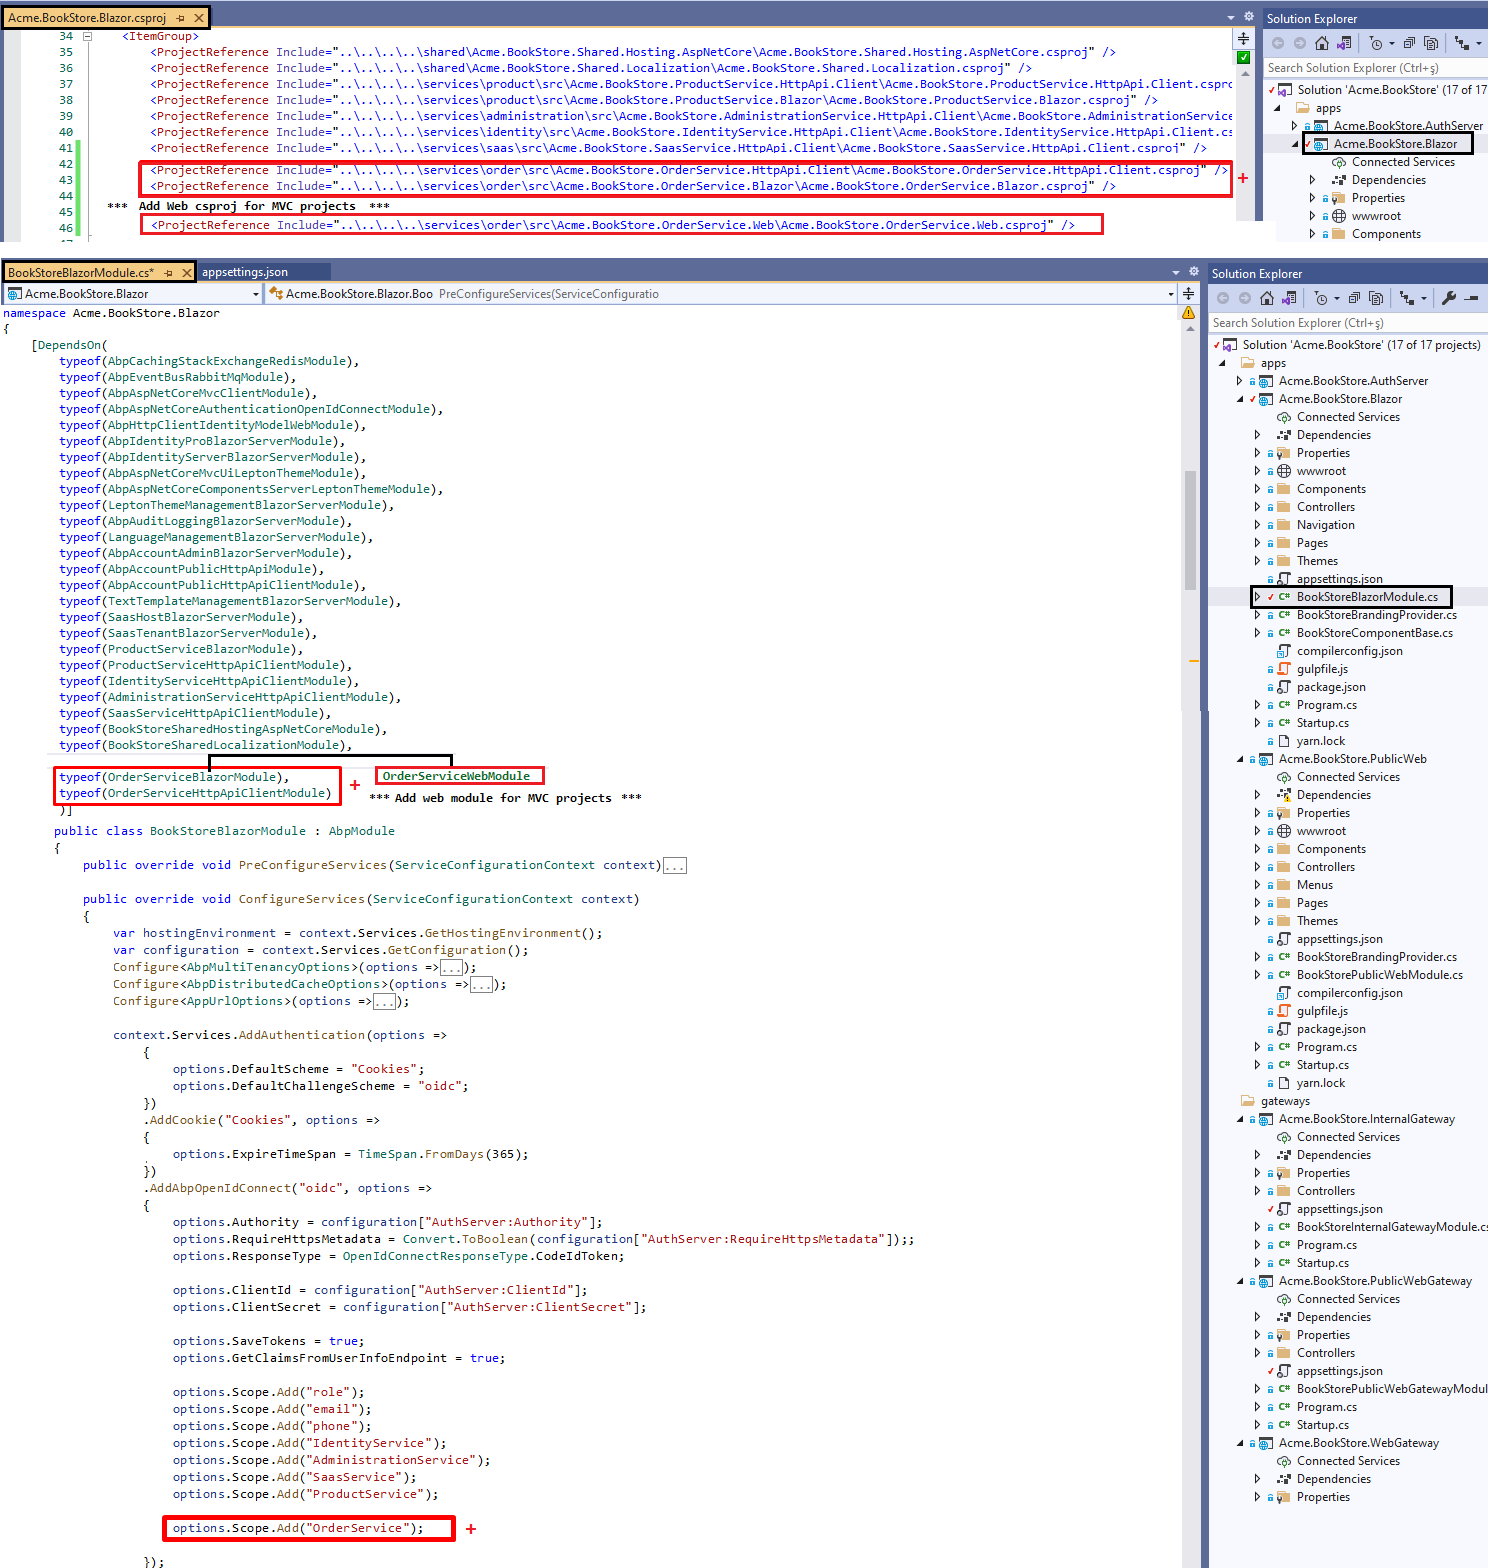
Add HttpApi.Client and Web (or Blazor) projects as references to the Web project and add new dependencies to WebModule as below:
- Add csproj references:
MVC: If your microservice project is MVC add the references to the Acme.BookStore.Web.csproj, if it's Blazor add the references to the Acme.BookStore.Blazor.csproj.
<ProjectReference Include="..\..\..\..\services\order\src\Acme.BookStore.OrderService.HttpApi.Client\Acme.BookStore.OrderService.HttpApi.Client.csproj" />

<ProjectReference Include="..\..\..\..\services\order\src\Acme.BookStore.OrderService.Web\Acme.BookStore.OrderService.Web.csproj" />
Blazor: If your project is Blazor then add the references to the Acme.BookStore.Blazor.csproj
<ProjectReference Include="..\..\..\..\services\order\src\Acme.BookStore.OrderService.HttpApi.Client\Acme.BookStore.OrderService.HttpApi.Client.csproj" />

<ProjectReference Include="..\..\..\..\services\order\src\Acme.BookStore.OrderService.Blazor\Acme.BookStore.OrderService.Blazor.csproj" />
- Add DependsOn attributes:
MVC:
typeof(OrderServiceWebModule),
typeof(OrderServiceHttpApiClientModule)
Blazor:
typeof(OrderServiceBlazorModule),
typeof(OrderServiceHttpApiClientModule)
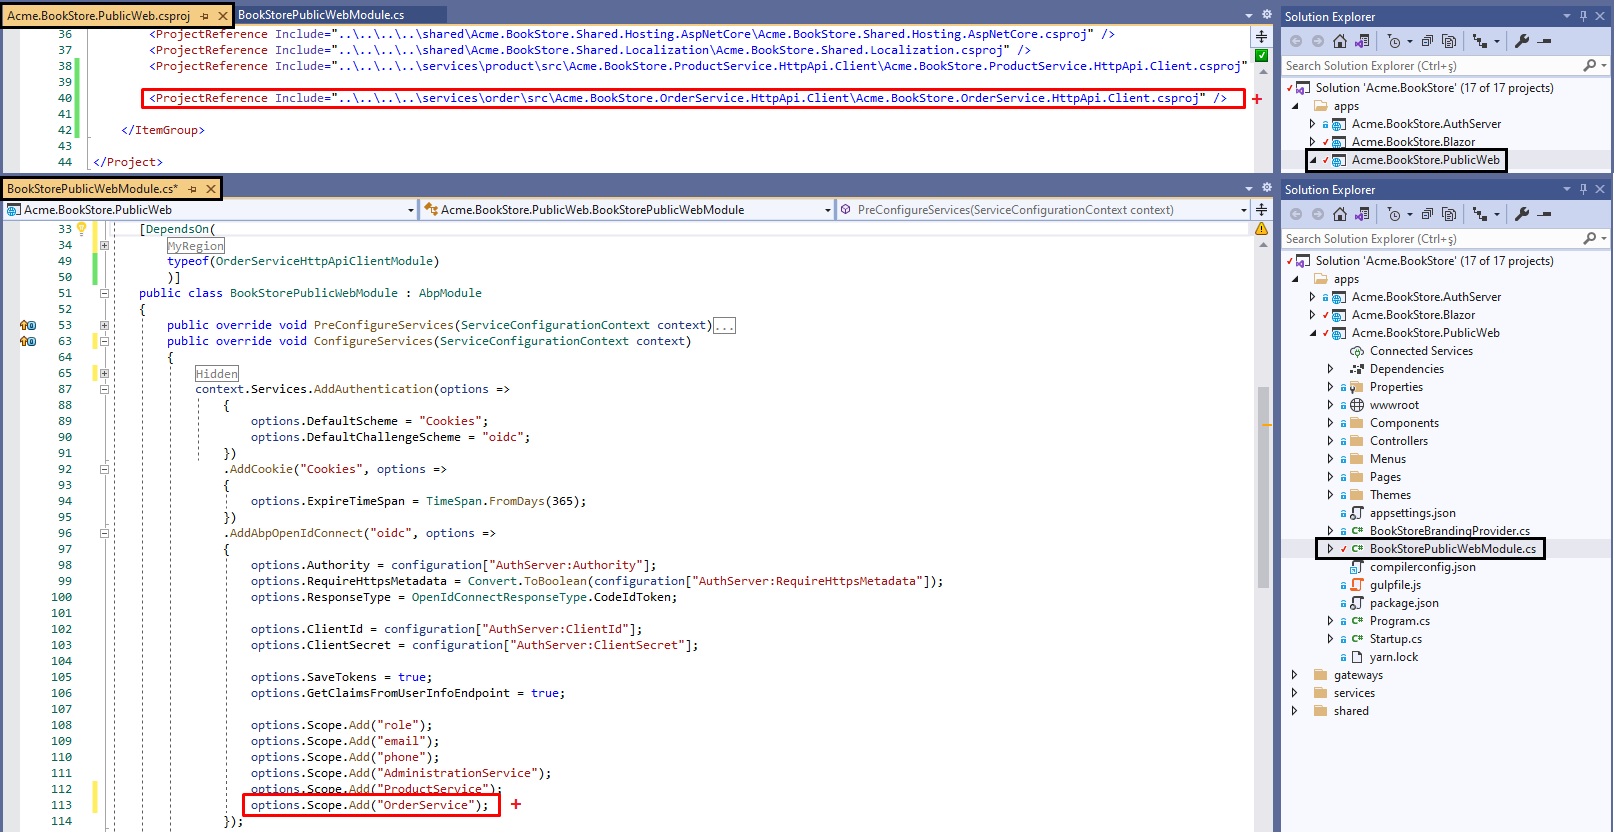
Add to OpenID Connect Scopes:
You need to add the new service scope in your startup project.
MVC: Open BookStoreWebModule.cs and add the below scope in AddAbpOpenIdConnect() method.
Blazor: Open BookStoreBlazorModule.cs and add the below scope in AddAbpOpenIdConnect() method.
options.Scope.Add("OrderService");
ProductService.Web module is designed this way. You can examine ProductService.Web project for the sample implementation.
This approach can benefit you to have backend and frontend integrity in your microservice as a whole, as you can develop the backend and frontend of your microservice in the same microservice solution.
2-) Monolith UI Development inside application:
Develop your application UI inside the application; add your pages under application layer of your solution and use microservice as a remote service. You can check Module Architecture Best Practices & Conventions Section D for more information. In this approach, you can separate the front-end and back-end team and develop each in their reputable solution.
To add your microservice UI to your application (PublicWeb application in this case):
Add HttpApi.Client reference to PublicWeb project and add new dependency to PublicWebModule as below:
- Add csproj reference:
<ProjectReference Include="..\..\..\..\services\order\src\Acme.BookStore.OrderService.HttpApi.Client\Acme.BookStore.OrderService.HttpApi.Client.csproj" />
- Add DependsOn attribute:
typeof(OrderServiceHttpApiClientModule)
You can check out the sample project ProductService.PublicWeb module to understand this implementation.
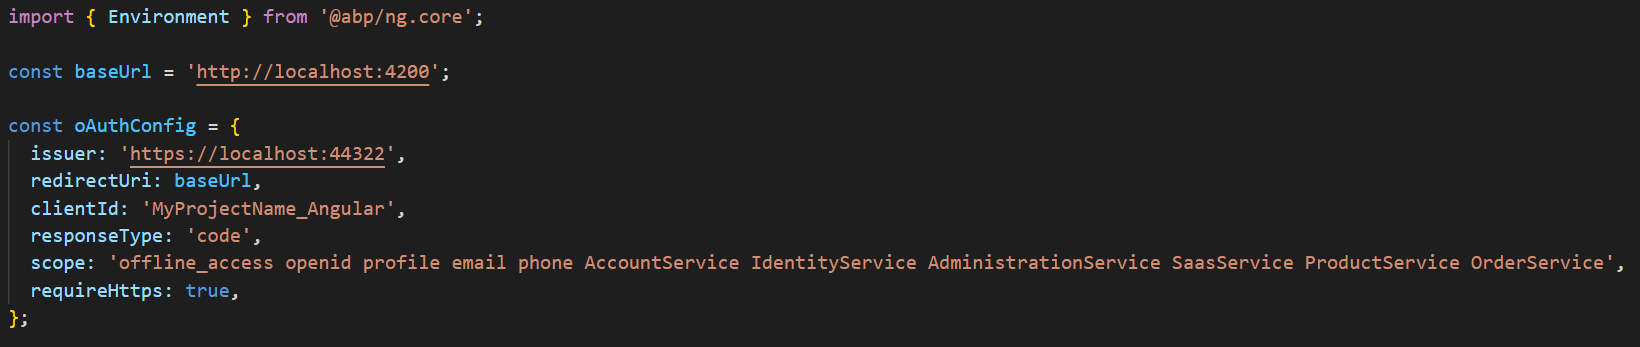
Updating Angular application:
If you are using the Angular application, you need to add the new scope to the oAuthConfig in envrionment.ts:
Creating Static Proxy
When the application makes a a request to the newly added microservice through the gateway, it will use the REST API information of the newly added service. By default, the OrderService uses Static proxies that you need to generate them manually. To generate static proxy for the OrderService, run the OrderService HttpApi.Host and then for MVC/Blazor/Blazor-Server applications, use the abp command under the OrderService.HttpApi.Client project:
abp generate-proxy -t csharp -u https://localhost:44459/ -m OrderService --without-contracts
for Angular application
abp generate-proxy -t ng -u https://localhost:44459/ -m OrderService --target order-service --without-contracts
This will generate the static proxy for the application services of your OrderService that will be used by the application. For more information, check https://docs.abp.io/en/abp/latest/API/Static-CSharp-API-Clients.
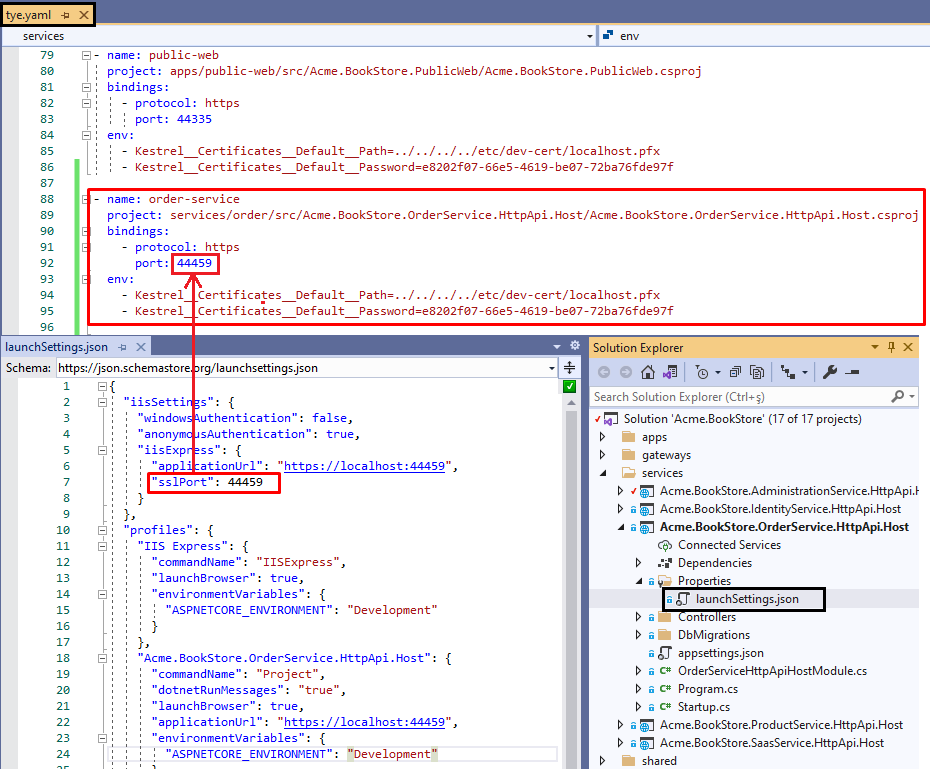
Updating Tye configuration:
If you are planning to use Tye to develop and deploy microservices, you need to update your tye.yaml configuration which exists in the root directory of your solution. Add OrderService.HttpApi.Host.csproj path and port with self-sign development certification information as below:
- name: order-service
  project: services/order/src/Acme.BookStore.OrderService.HttpApi.Host/Acme.BookStore.OrderService.HttpApi.Host.csproj
  bindings:
    - protocol: https
      port: 44459 <-- Your generated OrderService port
  env:
    - Kestrel__Certificates__Default__Path=../../../../etc/dev-cert/localhost.pfx
    - Kestrel__Certificates__Default__Password=e8202f07-66e5-4619-be07-72ba76fde97f // <- Your generated certificate passphrase
Important: The port 44459 is not same for all services. You can get your service port from \services\order\src\Acme.BookStore.OrderService.HttpApi.Host\Properties\launchSettings.json
Running the Solution
Simply use the run-tye.ps1 PowerShell script. Which does all the steps below:
1- Create dev certificates: This is a one time operation. You need to create dotnet HTTPS certificates with the following PowerShell command:
\etc\dev-cert\create-certificate.ps1
2- Start the infrastructure: Run the following PowerShell script to start the infrastructures:
etc\docker\up.ps1
3- Run the DbMigrator: Run the DbMigrator project to migrate the databases and seed the initial required data to use the applications:
cd "./shared/Acme.BookStore.DbMigrator"
dotnet run
3- Run tye: Run the following command in the root directory of your solution where tye.yaml exists. The watch parameter allows to build projects when the source code changes.
tye run --watch
Open your browser and navigate to your startup URL:
- Blazor Server: https://localhost:44314
- Blazor Web Assembly: https://localhost:44307
- MVC: https://localhost:44321
- Angular: http://localhost:4200
Deployment
If you are using K8s and Helm charts, don't forget to add new helm chart for the new OrderService and update the deployment and values .yaml files of related application and gateway charts.
 08-09 May


