ABP Studio: Solution Explorer
ABP Studio incorporates various concepts and we're using them in the solution explorer. To ensure clarity, please review the concepts documentation first. You can see the Solution Explorer on the left side of the ABP Studio. It displays an overview of your solution, you can manage your projects using the solution explorer. Simply navigate to the Solution Explorer panel in the left menu.
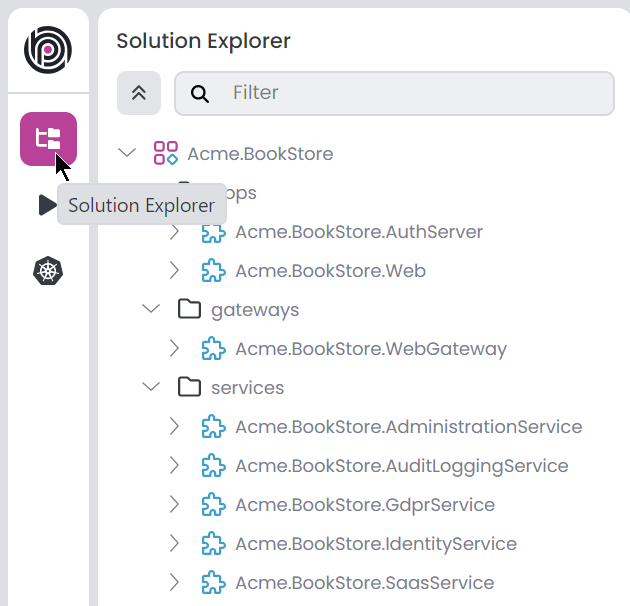
The solution explorer structure might be different based on your selection. For example MVC microservice project, looks like the following. You can edit modules, packages and folders from the solution explorer.
Solution
It is the main solution that you can open with ABP Studio, an ABP solution can contain multiple modules. You can create a new ABP solution using the New solution button on the welcome page. You can also open an existing ABP solution using the Open solution button on the welcome page. You can edit Modules and Folders using the root of the solution. There are 4 pre-built solution template; Empty, Application (Single Layer), Application (Layered), Microservice. These solution templates uses the Plug-In system and you can create custom solution templates if needed. Additionally, the solution explorer allows you to filter by Folder, Module, Package and Imports. We can collapse the entire tree using the up arrow icon. When you right-click the root of the solution, it opens the context-menu you can see the following options;
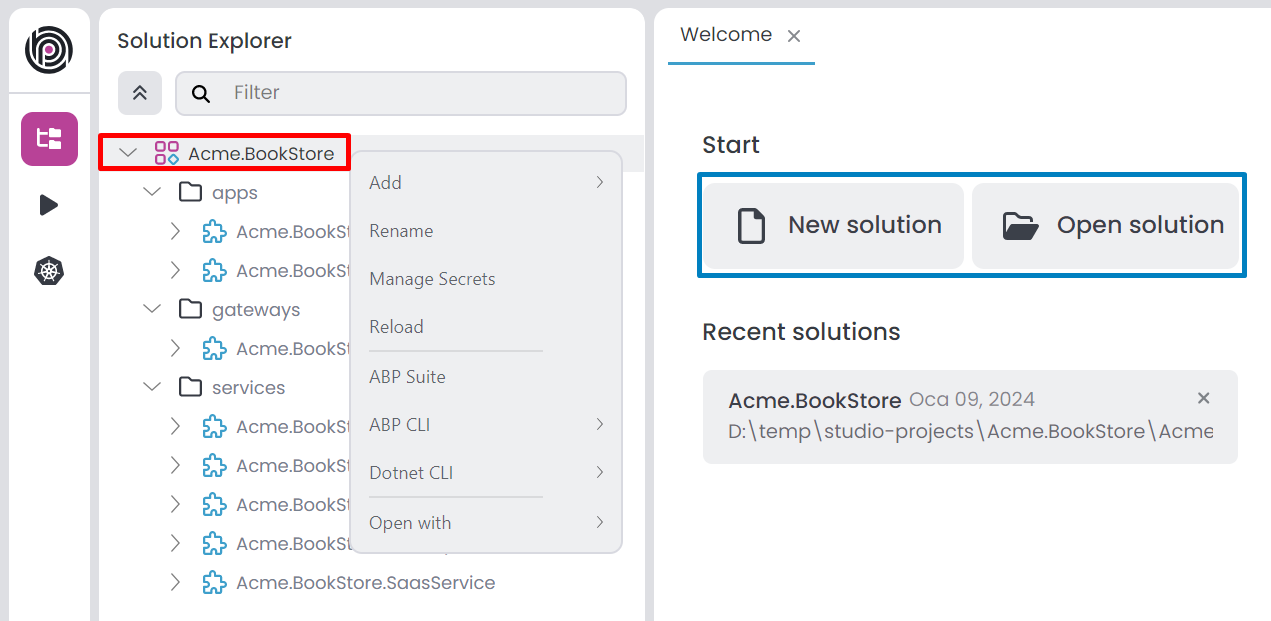
Add: You can add following options to your solution;New Folder: Creates a new folder within the ABP Solution, allowing you to organize your modules.New Module: Allows you to create a new module.Existing Module: You can add existing module to your solution.
Rename: Renames the solution.Manage Secrets: You can edit your solution secrets.Reload: Reloads the solution.ABP Suite: It opens the Choose Module window and you can select a module or continue without selecting a module. If you select a module, it will open the module in the ABP Suite. If you continue without selecting a module, it will open the ABP Suite without a module.ABP CLIInstall Libs: Install NPM Packages for UI projects in your solution.Upgrade ABP Packages: Update all the ABP related NuGet and NPM packages in your solution.Clean: Deletes allBINandOBJfolders in your solution.Switch to: It is switch your solution to the selected version of the ABP framework.Stable: Switches your solution to the latest stable version.Preview: Switches your solution to the preview version.Nightly Build: Switches your solution to the nightly version.
Dotnet CLIBuild: Builds each modules.Graph Build: Builds each modules with graphBuild option.Clean: Cleans the output of the previous build for modules.Restore: Restores the dependencies for modules.
Open WithTerminal: Opens the terminal in the solution directory.Explorer: Opens the file explorer in the solution directory.
Folder
When adding modules directly to the root of the solution, it can become disorganized, especially with numerous modules. Utilizing a folder structure allows us to organize modules more efficiently. This method enables executing collective commands within a specified folder. You can create a new folder using the Add -> New Folder button on the root of the solution context-menu it opens New folder window. You can also rename, delete, and move folders using the solution explorer.
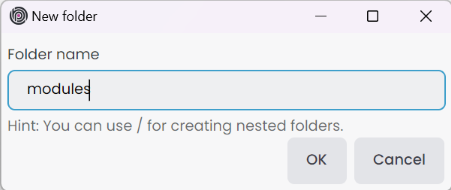
Folder name: Give the folder name that we wanna see in solution explorer. We can create nested folder with/character. This is a solution explorer folder so, it doesn't create a real folder. Ensure each folder name is unique.
You can click the OK button to add the folder to the solution. When you right-click the solution folder, it opens the context-menu you can see the following options;
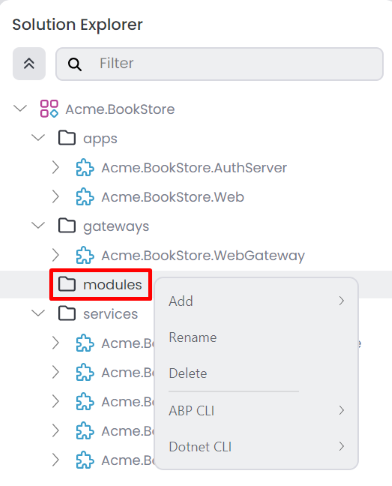
Add: You can add following options to your solution folder;New Folder: Creates a new nested folder within the selected folder, allowing you to organize your modules.New Module: Allows you to create a new module to selected folder.Existing Module: You can add existing module to your selected folder.
Rename: Renames the selected folder.Delete: Deletes the selected folder and all child items from the solution.ABP CLIInstall Libs: Install NPM Packages for UI projects in your selected folder.Upgrade ABP Packages: Update all the ABP related NuGet and NPM packages in your selected folder.Switch to: It switches your selected folder to the specified version of the ABP framework.Stable: Switches your selected folder to the latest stable version.Preview: Switches your selected folder to the preview version.Nightly Build: Switches your selected folder to the nightly version.
Clean: Deletes allBINandOBJfolders in your selected folder.
Dotnet CLIBuild: Builds each modules in your selected folder.Graph Build: Builds each modules with graphBuild option in your selected folder.Clean: Cleans the output of the previous build for modules in your selected folder.Restore: Restores the dependencies for modules in your selected folder.
You can drag and drop folders, modules and packages (within the same module) into a folder for organization purposes. Click and hold an item, then drag it into the desired folder.
Module
A module is a sub-solution that can contains zero, one or multiple packages. Each module is considered a .NET solution. We can create or import an existing module to the solution, with each module only able to be added once. When you right-click the module, it opens the context-menu where you can see the following options:
Add: You can add following options to your module;Package:New Package: Creates a new package within the selected module.Existing Package: You can add existing package to your selected module.
Folder: Creates a new folder within the selected module, allowing you to organize your packages.
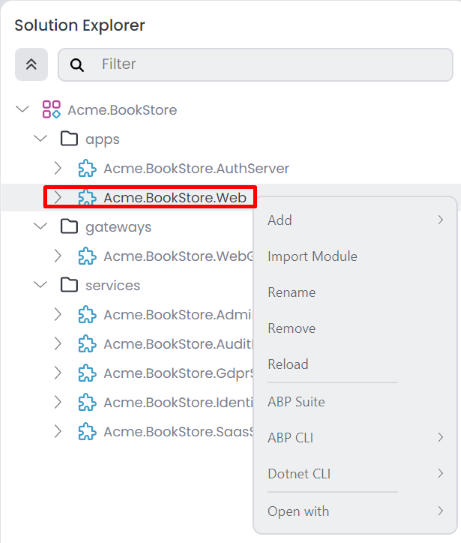
Import Module: This option allows you to import an existing module from Solution, Local, or NuGet into your selected module.Rename: Renames the selected module.Remove: Removes the selected module and all child items from the solution.Reload: Reloads the selected module.ABP Suite: It will open the selected module in the ABP Suite.ABP CLIInstall Libs: Install NPM Packages for UI projects in your selected module.Upgrade ABP Packages: Update all the ABP related NuGet and NPM packages in your module.Switch to: It switches your selected module to the specified version of the ABP framework.Stable: Switches your selected module to the latest stable version.Preview: Switches your selected module to the preview version.Nightly Build: Switches your selected module to the nightly version.
Clean: Deletes allBINandOBJfolders in your selected module.
Dotnet CLIBuild: Builds your selected module.Graph Build: Builds selected module with graphBuild option.Clean: Cleans the output of the previous build for selected module.Restore: Restores the dependencies for selected module.
Open WithVisual Studio: Opens the module in Visual Studio. This option is only available if you have Visual Studio installed.Visual Studio Code: Opens the module in Visual Studio Code. This option is only available if you have Visual Studio Code installed.JetBrains Rider: Opens the module in JetBrains Rider. This option is only available if you have JetBrains Rider installed.Terminal: Opens the terminal in the module directory.Explorer: Opens the file explorer in the module directory.
Adding a New Empty Module
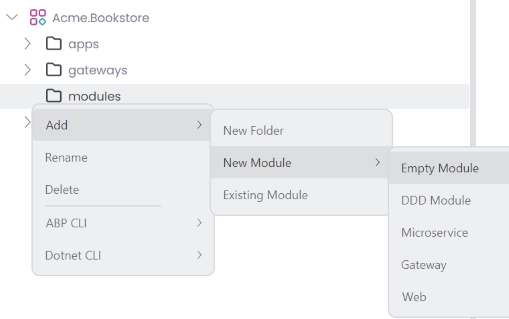
Create a new module by clicking the Add -> New Module -> Empty Module button at the root of the solution or in the solution folder context menu. The Microservice solution template also includes Microservice, Gateway, and Web modules. Other solution templates, such as Application (Layered), can only create Empty, and DDD modules.
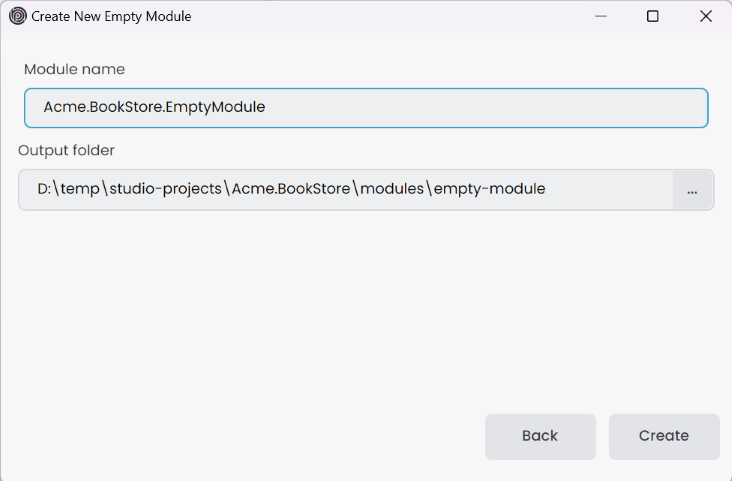
If you choose the Empty Module, provide the Module name and Output folder, then click the Create button to add the empty module to the solution.
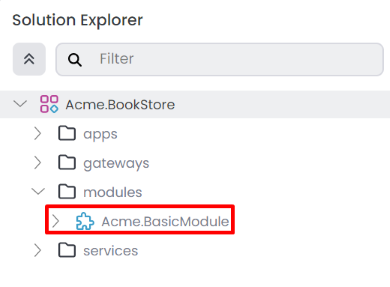
After creating the empty module, it will be added to the solution, and you should see the following structure in the solution explorer.
Adding a New Microservice Module
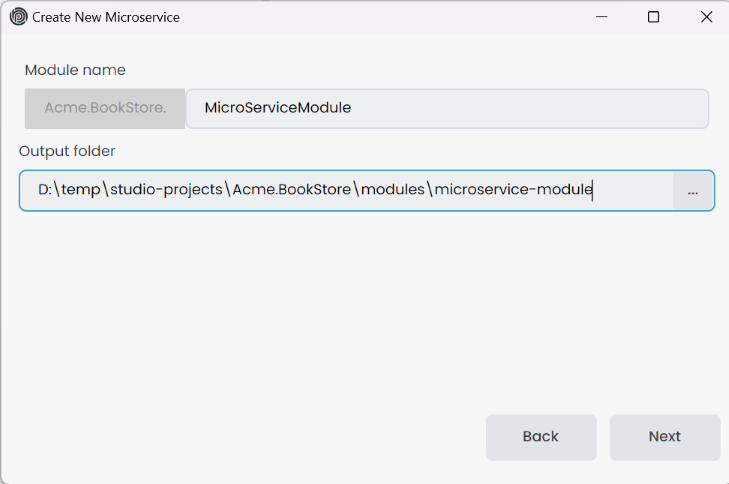
Similar to creating an empty module, if you select the Microservice module template, provide the Module name and Output folder, then click the Next button. Please note that the Module name includes the solution name as a prefix, and the use of the dot(.) character in the Module name is not allowed.
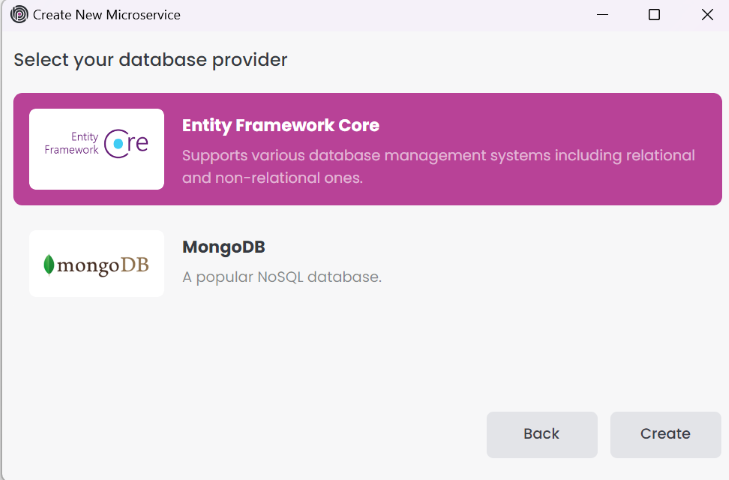
You can choose the database provider for your microservice module. Select one of the following options:
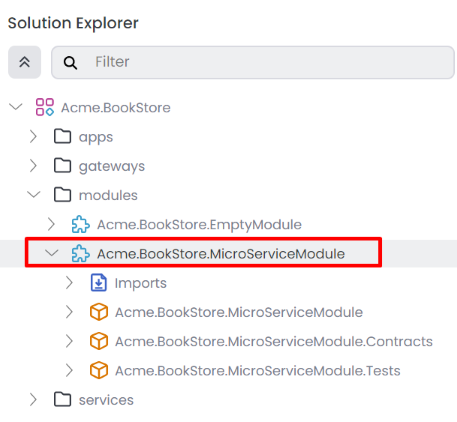
After creating the Microservice (service-nolayers) module, it will be added to the solution, and you should see the following structure in the solution explorer.
To customize the Microservice module templates, navigate to the solution folder in file explorer, where you'll find a
_templatesfolder. You can edit theservice_nolayers,gatewayandwebtemplates based on your specific needs.
Adding an Existing Module
ABP modules have their own file extension .abpmdl, and they are located in the specific module folder once created. Similar to creating a C# project in a solution and adding it to another solution as an existing project, you can create an ABP module in one solution and add it to another solution as an existing module. To add an existing module to your solution, use the Add -> Existing Module button at the root of the solution or in the folder context-menu. This action opens the Select an ABP module file window. Choose the module you want to add to the solution, then click the Open button.
The added module can be located outside of the solution folder. The path will be normalized, allowing flexibility in the module's location as long as it's accessible from the current ABP Solution path.
Difference Between ABP Framework Module Template and ABP Studio Module Approach
In ABP Framework, creating a module solution using the CLI results in a solution with numerous projects, some of which may not be necessary for a specific use case. The ABP Studio module approach differs from the ABP Framework module template, offering greater flexibility. With ABP Studio, we can create a module containing only the required projects; for example, an empty module with only the Domain and Application projects. In this approach, the term Package is used for module projects.
Furthermore, it's important to mention that we can create not just DDD-principled modules. The Modularity document clarifies the difference between Framework and Application modules. Basically, every C# project refers to the Volo.Abp.Core package and defines the Module class as an ABP Class Library. We have the option to develop an infrastructure module using only the ABP Class Library packages and provide a module reference to other modules.
Imports
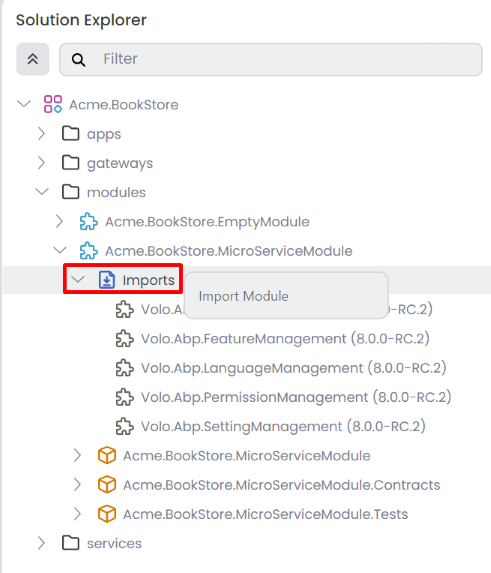
ABP Framework Modularity has a significant advantage in developing a module in a solution and adding it as a module reference to your application or another module. This approach allows each module to maintain its own solution and be used in different applications. Importing a module into another module grants access to all module features within our current module. In ABP Studio, importing one module into another is a straightforward process. You can import a module using the Imports section on a module in the solution explorer. You can also import a module using the Import Module button on the module context-menu.
Import a Module
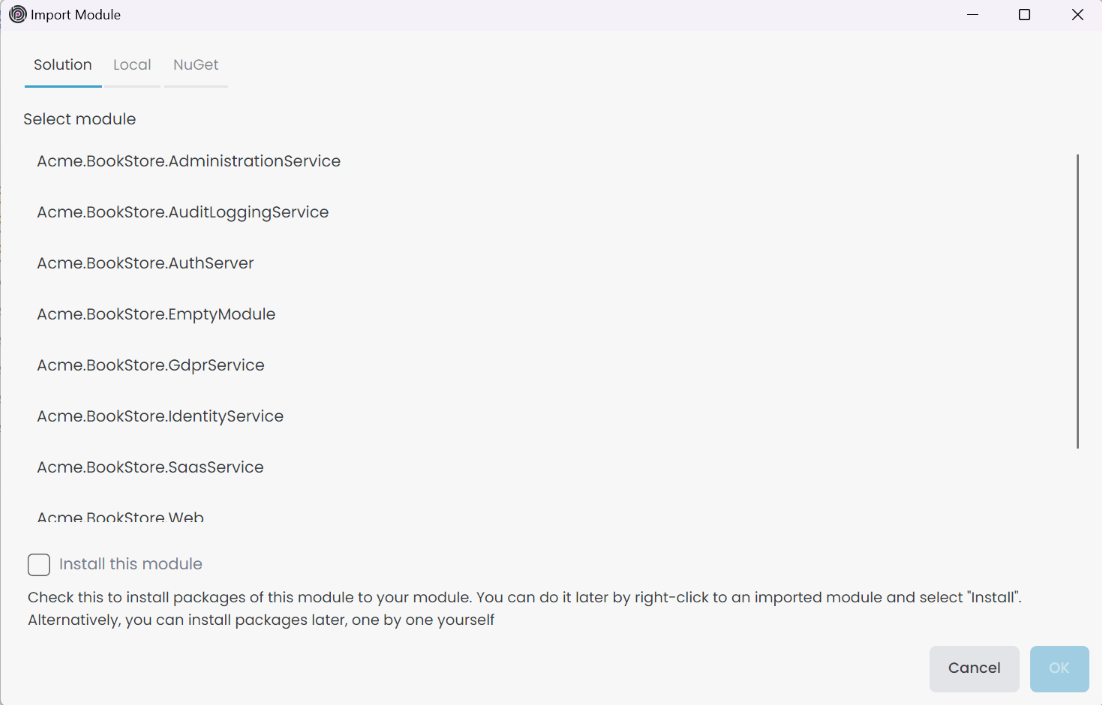
This action opens the Import Module window. We have several options to import a module from Solution, Local, or NuGet. In the Solution tab show us to the modules in the current solution.
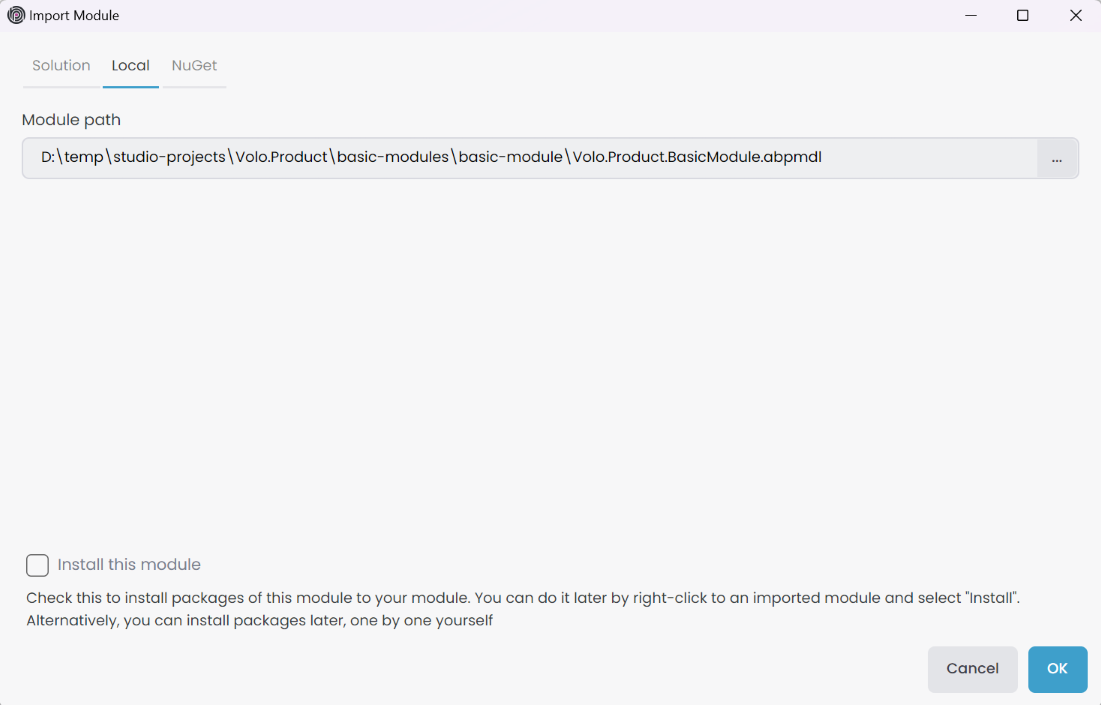
In the Local tab, we can import a module from a local folder outside of the solution. The path will be normalized, allowing flexibility in the module's location as long as it's accessible from the current ABP Solution path.
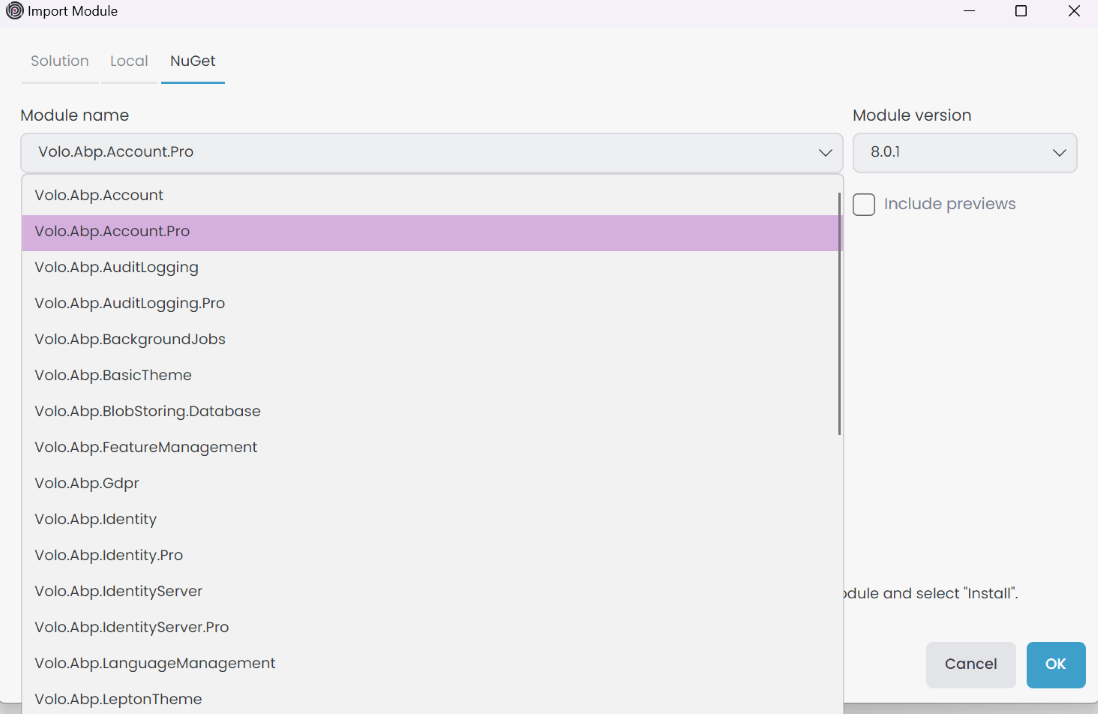
In the NuGet tab, we can import a module from a NuGet package. We can search for a module by name.
Click OK to complete the module import. After importing the module, you can view additional options by right-clicking on the imported module.
Install a Module
When you click the Install button, it opens the Install Module window. On the left side, it displays the packages of the imported module, the middle section shows the packages of the current module, and the right side shows the packages already installed in your solution. You can select the packages you want to install and click the OK button to install the chosen packages.
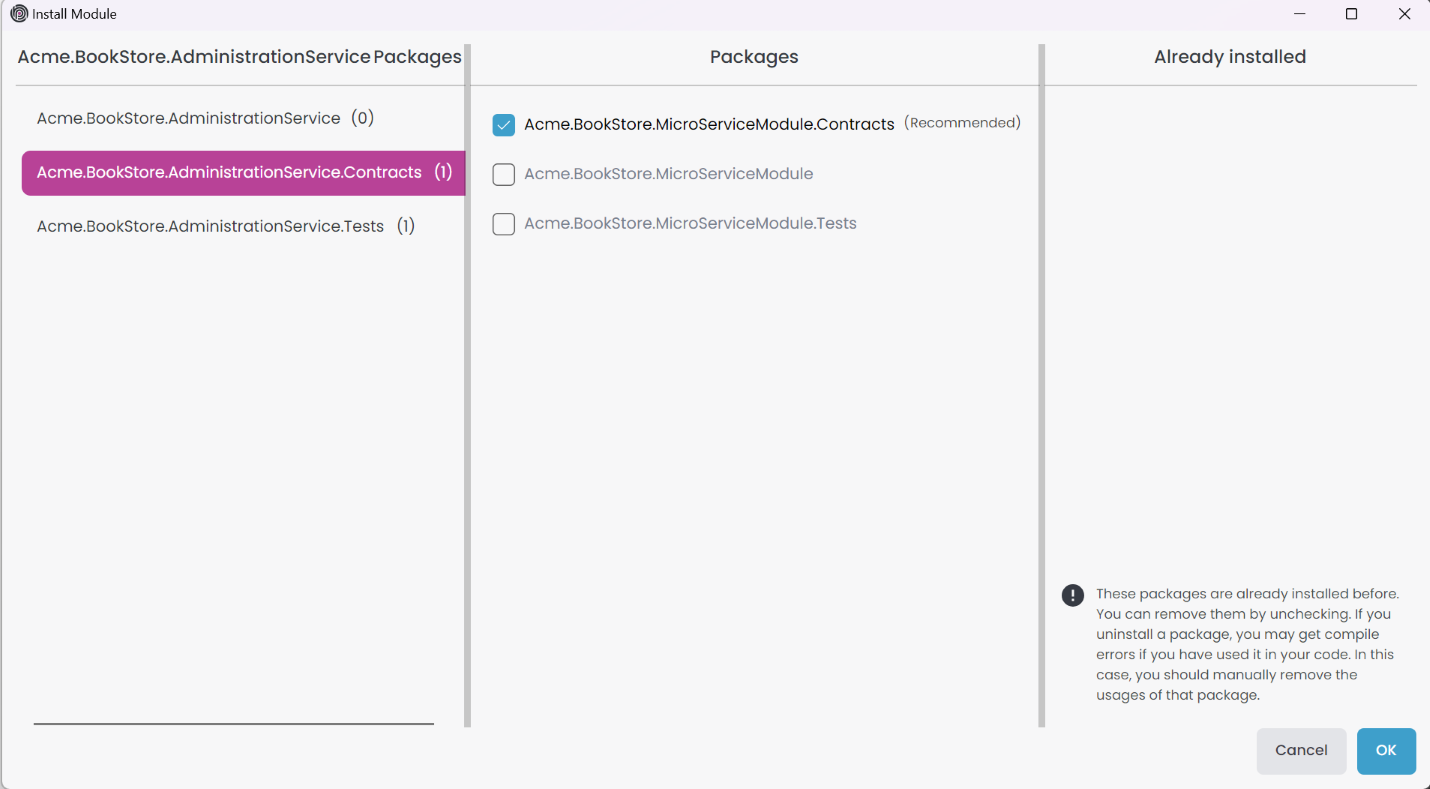
If the packages adhere to the DDD pattern, they will be checked by default with the information (Recommended). You can uncheck the packages if you prefer not to install them.
Modify Installation, Uninstall or Remove a Module
After we install the module, we're gonna see Modify Installation button instead of Install button. We can click the Modify Installation button to add or remove packages from the module. We can uninstall selected module with Uninstall button. After uninstalling the module, all package references in our module gonna be removed. We can remove the module with Remove button. This option only available if the imported module is not installed.
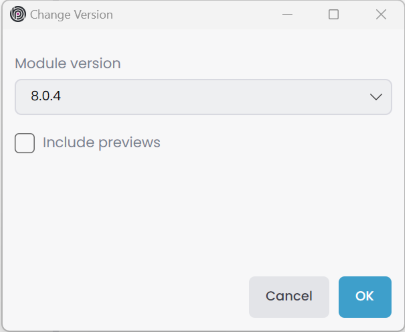
Change Version
If the module has been added as a NuGet package, you have the option to change the version of the module. Click the Change Version button on the imported module context-menu to open the Change Version window. Here, you can select the Version for the module and click the OK button to change the version of the module.
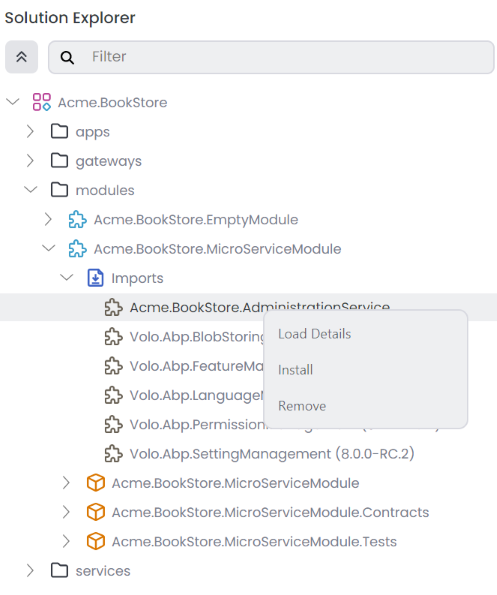
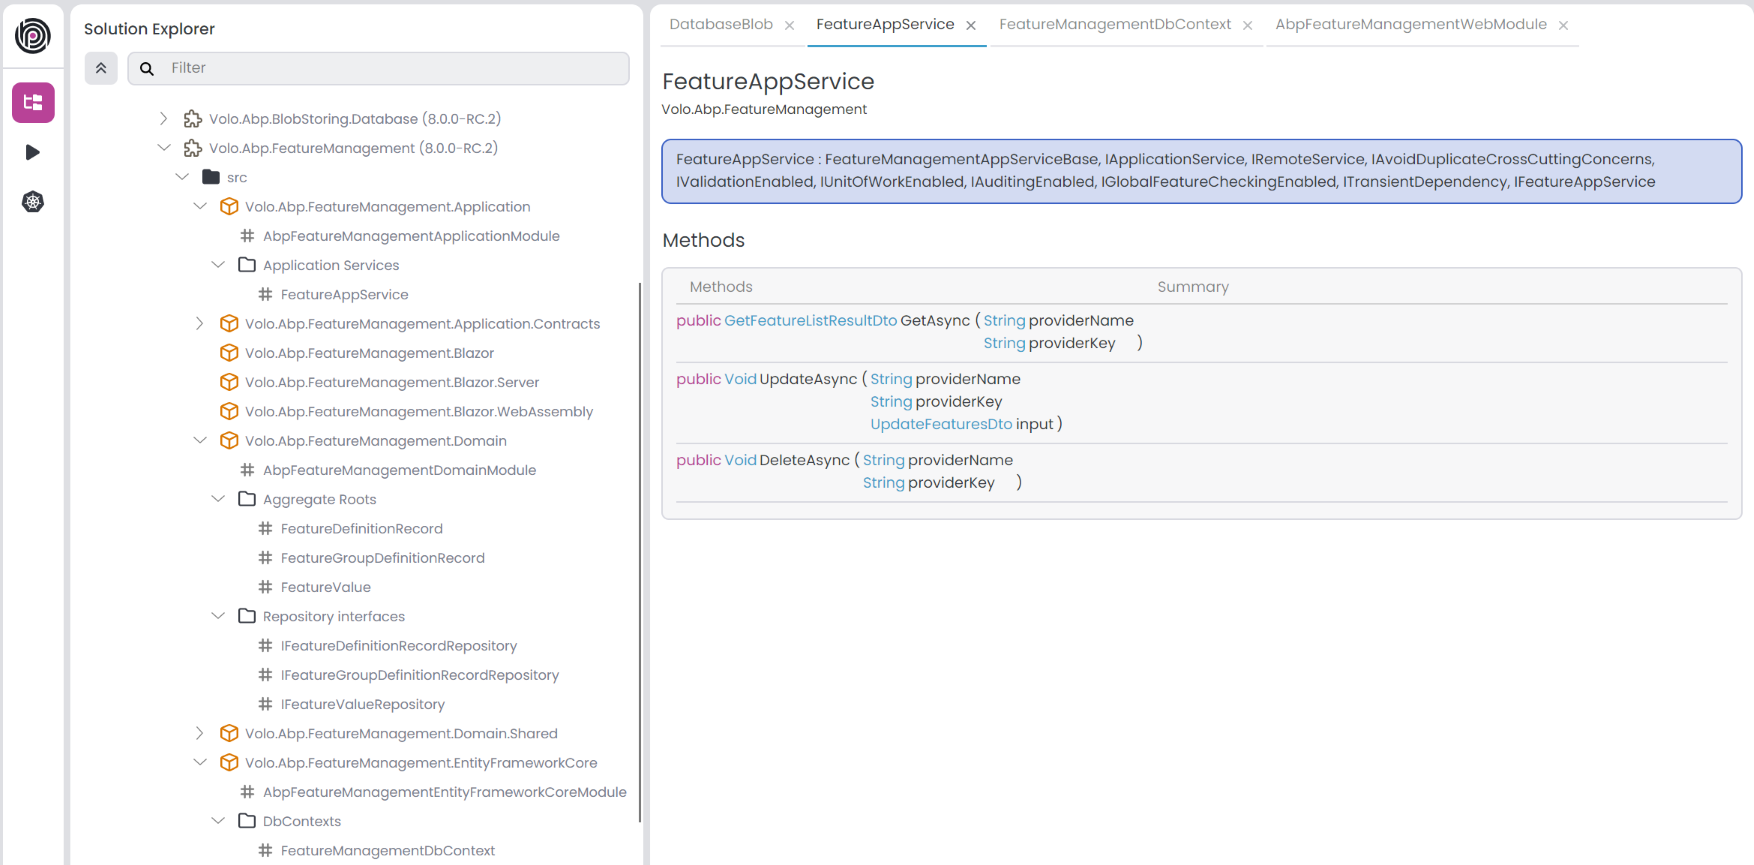
Load Details
To view module details, click the Load Details button for the imported modules. This will show us the analyzed module details, including Aggregate Roots, Application Services, Domain Services, EF Core DB Contexts, Features, Mongo DB Contexts, Permissions, Repository Interfaces, and Settings. When we click the item in the list, it will open the details in main panel as a tab where you can view methods, properties, implementations, etc.
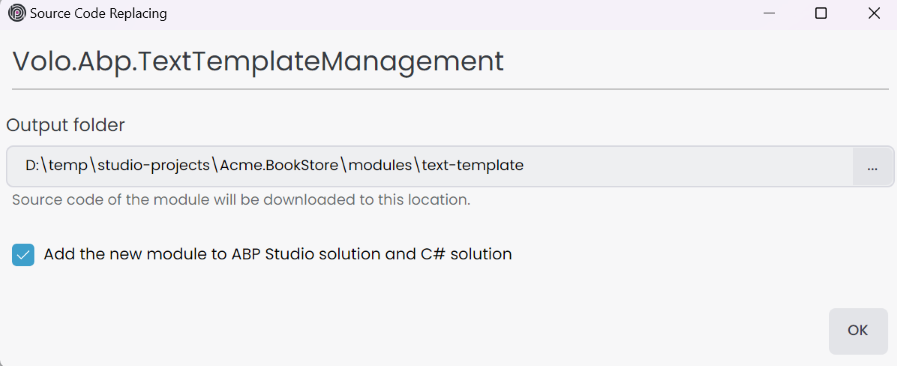
Replace With Source Code
If the module has been added as a NuGet package, you have the option to replace it with the source code. Click the Replace With Source Code button on the imported module context-menu to open the Source Code Replacing window. Here, you can select the Output folder for the source code of the module to be downloaded and click the OK button to replace the module with the source code. If you check the Add the new module to ABP Studio solution and C# solution checkbox, it will add the module to the ABP solution, create a module folder, and include the module projects in the selected module .NET solution.
Packages
A package is a project that can be added to a module, and each package is considered a .NET project. You can create or add an existing package to the module, with each package being allowed only once per module. However, you can add the same package to different modules. Right-clicking on the package opens a context menu where you can find the following options:

Add Package Reference: This option allows you to add a package reference to the selected package.Reload: Reloads the selected package.Remove: Removes the selected package from the module.ABP CLIInstall Libs: Install NPM Packages for UI projects in your selected package.Upgrade ABP Packages: Update all the ABP related NuGet and NPM packages in your selected package.Switch to: It switches your selected package to the specified version of the ABP framework.Stable: Switches your selected package to the latest stable version.Preview: Switches your selected package to the preview version.Nightly Build: Switches your selected package to the nightly version.
Clean: DeletesBINandOBJfolders in your selected package.
Dotnet CLIBuild: Builds your selected package.Graph Build: Builds selected package with graphBuild option.Clean: Cleans the output of the previous build for selected package.Restore: Restores the dependencies for selected package.
EF Core CLI: This option is visible only for packages that have a reference to the Microsoft.EntityFrameworkCore.Design or Microsoft.EntityFrameworkCore.Tools package.Add Migration: Opens the EF Core Migration Configuration window. After entering the Migration name, it creates a new migration for your selected package.Remove Last Migration: Removes the last migration for your selected package.Update Database: Updates the database for your selected package.
Open WithVisual Studio: Opens the package in Visual Studio. This option is only available if you have Visual Studio installed.Visual Studio Code: Opens the package in Visual Studio Code. This option is only available if you have Visual Studio Code installed.JetBrains Rider: Opens the package in JetBrains Rider. This option is only available if you have JetBrains Rider installed.Terminal: Opens the terminal in the package directory.Explorer: Opens the file explorer in the package directory.
Adding a New Package
To add a new package to the module, click the Add -> Package -> New Package button in the module or module folder context-menu. This action opens the Create new package window.
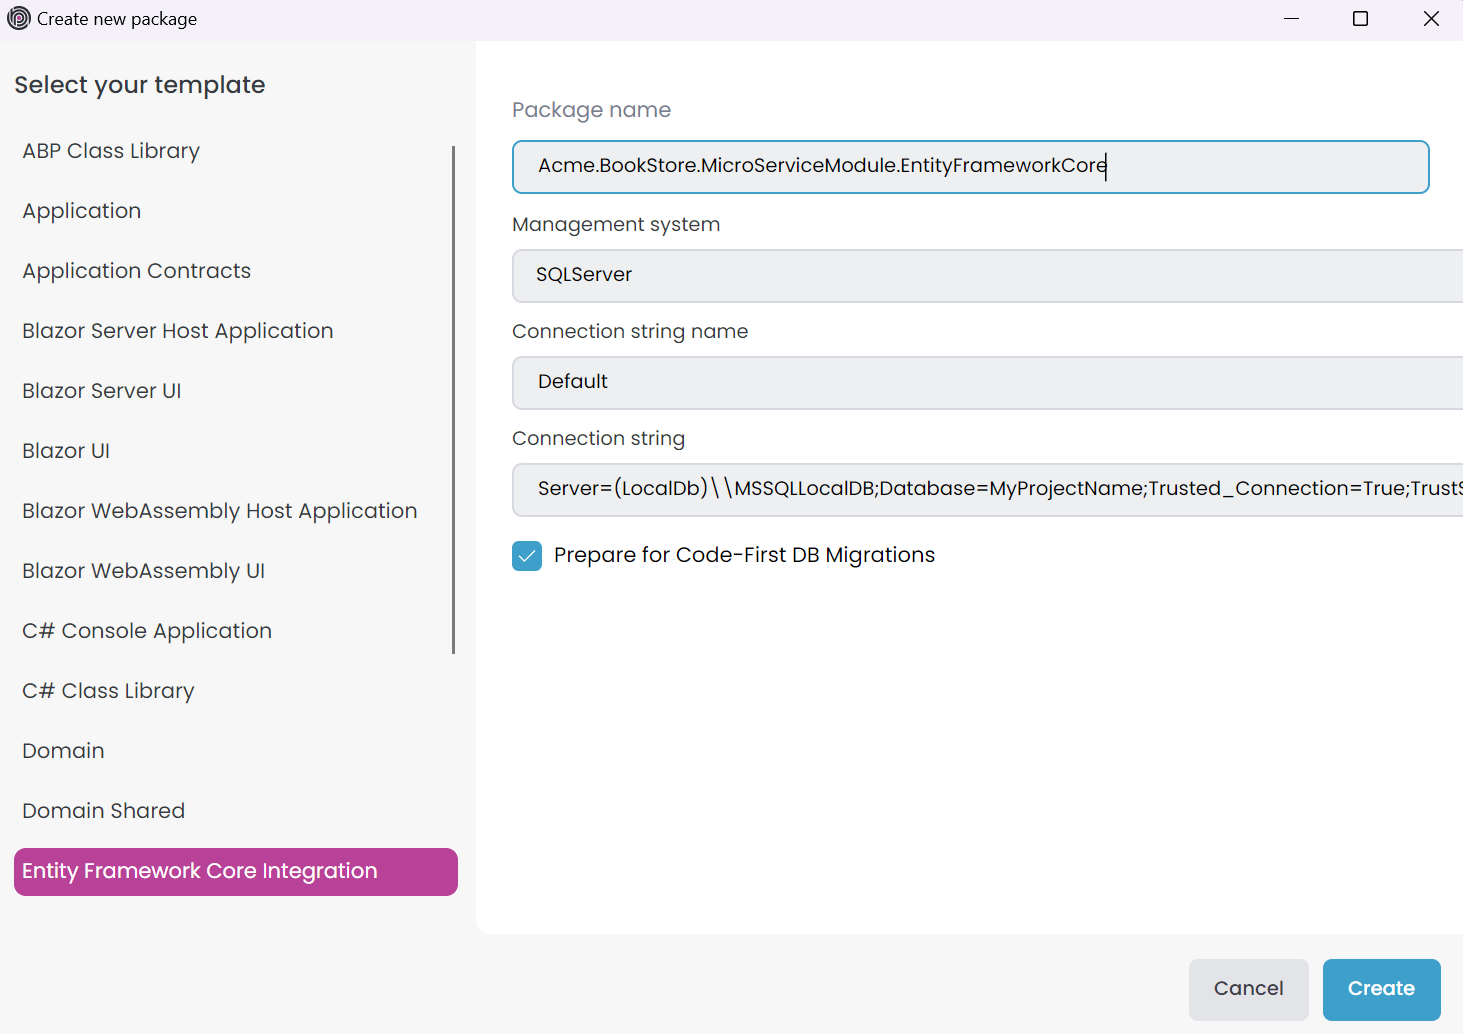
Select the package template on the left side, and package details will be displayed on the right. Provide the Package name and additional information based on the template. Click the Create button to add the package to the module. The added package will also be included in the module's .NET solution.
Adding an Existing Package
ABP packages have their own file extension .abppkg, and they are located in the specific package folder once created. Similar to creating a C# project in a solution and adding it to another solution as an existing project, you can create an ABP package in one module and add it to another module as an existing package. To add an existing package to your module, use the Add -> Package -> Existing Package button in the module or module folder context-menu. This action opens the Select a package window. Choose the package you want to add to the module, then click the Open button. The added package will also be included in the module's .NET solution.
Dependencies
To view the dependencies of the package, open the Dependencies section in the package tree. It displays Packages from NuGet package references and Projects from project references. To remove a dependency, click the Remove button on the context-menu of the respective dependency item.
Additionally, you can add a new dependency to the package by clicking the Add Package Reference button on the package context-menu. This action opens the Add Package Reference window. You can add package reference with following options;
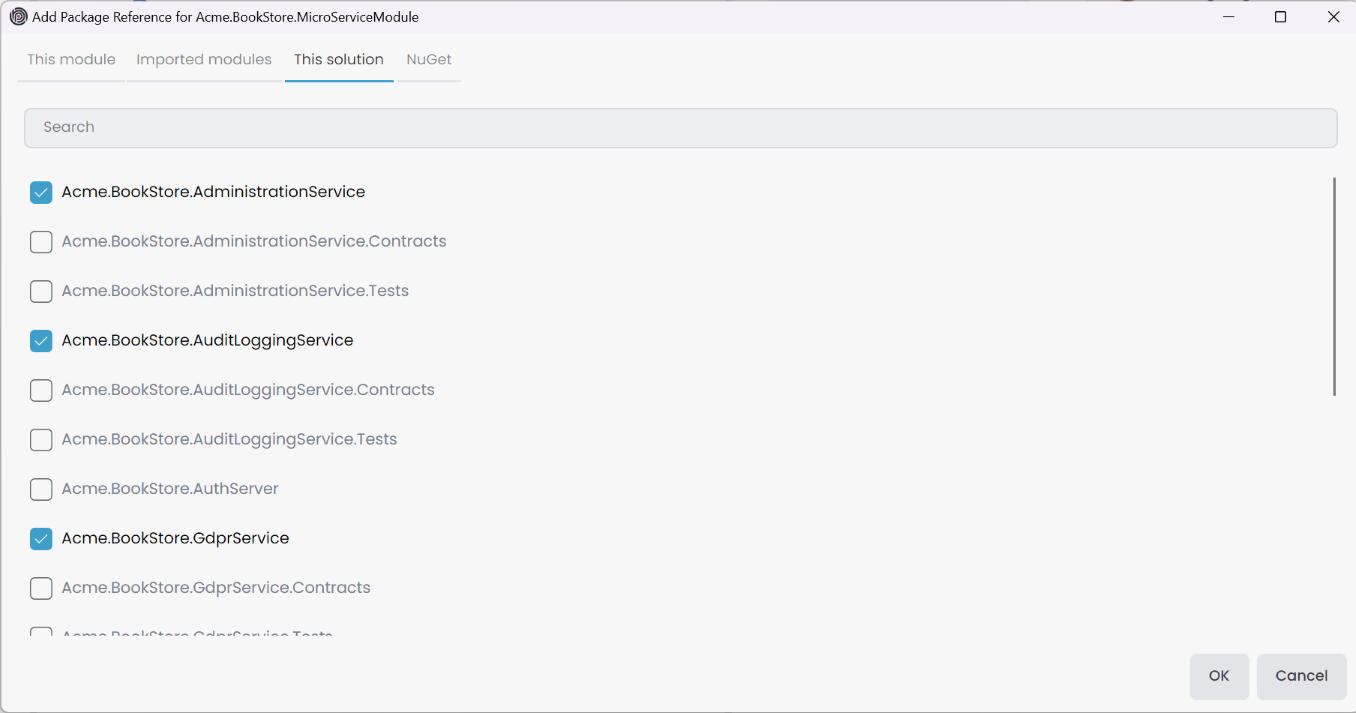
- This module: Displays only the packages in the current module.
- Imported module: Shows the packages in the imported modules.
- This solution: Lists all packages in the current ABP solution.
- NuGet: Allows you to search for a package by name and version.
You can filter packages by name using the Search field. If a package is already referenced in the selected package, it will be disabled. Simply select the desired packages and click the OK button to add the package reference.
 08-09 May


